

AWS CodeCommit is a secure, highly scalable, managed source control service provided by Amazon web services that you can use to host your Git-based code repositories. This service enables teams to collaborate securely on code, properly encrypting it in transit and at rest. Please see how to deploy a .NET application to AWS Elastic Beanstalk using AWS Tool Kit, and How to Deploy MVC Application to AWS EC2 Using RDP Connection and Web Deploy.
The AWS CodeCommit service allows organizations to import and host scalable private Git code repositories securely. All open-source git clients can integrate and work with CodeCommit repositories via the CLI.
Kindly refer to these related guides: For how to install Git on macOS, how to install Git on Windows, How to manage and use Amazon S3 access points using the AWS Management Console, and how to enable Amazon S3 default bucket encryption using S3 Console.
AWS CodeCommit is a fully-managed source control service that hosts secure Git-based repositories. It makes it easy for teams to collaborate on code in a secure and highly scalable ecosystem. CodeCommit eliminates the need to operate your own source control system or worry about scaling its infrastructure.CodeCommit also supports several Git commands and works with Jenkins, an open-source tool for continuous integration. There is no size limit with repositories hosted with AWS CodeCommit and can be up to 2GB. AWS CodeCommit stores data in Amazon S3 and Amazon DynamoDB. CodeCommit automatically encrypts files and repositories at rest through AWS Key
Greater security measures can be implemented by integrating CodeCommit with AWS IAM (Identity and Access Management), which enables Admins to assign user-access rights (policies) and establish MFA. Connection to CodeCommit can be achieved via HTTPS or SSH.
Step 1: Create Repository
Navigate to this Url and select your desired region. Then click on Create Repository on AWS CodeCommit

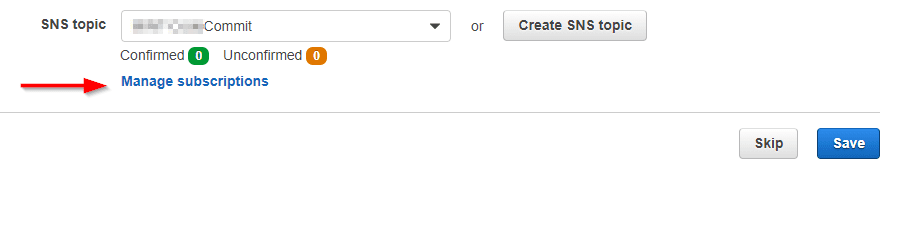
Step 2: Configure the email notification
Here, you can either select an existing SNS Topic or create a new Topic

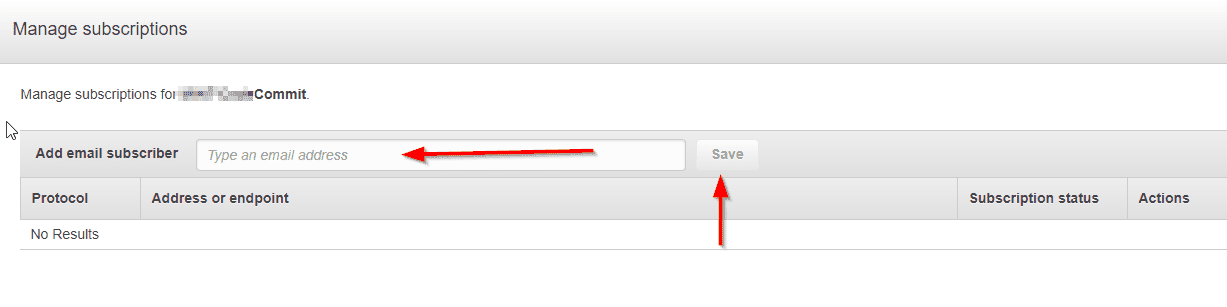
Now, on the same page a new dialog window pops up and here, you can subscribe users
Enter the email and save
Create IAM Policies
You should get an email, to confirm the subscription to the Topic and close the Subscribe window and save.
Create IAM policies and attach these Policies to the users
– For Admins: Attached AWSCodeCommitFullAccess to the users
– For normal users: Attached AWSCodeCommitPowerUser
Note: Without having these policies assigned to the IAM user(s), you will never be able to clone the repository nor perform any related task. Now you can select your connection types to get tips
For the HTTP connection to the Repository, I will discuss this in the next article.
Step 3: For SSH connection
To connect using SSh, please follow these steps. Proceed and download git for Windows.
Note: Since you are using git, the .ssh file would be located in the install path e.g., for me C:Program FilesGitetcssh
Your might be different <installPath>Gitetcsshssh_configGenerate your Public and Private Keys for Git and AWS CodeCommit
Run the Git Bash program: Enter ssh-keygen as shown below to generate your public and private key files and follow the directions to save the file to the .ssh directory for your profile.

Note: This generates the public and private key files
- Navigate to the path .ssh to get the public key and copy the content
- Sign in to AWS Console
note: You must have the right policies assigned in order to perform this. - In the IAM console, in the navigation pane, choose Users, and from the list of users, choose your IAM user.
- On the user details page, choose the Security Credentials tab, and then choose Upload SSH public key.
- Paste the contents of your SSH public key into the field, and then choose Upload SSH public key.
- Copy or save the information in SSH Key ID (for example, AxxxxxxxxxxxxxxxxxE).

- Navigate to .ssh/config
- Add the following lines to the file, where the user is the SSH Key ID generated after uploading the Public Key.
and the value for IdentityFile is the path to and name of the private key file:

Note: Ensure you give the right name and path of the private key for the IdentityFile and
Save the file as config
Note: not with any extension but just config and close the notepad. If you use an extension, the ssh connection will fail.
You can test your SSH configuration by running this syntax:
ssh git-codecommit.us-east-2.amazonaws.com
Step 4: Connect to the AWS CodeCommit Console and Clone the Repository
To connect to an AWS CodeCommit repository
- Open the AWS CodeCommit console.
- In the region selector, choose the right region where the repository was created. Repositories are specific to an AWS region
- Choose the repository and this will open the code page for the specific repository
- Choose Clone URL, and then copy the SSH URL
In the git bash program (In the Bash emulator), run the git clone command followed by the copied url to clone the repository.
This command will clone and create a local repo in a subdirectory of the directory where this command is run.
I hope you found this blog post helpful. If you have any questions, please let me know in the comment session.