Windows Admin Center (formerly codenamed Project Honolulu) is an evolution of Windows Server in-box management tools. It is a single pane of glass that consolidates all aspects of local and remote server management. As a locally deployed, browser-based management experience, an Internet connection and Azure aren’t required. Windows Admin Center gives you full control of all aspects of your deployment, including private networks that aren’t Internet-connected. This article discusses How to set up Windows Admin Center on a Windows Server. Please see How to Install Windows Admin Center on Windows 10 and Windows 11, and how to Test Network Connection to Windows Admin Center Gateway.
When installed on a Windows server, WAC provides a centralized point of management for your server environment. By defining who can access the WAC, we are also enhancing the security of our management. It can also be accessed via the web browser and this can also be disabled. See the following links for “How to setup Windows Admin Center and also how to troubleshoot Windows Admin Center (WAC) access from the Web. For more on Windows Admin Center, please visit this link.
Some points to note before installing WAC
It can be installed on Windows 10 or Windows 2016, and it does not require any agent to be installed on the servers that needed to be managed.
They are managed over Remote PowerShell and WMI over WinRM If you must manage Windows Server 2012 and 2012 R2 Server, Windows Management Framework (WMF 5.1) must be installed. To prepare your environment for Windows Admin Center, see if any of these factors relate to you.
An important factor to consider: Ensure you create a CSR (Certificate signing request) and request a certificate with it from a trusted CA). Preferred Installation type: Gateway Server (Serves as a gateway server and access from any client browser with connectivity to the gateway server). Please download WAC here from this link.
We have other installation types: Below is an image showing other WAC installation type!

- Local Client: Installed on Windows 10, great for quick start and testing
- Managed Server: Installed on an individual Server to have it managed.
- Failover Cluster: Enable high availability of the gateway service.
Steps to install WAC
Windows is currently using my country location “Germany” to deliver local content and this is why the installation is in German 😉 Download and double-click on the MSI file

Accept the license and click on next. And this will display the gateway endpoint configuration window as shown below.

Click on next and select the first option

Leave it as default and click on the installation
Enter the Certificate Thum Print
Note: The following before proceeding with the installation1: Automatically generated certificates expire 60 days after installation.
2: To use HTTPS, you can bind an SSL certificate Thumbprint in the second option below. See the link on how to retrieve an SSL Thumbprint

The installation will run and prompt a User Account Control, Click on Yes

This will run and have WAC installed on your Server

Click on finish

Once the installation is complete, open a browser from a remote computer and navigate to the URL presented in the last step of the installer.
Access the Windows Admin Center Over the Browser
Accessing the portal on the server will not require authentication to the server. There is no need to add 443 as this is a standard protocol for HTTPS.
Note: You do not need to add the 443 port as this is a standard protocol.
https://url.com 
Here are some interesting articles: How to install Windows Admin Center in an unattended mode using a self-signed certificate, how to schedule and run update via Windows Admin Center, How to upgrade Windows Admin Center, How to setup Chef Automate on AWS, and how to fix VM export could not connect to an AWS Region.
Add Servers to Windows Admin Center
To add resources (servers), Click on the Add button. Click on the Add button, and under Windows Server, Click on Add

Enter the server name as shown below and click on Add.

Authenticate to the Server with your credentials
Accessing from a different web browser will require you to authenticate to the server.

Microsoft Edge does not work at the moment. Firefox works This depends absolutely on your environment. If you have a different administrative credential other than your Windows login credential, specify it here before you can have your servers added to WAC.

When the Server is added. Click on the server and on the right Pane, decide on the account type you would like to use and click on continue.

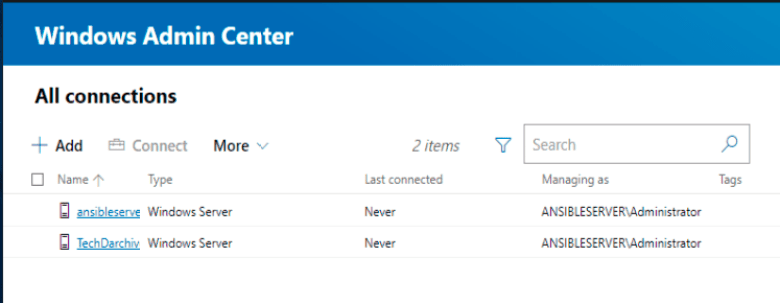
When you successfully supply your credentials, the server will be added to the Windows Admin Center as shown below.

Click on TechDArchive to open the server management tools window as shown below.

Note: WAC has an in-built set of tools that can be used to manage almost all aspects of Windows Server. To access this, simply click on the gateway. The screenshot below is a subset of the tools available.

I hope you found this blog post helpful on How to set up Windows Admin Center on a Windows Server. If you have any questions, please let me know in the comment session.
