Windows Deployment Services (WDS) is a really interesting tool from Microsoft. It allows an administrator to remotely deploy Windows operating systems to machines booting from a network adapter. On how to add images to WDS and configure Multicast transmission via the GUI and WDSUTIL, see the following link. See the following guide on how to set up a VM via PXE boot on a Generation 1 VM and how to set up a VM via PXE boot on a Generation 2 VM, and Windows deployment cannot continue, the operating system is missing via MDT deployment.
Deployment Steps: When we boot our computer, we will use the PXE technology on our Network Interface Card (NIC) to locate the WDS server. The WDS server then sends the boot image to the client. After the client chooses the install image. This image will be copied from the install image on the WDS server to the client computer. The installation process will appear as if we are running it from a local media, but it is really being streamed from the WDS server. To continue the deployment process, please follow the steps below:
Note: When the client establishes a connection to the WDS server (PXE Server), you may need to press the F12 key (on legacy BIOS devices) or press the Enter key (on newer UEFI-based devices) to confirm the connection. If you are using Oracle VirtualBox, you may encounter an error: “No bootable media found system halted: Unable to PXE boot WDS to Virtualbox, see this article for a fix.
Regardless of the VM or device, you are using, the steps are similar. If you are using a Hyper-V virtual machine, ensure you configure the VM for Pre-Boot Execution Environment (PXE) in your Hyper-V. See the below hyperlinks on how to provision a generation 1 and 2 VM in Hyper-V. How to set up a VM via PXE boot on a Generation 1 VM – Hyper-V, and how to setup a VM via PXE boot on a Generation 2 VM – Hyper-V.
PXE BOOT Windows Deployment Service
To proceed. select the VM, and
– Click on start as shown below. You can also right-click on the VM and click on start


Note: The client is able to get an IP Address because we deployed a DHCP role and configured DHCP scopes as well.
– For how DHCP works, see the link.
After the server is started, you may get the below windows if you have multiple Operating systems
– Click on Enter to continue (If you do not get this window, you will get the next image below.

Review the Client MAC ADDR, Client IP and Gateway IP, When prompted and
– Press F12 for Network Service Boot (from the WDS server). The machine will start booting via network as shown below.

As you can see, the machine is booting via network and windows os files loading starts.

If the files are loaded successfully, Windows Deployment Service (Windows Setup box) will appear and to continue
– Select your local and Keyboard Input (For some reasons, I left the Locale as it is here)
– Click on Next.

Type a User Name and Password on
– Ensure it is properly formatted with your domain name as shown below, or else it will fail.
Note: This is a lab environment, you should not be using the domain administrator credentials.

If the credentials are correct, you will be prompted to select your desired Operating system. See this link for more information on how to load images to WDS. For some difference between boot, install images, capture images etc.

Now you can install windows on a client computer with a normal windows installation process. See the article for how to install Windows Server 2019.
Note: In order to proceed with the Window below, ensure you have the right space allocated or else Windows will not be able to install to the Drive.
– Click on Next

As we can see below, the installation process will continue. Just sit back and enjoy a pot of Nkwobi 🙂


Select your region in the Window below and click on Yes as shown below


Accept the License as shown below

In the image below, since this is a lab environment, I decided to select “Set up for Personal use”
– Click on Next


I have decided to create a local account for my VM
– Click on Offline account

I decided to go for limited experience as shown below


Now, you are prompted to enter a name for your account
– Entered my Name and I Clicked on Next

You will be prompted to enter your password and to also confirm the password


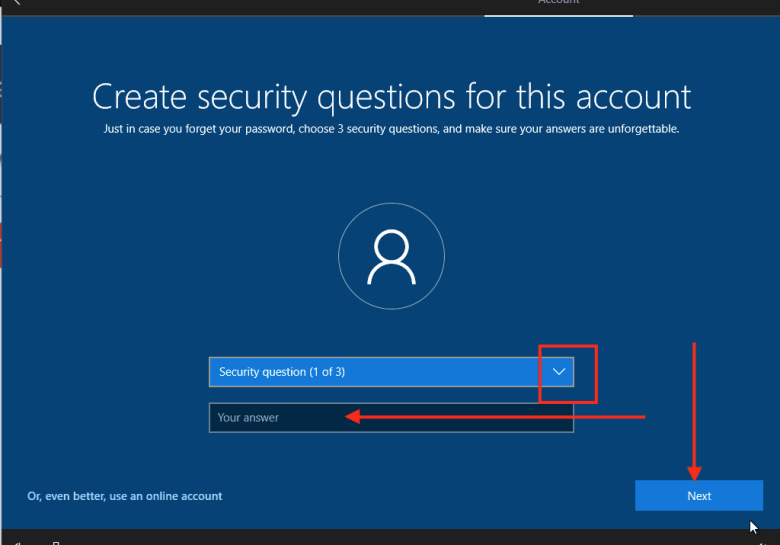
Next, you will be requested to create security questions as shown below
– Walkthrough the three steps and click on Next

Accept the privacy settings as shown below


In the Next Windows, I selected No since it is a test environment as shown below

Next, Windows will start configuring and applying all settings as shown below


Moreover, Windows 10 installation via PXE boot is finished and completed successfully as shown below.

However, I hope you found this blog post on PXE BOOT Windows Deployment Service helpful. Furthermore, Please let me know in the comment session if you have any questions.
