

Microsoft Deployment Toolkit (MDT) is a unified collection of tools, processes, and guidance for automating desktop and server deployment. And this in turn reduces deployment time and standardizes desktop and server image deployment. In this article, you will learn how to install “ADK|WinPE|MDT: Deploy Windows with WDS”. Please see how to migrate WDS and MDT to a new Windows Server, and how to Configure NIC Teaming on Windows Server.
MDT builds on top of the core deployment tools in the Windows Assessment and Deployment Kit (Windows ADK). Its additional guidance and features are designed to reduce the complexity and time required for deployment in an enterprise environment.For more information on the differences between ADK, MDT, Microsoft Endpoint Configuration Manager (SCCM), Intune, Autopilot, and WSUS, how to create a capture image on Windows Deployment Services, Windows Deployment Services: WDSUTIL CommandLine Options on Windows Server 2019.
Windows ADK
Windows Assessment and Deployment Kit (Windows ADK) is a collection of tools that you can use to customize, assess, and deploy Windows operating systems to new computers. To learn more about the various Windows 10 deployment scenarios and tools, see the following link. See the following guide on how to enable Bitlocker via the Local Group Policy Editor and the Group Policy Management Console.
In order to customize Windows, you would need to install ADK|WinPE|MDT: Deploy Windows with WDS.For some other articles, I have written WDS, see the following guides: No bootable media found system halted: Unable to PXE boot WDS to Virtualbox, WDS/DHCP scenarios: How to configure DHCP Server option 60, 66 and 67 for Windows Deployment Services, and how to remove Windows Deployment Services role via the GUI and PowerShell.
ADK|WinPE|MDT: Deploy Windows with WDS
In the below section, you shall learn how to install “ADK|WinPE|MDT: Deploy Windows with WDS”.
Step 1 – Install Windows Assessment and Deployment Kit
Download and install Windows Assessment and Deployment Kit (Windows ADK) on your WDS server. Double-click on the executable as shown below.
For Windows Assessment and Deployment Kit (Windows ADK) for Windows 10 or Windows 11. Here is a related guide: Windows Deployment Services (How to boot (deploy) operating systems images through the network).
Note: When you wish to reinstall a new (updated) ADK, an old ADK must be uninstalled before installing a new one (If this is not uninstalled, you will get an error). With this, you will lose some configuration if you have a custom environmentNote: If you have no Windows ADK installed previously, please download and continue the installation as shown below. You can use the Assessment and Deployment Kit for Windows to install Windows 11 and Windows Server 2022.

This will open the Windows Assessment and Deployment Kit -Windows 10 Window. Select the location to install Windows ADK into. I will leave it to the default path selected.
If you wish to choose a different install path, please use the Browse button to have this done.
Click on Next when you are done.
This will Open up the Windows Kits Privacy window as shown below. I do not want to send Microsoft any data usage, because of this, I will select No and then click on Next

Accept the License Agreement as shown below

This will open the “Select the feature you want to install”.

Uncheck the features that are not relevant to you as shown below, and click on Install
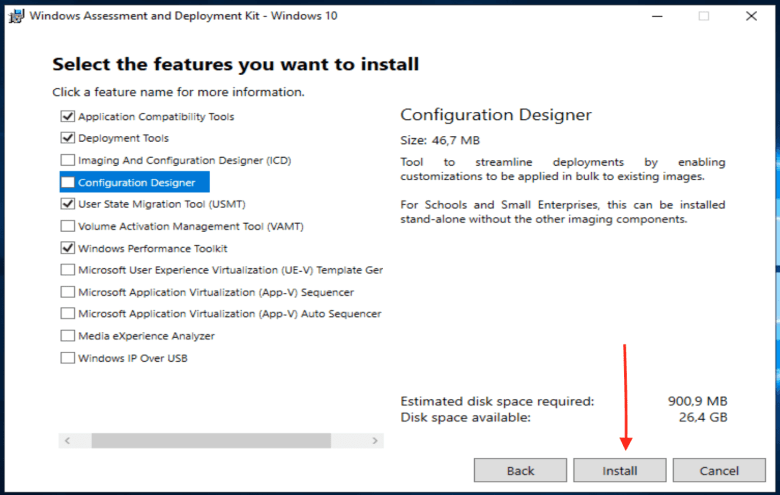
This will continue with the installation of the features we have selected with its progress bar as shown below.

Once the process is completed as shown below, click on close.

Step 2: Install the WinPE add-on for ADK
WinPE is an add-on to the Windows Assessment and Deployment Kit (ADK). You can download the ADK and WinPE add-ons. Install the ADK and the WinPE add-ons to start working with WinPE.
As we can see in the Windows ADK installation above, the Windows PE environment was not included. To do this, we will have to Download the Windows PE add-on for the MDT server.
Note: If you have previously installed the WindowsPE (Windows ADK Addon), please uninstall and reinstall, else the error below will be prompted. When the uninstallation is complete, please proceed with the reinstallation.
Note: The installation steps are similar to step 1 above. Double-click on the installer as shown below. If you have previously installed WinPE (ADK Addon), please download and install it.

This will open the Windows Assessment and Deployment Kit Windows Preinstallation Environment Addons window. Click on Next (But if you wish to install this in a different path, click on Browse and choose your desired path)

On the Windows Kits Privacy (For me, I have decided not to send Microsoft anonymous usage data). Click on Next to proceed

Accept the License Agreement

On the Select your features Windows, you have just one Feature to select and it is the WinPE. Click on Install

This will start the Installation of the WinPE as shown below.

The installation process is complete as you can see below.
The Windows PE add-on is successfully installed
Optional - Not needed for this scenario: For some custom environments where you have to customize the Windows image using a different drive such as "D:", you may need to copy the DISM variables (C:\Program Files (x86)\Windows Kits\10\Assessment and Deployment Kit\Deployment Tools\amd64\DISM) to this drive D:\wds\DISM11). Afterward, you will have to create an environment variable for this pointing to the D:\wds\DISM11.See what happens when WDS and DNS is installed on the same server: DNS issues with WDS, and how does WDS work: How to configure Windows Deployment Services on Windows Server 2019.
Step 3: Download and Install Microsoft Deployment Toolkit
Next, download the Microsoft Deployment Toolkit (MDT). I will be installing MDT 64bits as shown below. Click on Next to continue the download.

Now the MDT setup file has been downloaded. Double-click on the .msi to continue the installation as shown below

This will open the Microsoft Deployment Tool Kit as shown below. Click on Next

Accept the License and click on next.
Note: Without accepting the licensing, you cannot proceed.
On the Custom Setup, simply click on Next

On the Customer Experience Improvement Program interface, select No and click on Next. If you wish, you can tick “Yes” here! it’s absolutely up to you.

On the next window, Click on install. This will ensure Microsoft Deployment Toolkit (MDT) is installed on your device.

When the installation process is completed, click on Finish

Now, you have successfully deployed the first part of this task. “ADK|WinPE|MDT: Deploy Windows with WDS”. In the following section below, we will be deploying Windows.
Step – Create a Deployment Workbench
Let’s configure the Microsoft Deployment Toolkit (MDT). Launch the Deployment Workbench as shown below

After the Microsoft Deployment Toolkit (MDT) application is launched. Right-click on Deployment Shares in the left navigation and select New Deployment Share

Note: If your environment requires special rights, it is recommended to create a folder (directory) first before connecting to it. Since it is not so for us, I will proceed with the creating of the Deployment Shares.This will open the New Deployment Share Wizard as shown below. If you wish to change the deployment share path, please use the browse button as shown below

On the Share wizard, enter the share name.
- Verify the name of the share is the same as the name entered in the path above. (By default the name is DeploymentShare$), I will leave it the same way
- Then click Next

Change the Deployment share description or leave the default. I will leave this way since this is a lab environment. Click on next.

On the Options window, I will uncheck all the boxes except “Ask to set the local Administrators password”.
Note: If your environment requires other input, please check them. Click on Next

On the Summary Windows, review this and click on Next

Next, the shares will be created as you can see below.

From the confirmation window, click on finish. The Deployment Share was completed successfully and MDT has been configured successfully.
Now Click on Finish.

Before proceeding with the next steps, ensure you have attached the ISO image for your version of OS.
– or me, it is Windows 10 (ISO image or DVD).
Step 5: Import the Operating System
On the Deployment Workbench console.

Right-click on the Operating System Folder and click Import Operating System

On the OS Type wizard, click on “Full Set of source files” and then click Next

Type the drive letter where the ISO is located. Use the Browse button to locate the path to the ISO.
- For me it is “F:\”
- Click on Next.


Enter a destination directory name and click Next

Review the summary page and click on Next

This will continue the importing of the OS files.

On the Confirmation page, click on Finish as shown below
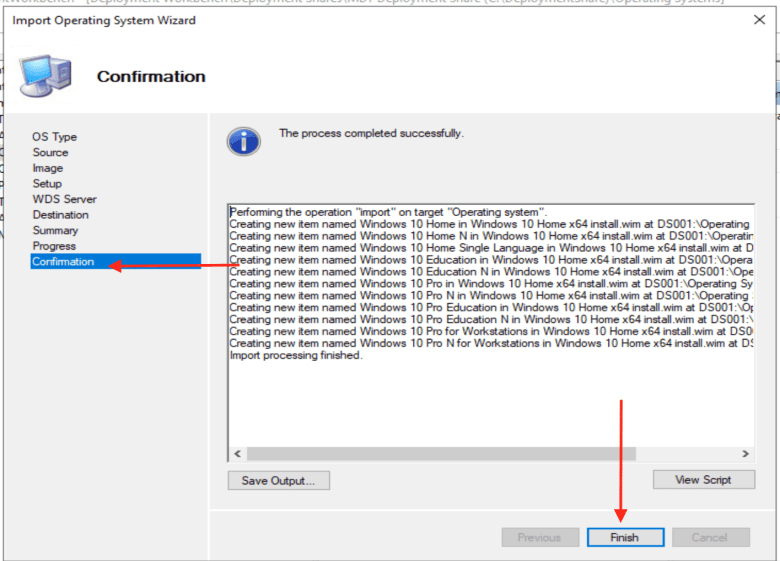
From the screenshot below, the Operating System has been successfully imported.

Create or Add an Application
Step 6: Let’s add an Application.

Right-click the application node.

On the Application type, select the application with source files

On the details page, you will be asked to enter information about the application being added.
Other fields occupy important information only when the name of the application is required, which can be beneficial when troubleshooting applications on the road are installed.
I will add zip in the window below

I have entered the following information as shown below

Now browse the location to provide a source folder for import into the MDT folder.

I have selected the download path as the location to store these files.

Specify the name of the Directory that should be created. Please modify the name to suit your need.

For more information on how to install an application silently, also see here. However, the command line box will not be populated automatically and must be manually entered for the application to work quietly.
Enter the name of the executable installation file and if any/all switches are needed to obtain a silent installation, click next to continue.
msiexec /i 7z1900-x64.exe /qr
Review the summary page as shown below to know what will be imported into MDT and click on Next

This will work through the import as shown below

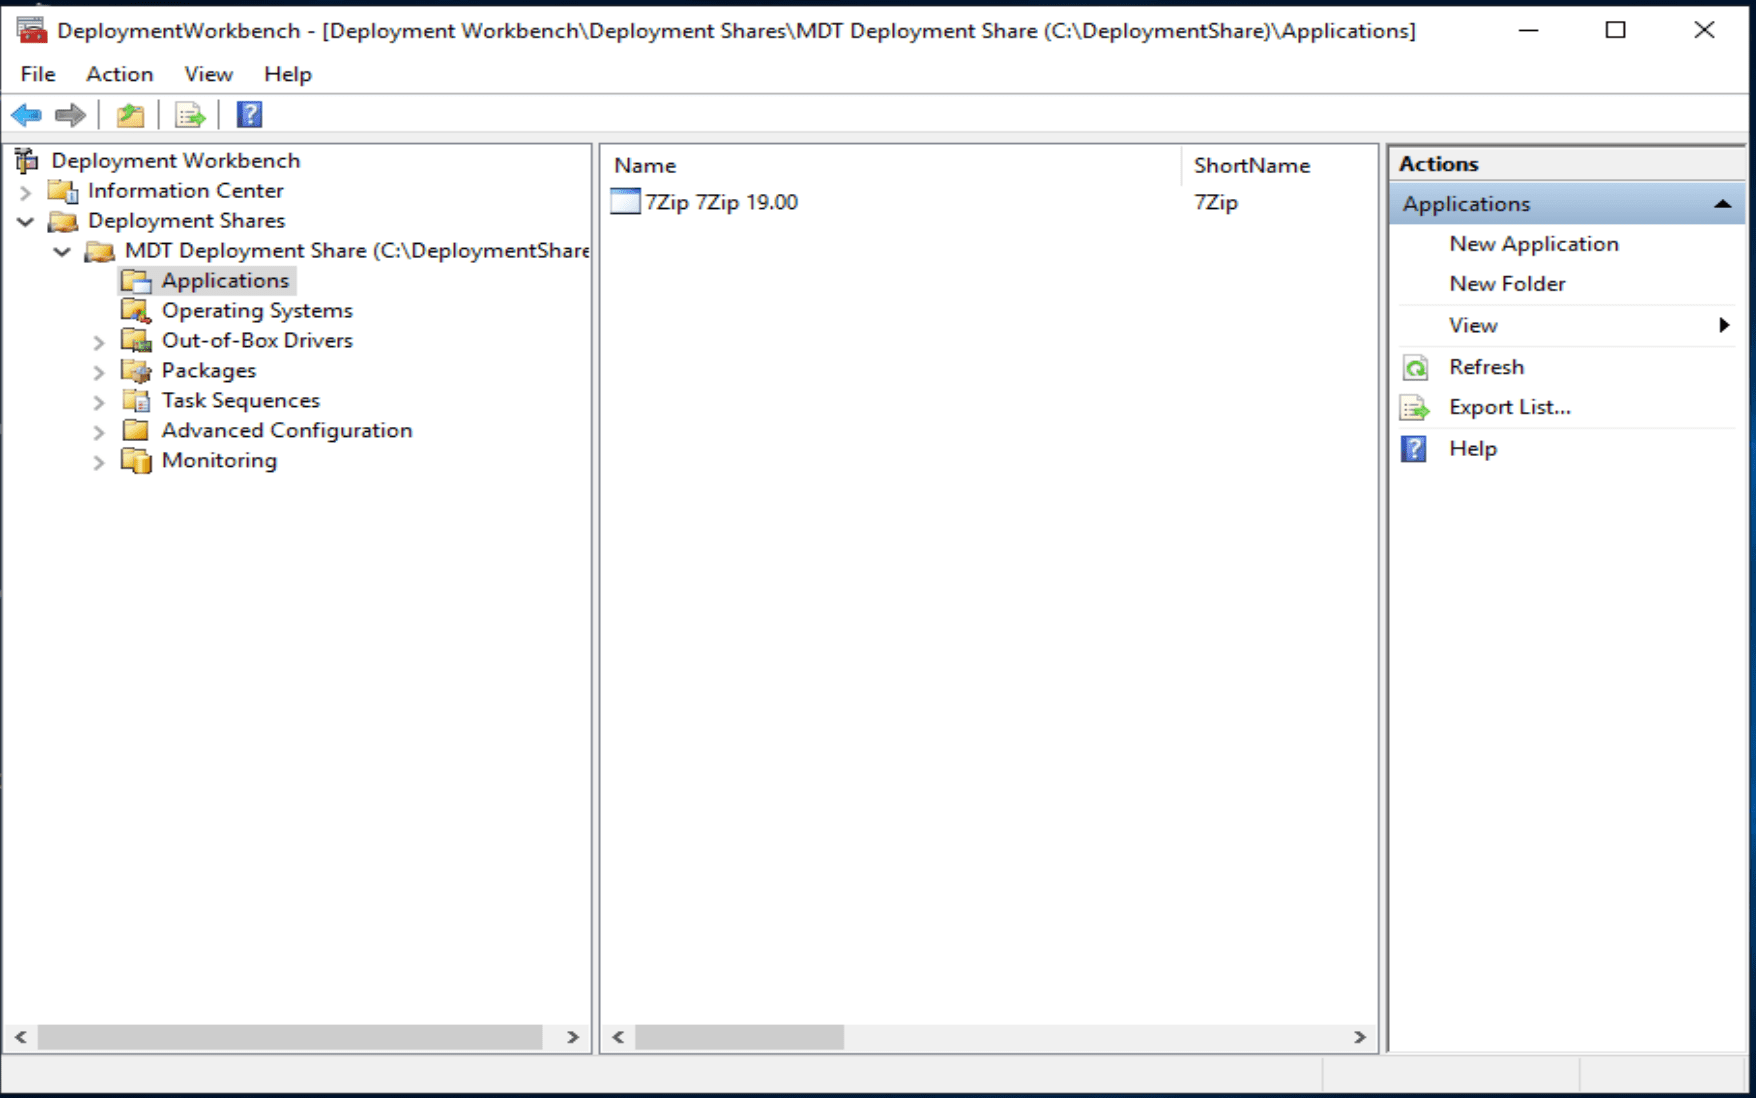
On the confirmation page, click on Finish as shown below.

From the screenshot below, the Application has been successfully imported.
Step 7: Let’s create a Task sequence
On the Deployment Workbench console, right-click Task Sequence and then click on New Task Sequence


On the General settings page, enter the following information below. You can enter numbers or words but I have decided to use “Win10Pro“

On the Select Template wizard, – Select the Standard Client Task Sequence and click on Next


Select the Operating System from the list which is you imported and click on Next.

On the Specify Product Key window, select “Do not specify a product key at this time” and click on Next

On the OS Settings page, enter the following information. If you have an internet homepage, enter it here and then click on Next

On the Admin Password window, select “Do not specify an Administrator password at this time“, and click on Next

Check Summary and Click on Next

On the confirmation window, click on Finish.

As we can see below, the task sequence has been created successfully.

Step 8: Configure MDT rules, Windows PE, and Monitoring
This step is very important if you do not want to do a lot of manual configuration later.
Right-click MDT Deployment Share and then
Click on Properties
On the MDT Deployment Share window. Click on the Rules tab and then key in the rules you want (Change the Deployment share Rule or leave the default).
I will leave the default, Please do not do this in production in order to automate the whole process speedily. Click on OK


Note: If you modified the files, click edit the Bootstrap.ini files and save it. Also, change the Deployment share Windows PE Settings or leave the default.
Note: If you leave the MDT Deployment Share rule as default, you will have to do a lot of manual input. See step 11 for more info of the kind of work I had to do. You do not want to do this. Below is a sample of a rule file, use this file to speed up the process.
[Settings]
Priority=Default
Properties=MyCustomProperty
[Default]
OSInstall=Y
UserID=Administrator
UserDomain=NewHelpTech.lk
UserPassword=Pa$$w0rd
SkipBDDWelcome=YES
SkipDeploymentType=YES
SkipDomainMembership=NO
SkipApplications=NO
SkipSummary=YES
SkipUserData=YES
SkipComputerName=NO
SkipTaskSequence=NO
SkipLocaleSelection=YES
SkipTimeZone=YES
SkipAppsOnUpgrade=YES
SkipAdminPassword=YES
SkipProductKey=YES
SkipComputerBackup=YES
SkipBitLocker=YES
SkipCapture=YES
SkipFinalSummary=YES
– Click on apply if you made any modification in order to proceed to the next tab
– Also, if you wish to enable Monitoring, Click on the “Monitoring tab”
– Enable it by checking the box
– And click on ok


Step 9: Update the Deployment Share
To update the deployment share, follow the following steps. Right-click MDT Deployment Share, and then click on Update Deployment Share will create a Windows 10 LiteTouchPE_x64.wim file

On the Options window, click on Optimize the boot image updating process, and then click on Next

On the summary page, click on Next. Click on Next.

As we can see, the deployment Share Settings update process step will continue. Note: This process takes a while.


Now, from the output below, the Deployment Share has been successfully updated.
– Click on Finish

Step 10: After updating the Deployment Share folder, a LiteTouch WIM file will be created. These files will be located under the boot folder in the Deployment Share you created.

To Add the Lite-Touch Images to WDS, follow the steps below
- On the WDS-SERVER, open Windows Deployment Services (WDS),
- Right-click on the Boot Images and then
- Click on Add Boot Image, for similar steps.
This will open the Add Image Wizard as shown below. Click on Browse, select the LiteTouch file under the Boot file folder on the Deployment Share as shown below


On the Add Image File wizard, verify the image name and description and click on Next

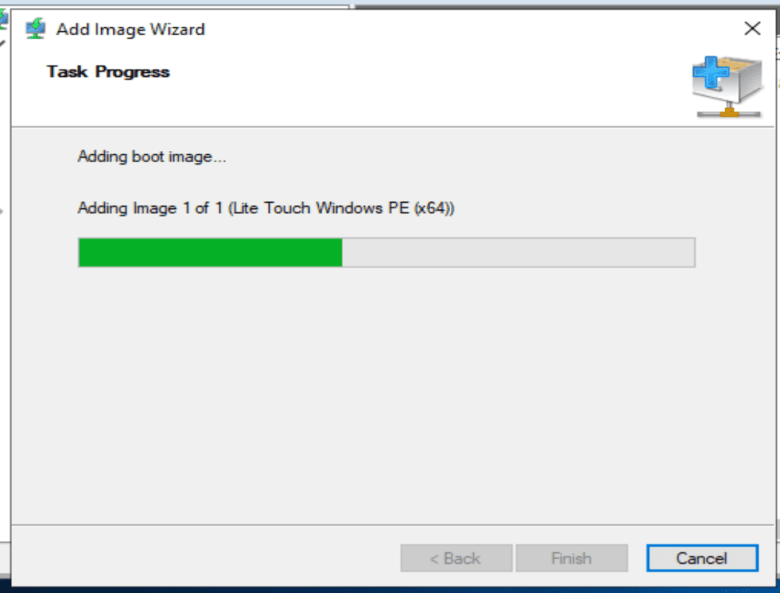
On the Summary box, click Next.

The image below shows the progress of adding the LiteTouch image to WDS. When the operation is completed, click on Finish.

Upon clicking on Finish, the LiteTouch.wim can be seen added to the WDS as shown below

Step 11: Deploy Windows using MDT
Note: When the client establishes a connection to the WDS server (PXE Server), you will need to press the F12 key (on legacy BIOS devices), or hit the Enter key on newer UEFI-based devices to confirm the connection.
If you are using Oracle VirtualBox, you may encounter an error: “No bootable media found system halted: Unable to PXE boot WDS to Virtualbox, see this article for a fix“.
After the server is started, you may get the below windows if you have multiple Operating systems. click on Enter to continue

The device will start loading files via network as shown below.


Loading the MDT wizard

The device should pop up to the MDT window as shown below

Select the Keyboard Langauge
On the MDT Welcome screen as shown below. Click Run the Deployment Wizard to install a new Operating System, and select the Keyboard layout and on this page. You can also configure the started IP Address

If you do not want to see the following steps below when installing the OS, but only Windows 10 installation, ensure to configure the rules in step 8 correctly.These articles are highly recommended: How to check the version of Windows ADK, How to remove an MDT Deployment Share, How to fix the external display not working on Windows 11, What are the differences between MDT and WDS?, and How to correctly uninstall and upgrade Windows Assessment and Deployment Kit, Windows Preparation Environment, and Microsoft Deployment Toolkit.
Enter the WDS Credentials
Enter the WDS Credentials to connect WDS and MDT Server (Network Shares).


Select Windows10 Pro and click on enter.
– Note: The name you entered for your task sequence will be listed here

If you have configured Active Directory in your environment, select join this domain as domain and enter the information as shown below or else select join a workgroup.

In the next window, I have decided to select Do not move user data and settings

If you want to restore the data, enter the path of the data restores. Me, I do not want to restore the data

Select your language and time as shown below, then click on Next

Now select the Application(s) to Install
Select the application (7Zip in my case) you uploaded and would like to install and click on Next.

Enter Administrator Password and click on next.

Click on Begin to start OS deployment as shown below.

As we can see below, the Window Deployment has started with MDT.


This actually completes the steps, the steps below are just the process MDT goes through to have Windows 10 installed o your device.


Now, Windows 10 is completed as shown below. You have completed the task to install “ADK|WinPE|MDT: Deploy Windows with WDS”.

Modify the Deployment Share rule
If you ever wish to modify the Deployment Share rule, follow the steps below
– Right-click on the Deployment Share you created.
– Select Properties and the MDT Deployment Share properties window will open up.
– Click on the Rules menu and populate them with the following information as shown below. Also, ensure to edit the Bootstrap.ini file and save it finally click on OK.
After updating the Deployment Share folder, a LiteTouch WIM file will be created. These files will be located under the boot folder in the Deployment Share you created.

- Remember to add this new image to WDS!!! 
Now I ran the OS deployment again, and it was pretty very fast without having to enter those annoying deployment details as seen in step 11 above.


I hope you found this blog post helpful. Now to have learned how to install “ADK|WinPE|MDT: Deploy Windows with WDS”. If you have any questions, please let me know in the comment session.