

Let’s discuss “Windows Driver Management: Upgrade Driver Automation Tool”. The Driver Automation Tool is a PowerShell GUI that automates the process of downloading, extracting, importing, and distributing driver and BIOS packages. At present, the tool provides supports the following manufacturers’ Dell, Lenovo, HP, and Microsoft systems and also helps manage (replace) old packages and automatically deploy them on SCCM or MDT distribution points. Please see how to add Print Drivers with PowerShell, RUNDLL32, and VBScript in Windows 10, and “how to install Driver Automation Tool“.
This article focuses on using MDT to Upgrade Driver Automation Tool. While this tool is designed for ConfigMgr, it also provides support for MDT. It gives you the ability to select your deployment shares as well as the dynamic creation of folder hierarchies based on total control naming methods.
Here are some articles relating to driver management in Windows. How to import drivers in .exe format MDT, how to update Printer Drivers on your Windows device, and how to determine the version and type of a Printer Driver.
Prerequisites for using Driver Automation Tool
Because of this, I will not be discussing configurations (settings) relating to ConfigMgr. The script uses source feeds from man vendors including Dell, HP, Lenovo, and Microsoft to present a list to client systems. The prerequisite to using this tool includes the following.
- PowerShell version 5 or greater
- Make sure you have downloaded and installed 7-Zip
- If you are using SCCM, here is the configuration Manager Requirement
– Remote access to the SCCM site Server
– SCCM PowerShell module for SCCM downloads
– Security rights to the SCCM server - MDT PowerShell module for MDT downloads
- Full write access to all storage locations used by the Driver Automation Tool
- Visual Studio 2015 isolated shell is required. If this is not installed, the download sites will be launched in the Explorer automatically.
If you do not meet these requirements, you may run into issues when downloading Drivers as shown in the figure below. Please click on this hyperlink to download the Visual Studio 2015 isolated shell.

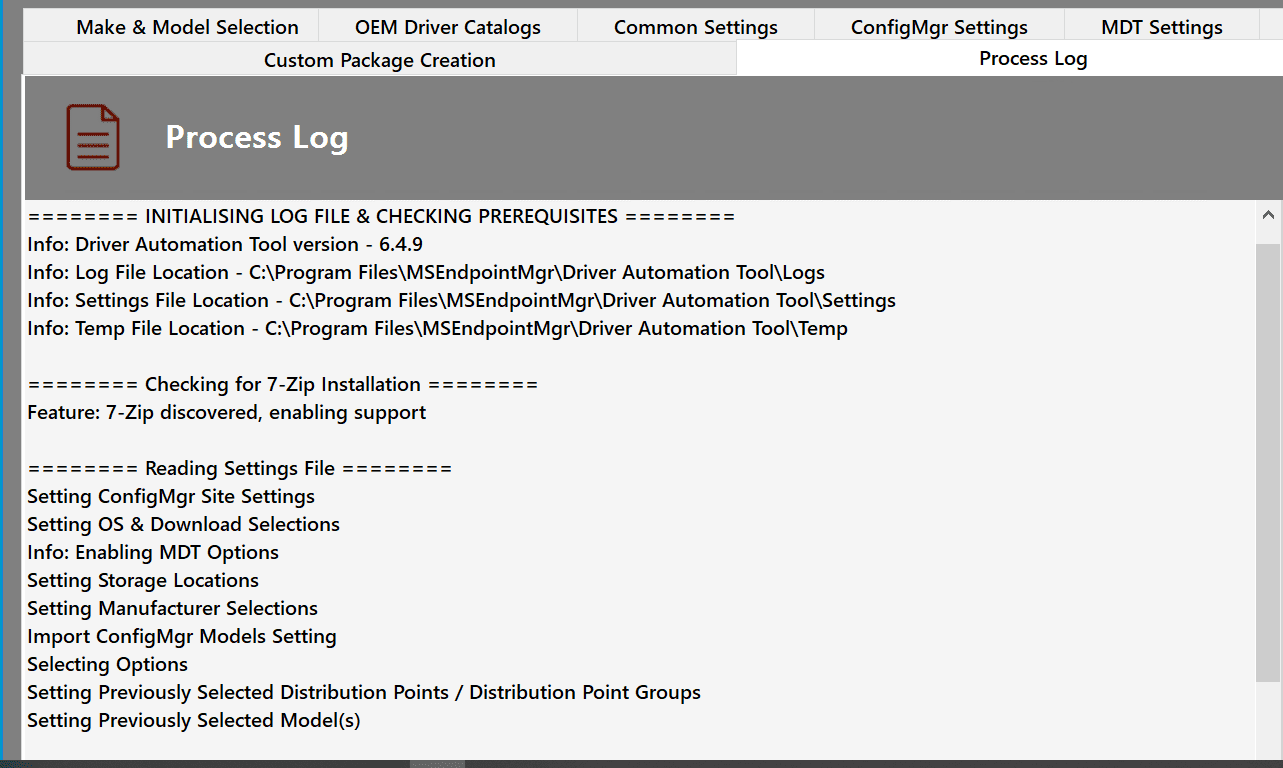
If all the prerequisites have been satisfied, downloaded, and installed correctly as previously outlined, the Process log should display without any errors.
Install MDT PowerShell module for MDT downloads
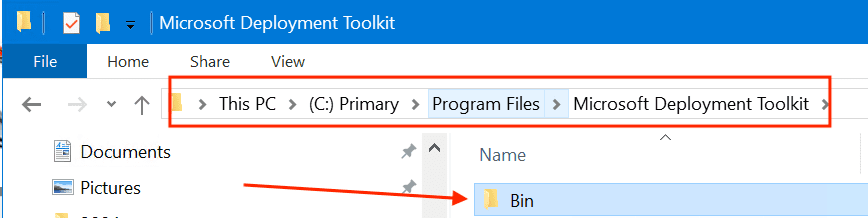
To install the MDT PowerShell module for MDT downloads, please run the following command below, else the Driver Download/Export/Import will fail. Click on the following hyperlink for more information on MDT PowerShell Module.
Import-Module “C:\Program Files\Microsoft Deployment Toolkit\bin\MicrosoftDeploymentToolkit.psd1”
Connecting to the GUI
After installation, to launch, use and eventually upgrade Driver Automation Tool, click on the Windows start button and select the Driver Automation Tool as shown below.

Below is an image of how the SCConfig Driver Automation Tool console looks like. Download and install the tool.

When you open the tool, you can select your manufacturer and OS of choice. When you click on the “Find Model” button, the tool initiates a download of XML content from the selected manufacturer, reads in the XML, and displays a full list of models for selection.
Clicking on the “Add to Import List” adds each of these models for processing and once you click on the Start Download and Import Process button, the tool starts the full process to automatically download and package the content. By default when you run the script, it will launch the full GUI mode of the Driver Automation Tool as well.
C:\Program Files\MSEndpointMgr\Driver Automation Tool\DriverAutomationTool.exeNote: When running the Driver Automation Tool.ps1 script, ensure to run it with Administrative privilege and also permit the execution of PowerShell scripts on the server.
Ffor more information on how to do perform this task, see the following guides. “how to set PowerShell Execution Policy via Windows Settings, how to set Execution Policy via Windows PowerShell, and how to set the PowerShell Execution Policy via Windows Registry.
Set-ExecutionPolicy Bypass -File C:\DriverAutomationTool.ps1Deployment Platform
After launching the console and connecting to your MDT or SCCM environment, you can progress to making the selections for the import process, such as the type of download and model match. Below are the various deployment platforms available.
- ConfigMgr-Driver Pkg: This module uses the Driver Package Method with each of the INF’s individually imported and presented in the GUI.
- ConfigMgr-Standard Pkg: This module uses the standard type package method and can be used with the Modern Driver Management process and Web service for dynamic deployment of drivers.
- ConfigMgr-Standard PkG (Pilot): This module provides the same functionality as the Standard Pkg option but names the packages with the “Pilot” naming scheme. You can use this for testing before moving it into production.
- MDT: Used for MDT import jobs.
- Both: SCCM Driver / Standard Pkg: Used to import both into SCCM and MDT.
- Download Only: Drivers can be download but not imported.
- Download & XML Model Generation: The same as the download option with the exception that an XML list created contains details of all models contained within the download path. This option allows for third-party disk imaging systems.
I will be discussing two of them which are "Download Only" and "MDT".Download Only
From the image below, all marked boxes are vital to understanding how Driver Automation Tool functions.
Operating System Selection: You must specify the operating system and architecture for the script to run in a normal and silent mode.
Manufacturer Selection: This selection is based upon the OS support from each of the supported vendors. Here is an example, when the Manufacturer is greyed out, this either means the manufacturer is supporting the operating system build numbers in their XML Feed, instead of just selecting the operating system without a build number.
Simply select the vendor you intend to download files from and click on the find model button for a full list of models matching the support on the operating system selected. If you found your desired driver, you could select it and click on start download to have this downloaded, extracted, and imported. 
HP SoftPaq Selection
For those of you that are interested in HP, this feature is available in newer versions of the Drivers Automation Tool. HP shares a large number of SoftPaqs across its model range.
Click on the download SoftPaqs and this will start the process of the download process. The drivers are displayed in a new tab called “HP Driver Catalog”. Once downloaded and packaged, it will open up a sub-folder and the contents.

Driver Storage Selection
Storage paths are dependent on the deployment platforms selected in this tool. ConfigMgr requires a package path but not MDT. To enter a storage path, follow the steps below.
Click on Common settings and select “Storage location“, select “Storage location” under “common settings” and enter the storage path.

Admin GUI Control
Also under “common settings“. Under the Admin Console, you will be able to hide some individual tabs or lock controls via the Windows registry under the Admin Console.

Driver Download Scenario 1
Since we have configured a storage location as shown in the Driver Storage image, I will try to download a Dell BIOS driver for Latitude 7410.
Since we have not connected to the MDT just yet, and we only have our storage path set, we will be downloading the Dell Latitude 7110 Driver to the storage location.
- Click on the “Make & Model Selection.
- Under the Platform/Download types, select as shown below respectively.
- Select Windows 10 OS and the architecture under the Operating Systems Selection.
- Click on find model. When the model is found, select it.
- Click on Start download, extract and export.

The download process will start and when complete, you will be able to see the process log as shown below.

As you can see, the driver has been download to the storage location we defined Driver Storage Selection above.

Connecting to MDT Environments
This enables you to specify an alternative location for MDT installation. More information on this as we proceed. For MDT imports, you will have to connect to the MDT environment using the MDT Settings prior to pressing the “create Driver Packages” button.
Ensure you have MDT installed and the MDT PowerShell module is available for MDT downloads. At the time of this writing, here are the features supported by the Driver Automation Tool for MDT:
- Auto or manual selection of the MDT PS module,
- Deployment share listing,
- Folder structure naming.
To get to the MDT settings, from the Driver Automation Tool console, click on the MDT settings as shown below.
Note: Most times this window will be greyed out and unusable. kindly refer to the alternative method below to enable the MDT settings.
Enter the script location for the MDT script path and click on “import Modules” and for Control Naming Method, under folder structure options, select the naming method you want.

Alternatively!
If you find the MDT settings greyed out, follow the A and B steps below.
A: If you haven’t configured MDT settings previously, you will get directed to the MDT settings window from the “Make and Model Selection” window, as depicted below. Under the “Platform/Download Type“, select MDT. This should prompt the MDT Settings window as well.

B: You will get redirected to the MDT settings as shown below. Set the following the location of the BIN subfolder and
Click on Import PS Module, this will connect to MDT and display the available deployment-shares. Now, you can select a single or multiple deployment shares to distribute contents to during the download and import process.
Also, you can select the different folder naming structure for your MDT total control method. Expand the “Folder Structure Options” for more details.

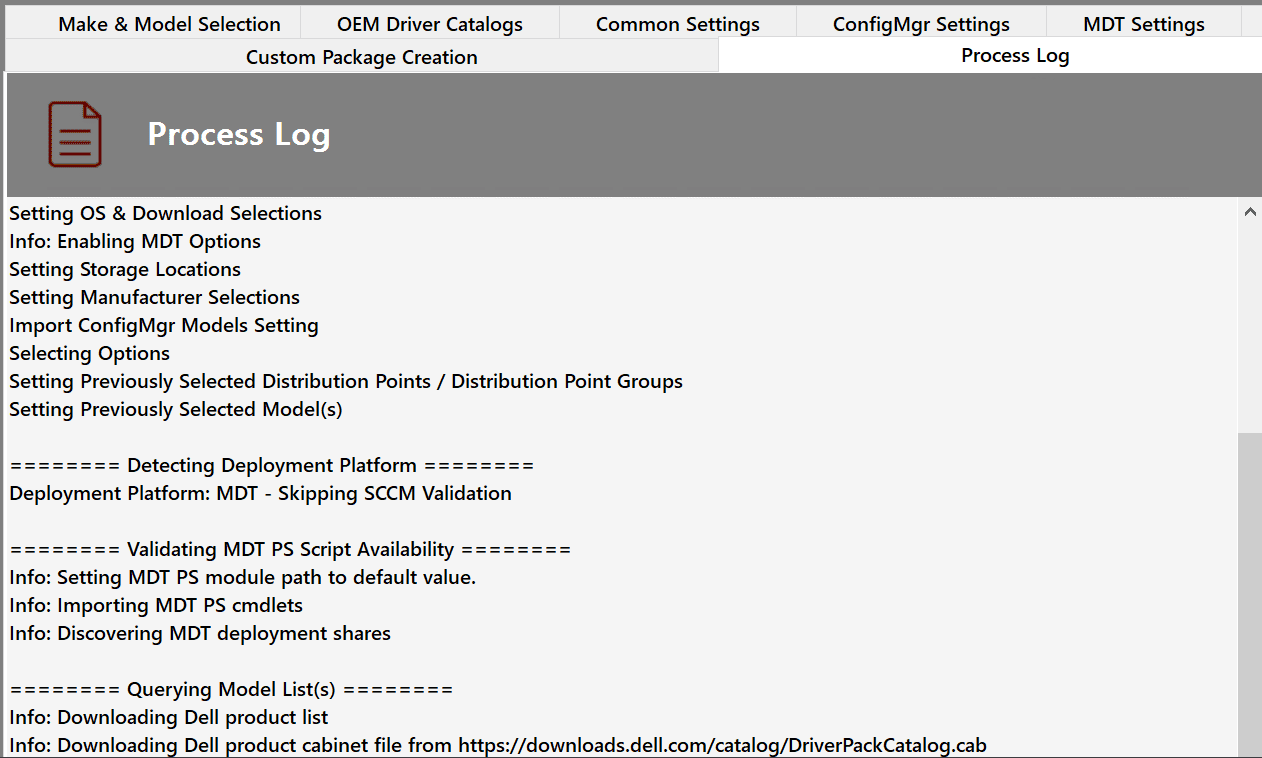
If you have met the prerequisites and configured Driver Automation Tool, the Process log should look this way.
MDT Driver Download Scenario 2
Now we have successfully integrated MDT with the Driver Automation Tool. We should be able to download drivers and have them imported to MDT (Out-of-Box) driver and also to the storage location we created above.
I will be selecting two drivers to download under “Make and Model Selection” and then select MDT.
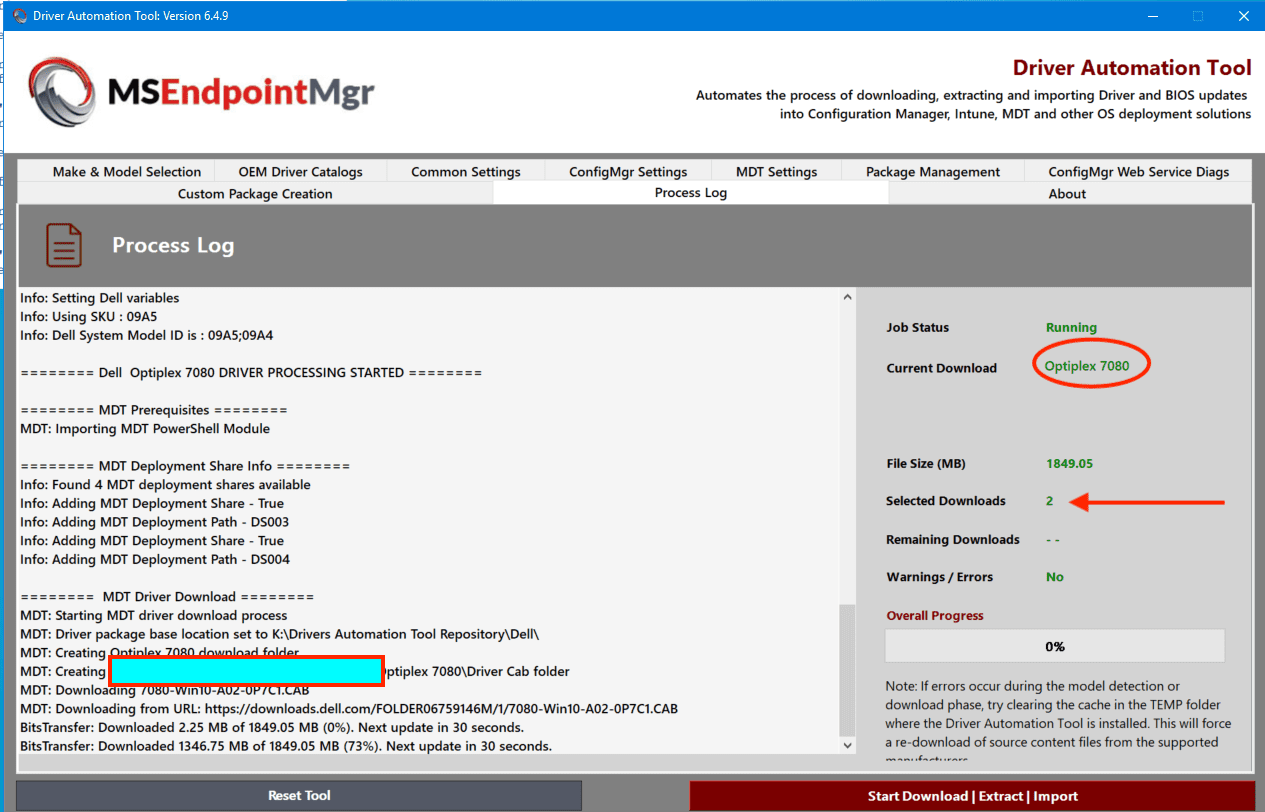
Next, I will navigate to the MDT Settings Tab. Then select the right “Deployment Share” I wish to extract the Drivers to. And click on Create/Extract/Import.

This initiates the Driver Download from Dell, followed by extraction and importation into MDT, with storage in the location below.
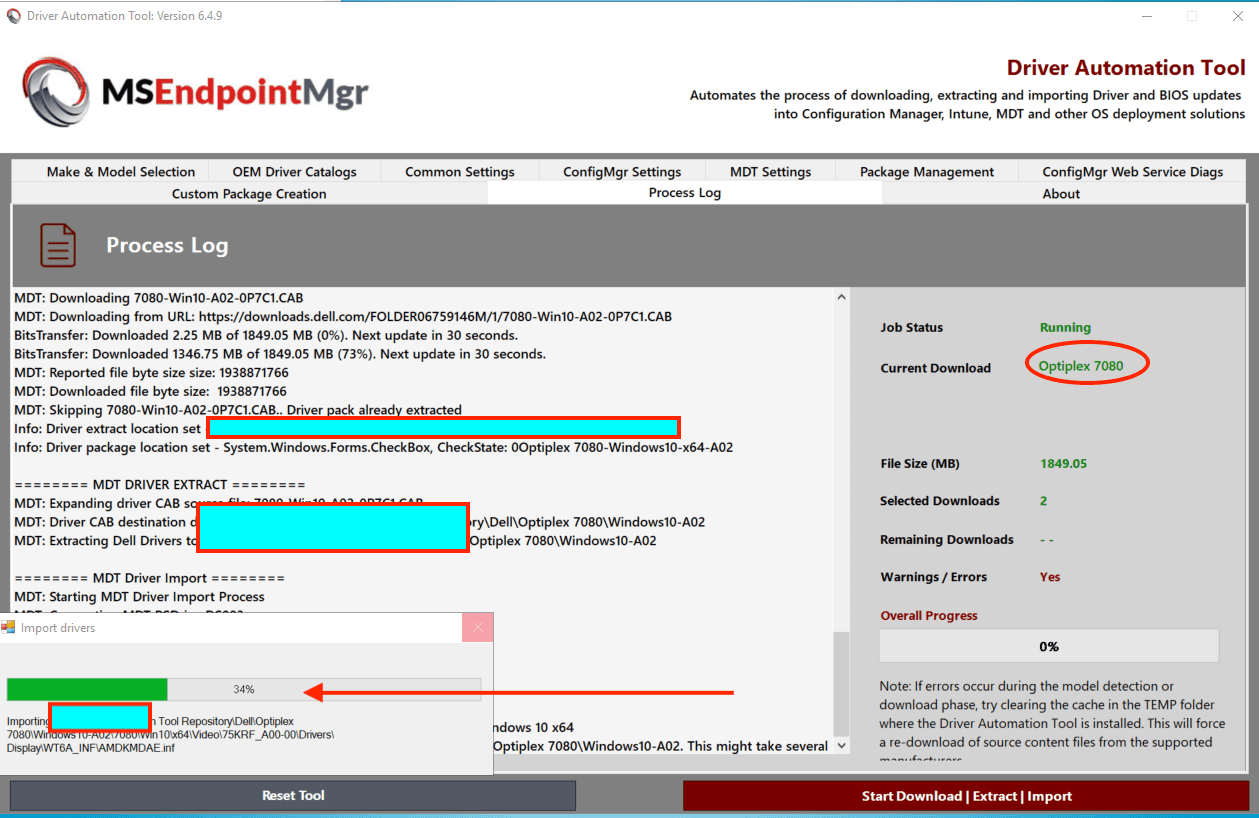
After completing this step, the next one involves downloading the drivers for the second Dell model and make. I have only selected two make and models, but if you select over two, one will have to finish before the other starts downloading, extracting, and then the import can happen.


Here is the process log for the second Dell device.
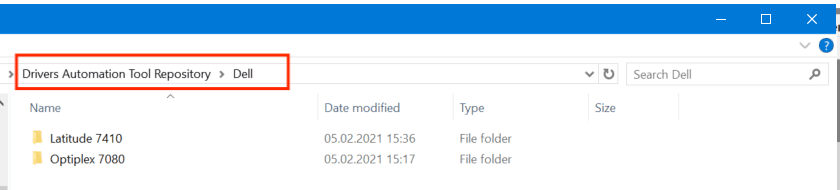
You should head to the Storage Location. You will see the two Dell device Drivers have been download, extracted and imported into the location you defined.
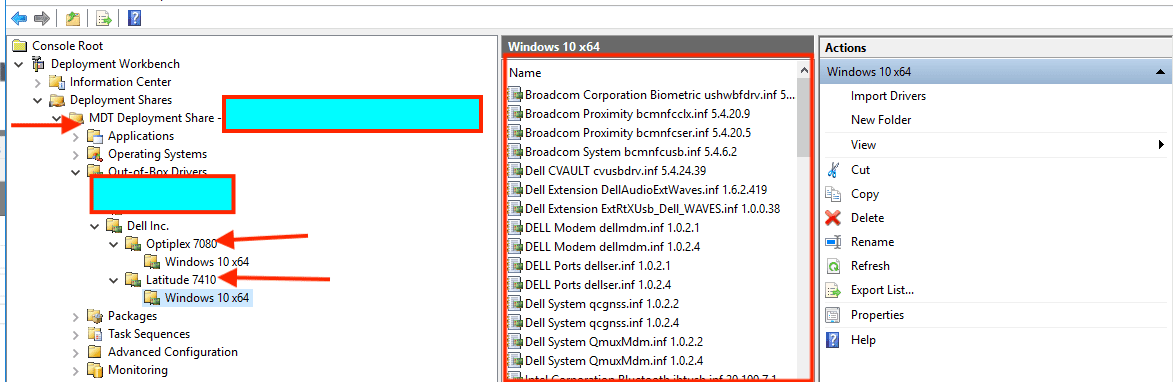
Also, launch the MDT and navigate to the DeploymentShare you selected to have the Drivers, download, extracted and imported into. You will find the drivers uploaded using the folder structure you defined. That is all 🙂
Package Management
The package management allows to quickly move packages between pre-production (pilot), production, and retired state. This enables you to move packages between Windows 10 versions.
- Production: Here you will find packages you deemed suitable for mass deployment.
- Pilot: This stage is for pre-production testing.
- Retire: You can flag packages that are retired. This makes it possible to bulk remove packages via PowerShell.
- Move to Windows 10 xxxx (version): This option provides a quick means of converting packages that use the Windows build number to the new Windows version number format.

As you can see in the above image, packages can be moved from one state to the other by using the "Actions" dropdown list.Custom Packages
Before diving into this section, I would like to discuss what a driver package is at first.
A driver package consists of all the software components that you must supply in order for your device to be elgible for Windows support. Installing a device or driver involves system-supplied and vendor-supplied components. The system provides generic installation software for all device classes.
Custom Packages give you the ability to create driver packages for any model or make. To create a package, you will need to first ensure you download and extract the vendor driver.
Then afterward obtain the baseboard product value from WMI. The baseboard product value acts as the unique identifier to match packages. To get the baseboard product value, run the following PowerShell code.
(Get-CIMInstance -ClassName MS_SystemInformation -NameSpace root\WMI).BaseBoardProductAs the import process allows for a mix of MDT, XML, and ConfigMgr imports, you will need to connect these environments first as we have done with MDT here before proceeding to create the Driver Packages.
There are two options when adding the custom make and models. You can either input all the details manually just like I have done or create a CSV file and input the contents.

Once you enter all the details (values) correctly or imported from a completed CSV file, you should click on “Create Driver Package”. This will continue the process of creating and importing them into MDT.
You can also “Query the Local System”, and “Extract System Drivers” etc. These are self-explanatory, therefore I will not be going into details.
If you will be using the CSV format, refer to the Driver Automation Tool guide for more information. Below is an example of a typical CSV format.

Custom and fallback packages
For those manufacturers who do not provide direct model XML feeds, you can also use the tool to create custom driver packages based on the same naming schema. This is important when it comes to combining the use of this tool with our Modern Driver & BIOS Management solutions.
If you also wish to cater for those unknown models in your environment and provide a basic list of generic drivers to attempt a match on, there is also the ability to create a Driver Fallback Package.
When used with the UseDriverFallback switch with our MDM solution, if a suitable model match is not found it deploys and downloads a fall-back package that matches the OS. Matching drivers are then attempted within the contents of this package.
Unfortunately, to use this feature, you must be integrate this tool with SCCM.
Upgrade Driver Automation Tool
When new updates are available, they will be available in the “About Page“. To Upgrade Driver Automation Tool, you can copy or click on the URLs to have the Driver Automation Tool executable downloaded.

Here is how the process will look like. Click on download to continue

Double-click on the setup file as shown below to continue the upgrade. When prompted to accept the UAC, click on Yes. To find more User Access Control see this guide “how to turn User Access Control on or off in Windows“.

As you can see below, we have upgraded Driver Automation Tool from 6.4.9 to 6.5.0.

I hope you found this blog post on “Windows Driver Management: Upgrade Driver Automation Tool” helpful. If you have any questions, please let me know in the comment session.