
In this article, we shall discuss How to create a static pod in Kubernetes. The concept of pods is very important because it’s just as a cell is to the human body. That is the basic unit of life! But before we talk about pods and most especially static pods. Let’s briefly talk about containers and Kubernetes. Kindly refer to these related guides: How to create and deliver a report on System Utilization on a Linux-based OS, and how to create and deliver a report on System Utilization on a Linux-based OS.
Containers have become mainstream because they can be used to virtualize any software. Whether it is a small piece of an application or even a large enterprise-grade application. This is because they come bundled with every piece of software needed for the application to run. Which are executables, binary code, libraries, and configuration files. In this article, you will learn how to create a static pod in Kubernetes to make you become a better System Administrator.
The reason why containers have become a mainstay in the software development space is that. They do not have operating system images and as such, they are not heavy at all.
This uniqueness gives them the advantage of being light and portable and this is a very important benefit with regards to cost saving for businesses.
Benefits of Containers
1: Reduced Cost of Operation: As mentioned in the introduction. They come bundled with all the pieces required to make an application run with no extra cost outlay.
2: Handy and compact: Because of how portable they are they can be made to run in lots of machines. And operating systems at the same time.
3: Reliability and consistency: The result will always be the same regardless of the platform where they are deployed.
4: Efficiency: They can be used to scale up or scale down capacity as required. Such the desired result required from a service or an app is increased.
Practical use cases of containers
1: Migration of applications from their old state to a modern environment.
This can be an application that is being moved from an on-premise environment to a cloud environment.2: Refactor an existing monolithic application for the container. As most applications can feel out of date in a short while
3: Provides Devops support for CI/CD as container technology provides the needed support for testing, and build
How does Kubernetes relate to containers?
Kubernetes is a container orchestrator. Which in simple terms means that it is used to manage containers. It also recognizes other container run time technologies such as docker. For the fact that it is open source and the most currently used and popular container orchestrator used today.
We shall deep-dive into it. It is good to mention that Kubernetes can run different types of workloads. But it’s best for use with the microservices category of workloads.
Please refer to these related guides: How to Install and Uninstall Yarn on a Linux Ubuntu System. Learn Linux Boot Process explained step by step for beginners, how to create, edit and save a file and quit Vim Editor in Linux, and how to enable and disable automatic login on Ubuntu Linux via the GUI and CLI.
Kubernetes Architecture
Kubernetes takes after the pattern of the server-client model architecture. The components are made up of etcd cluster, kube-apiserver, kube-controller-manager, scheduler.
Master Components of Kubernetes
1. etcd cluster: This is a distributed key value store that is used to store information gotten from the cluster, these information can be namespaces, number of pods and even their state.
2. kube-apiserver: This is the main tool that is used to manage everything within a Kubernetes cluster. It accepts REST requests for (to pods, services, replication sets/controllers and others). Literally providing the service of frontend to the cluster.
3. kube-controller-manager: Runs background processes to make sure that state information that is needed by all processes are well distributed. It also makes sure that rountine task are performed without any issues.
4. kube-scheduler: Helps to schedule the pods on the number of available nodes as per the required operational specification and requirements
Node Components of Kubernetes
1: kubelet: This is the component responsible for making sure the state of the pod is running in the desire form and it also reports to the host about state of the pods
2: kube-proxy: This is responsible for service discovery on the worker nodes and makes sure that each node has the required subnet and gets exposed to the public.
3: Kubectl: Kubectl is kubernetes’s command line tool. Whether you are using minikube , microk8s any of the cloud provider’s offerings such as Google Kubernetes Engine (GKE) or Azure Kubernetes Engine (AKE) you need a command line tool to be able to communicate with kube-apiserver.
The commands are passed commands in the form of Api calls to the master node. Important Kubernetes Concepts
To give you an understanding of what’s happening to the system at any given time Kubernetes makes use of abstractions such as services, pods, volumes, namespaces, and deployments
Namespaces: These are virtual clusters, a single non-virtual cluster can be used for lots of virtual ones.
Namespaces are usually used when the number of users and also the projects are many, and as such for the purpose of uniqueness and being organized and also the accountability of resources.Pods: This is the smallest unit of an application and its consist of a container or two. A pod encapsulate settings for running the containers.
Volumes: This is a directory that contains data accessible to containers in a given Pod in the orchestration and scheduling platform. The concept of volumes in Kubernetes is not different from how you would use it in Docker.
In Docker you create a volume in the /var/lib/volume directory which is known as volume mount, you also have volumes that are either files or directories that you can extend their capabilities from anywhere in the docker environment using the full path of the directory. these are known as bind mount.
Deployments: This is a resource object in Kubernetes that provides declarative updates to applications. A deployment allows you to describe an application’s life cycle, such as which images to use for the app, the number of pods there should be, and the way in which they should be updated
How to create a pod in Kubernetes
You can use katakonda playground to practise along . The first step is to launch the kubernetes cluster, inspect the cluster by inspecting kubectl get nodes in the command line . If we are to create a pod called techdirectarchive using busybox image we would run the command
kubectl run techdirectarchive --image=busybox --restart=Never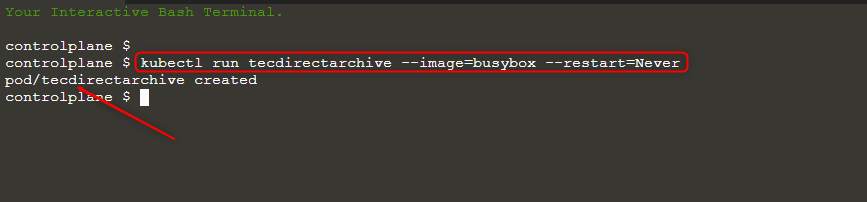
using restart =Never differentiates your pod from a deployment because it tells Kubernetes to create a single pod instead of a deployment
What is a Static Pod?
As we already know there are pods that are managed by the control plane such as your deployments, replica set. But in this case, static pods are pods the kubelet have total control over.
And this is very crucial for our application because what happens if a static pod node suddenly goes off and for some weird reason our control plane goes off as well?.
Well, you guessed right, the static pod will take over by restarting that node without any intervention from the control plane. It does this by creating a direct copy and mirroring it on the Kubernetes Api Server for those pods that had such incidence.
Challenge demo
The  demos are geared towards the Certified Kubernetes Administrator Examination
- This is taken from the exam guide and there is a certain level of guarantee that you will meet this in the examination.
Demo 1: Create a static pod on node01 called static-nginx with image nginx and make sure it is recreated and started automatically in case any failure occurs. Inspect the pod by writing the command below to list all available nodes
kubectl get nodes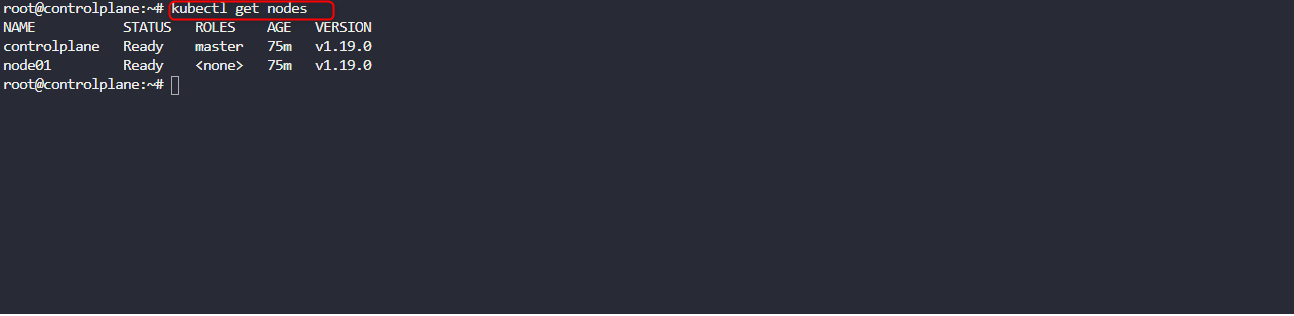
ssh into the required node which is node01 by writing the command below
ssh node01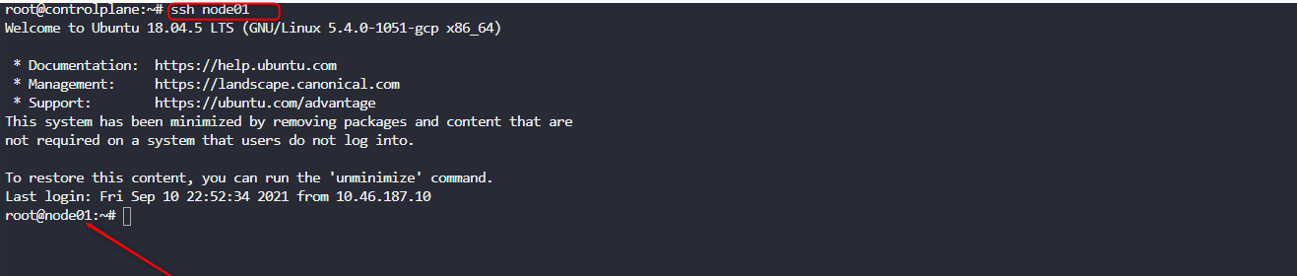
Remember when working with static pods we are mostly dealing with resources that are managed by kubelet so it will make a lot of sense to locate the config file for file kubelet . We achieve this by using the command below
ps aux | grep kubelet
copy the /var/lib/kubelet/config.yaml file that is shown as shown in the image above. In the next step use the cat /var/lib/kublet/config.yaml | grep staticPod as shown below

as you might have already known the cat command can be used to look into the content of a file but in this case, it brought out the path of the file as shown in fig4 with the path as staticPodPath: /etc/kubernetes/manifest
The next step would be to cd into the path cd into the path

And do an ls . If it’s empty which it most likely would, then we have to create a pod with the usual pod creation commands using the vi editor, name your file and create the pod declaratively.
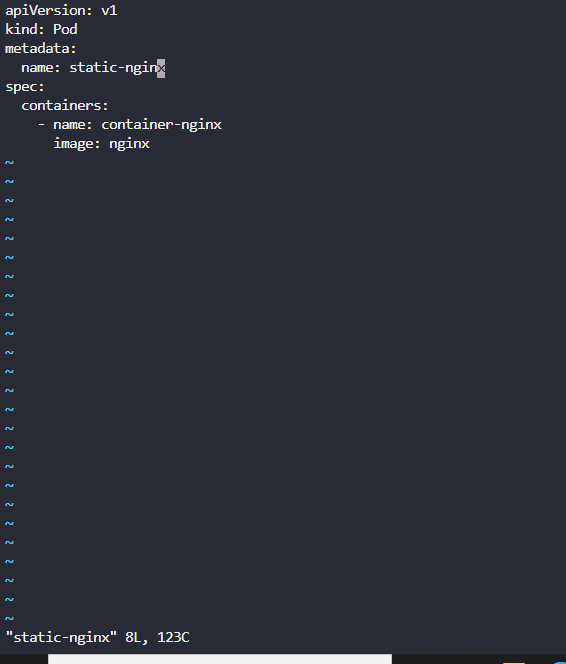
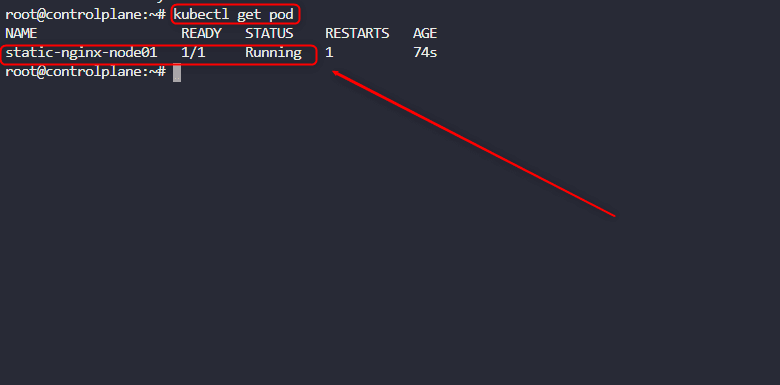
Save the file and run kubectl get pod in the control plane
Save the file the usual way you would save a vi document(:wq) and If you run an ls again you will see that you have a file. Next thing is to exit the node and return to the main cluster(control plane)by pressing Ctrl D.
When you run kubectl get pod in the control plane, you will see that the name of the pod gets prefixed with the name of the node01 where we earlier created a static pod declaratively
What if the path is given?
In such scenarios, proceed by navigating directly to the specified path, use the vi editor to assign a name to the pod, and then create the pod declaratively. This example represents one of the most challenging cases you might encounter.
The beauty of this is that we didn’t run kubectl apply -f pod <name> against the name of the static pod as we would normally do when creating pods. This was created automatically and if anything happens and it by any chance gets destroyed. It gets created again automatically.
The ability to be recreated and started automatically in case any failure occurs is a unique feature of static pods. As such we do not need to take any further steps as we have met the requirements.
Note: Our static pod is up and running as shown in the image below.
Refreshers :
- How do I  inspect  the number of nodes/pods in the cluster kubectl get pods  or kubectl get nodes
- How do I get started with creating my static pod? you need to locate the file where kubelet is saved with the steps: - ssh into the required node
- grep for kubelet so as to get the file – if the path is given skip to step 4
- use the cat command and file where kubelet is located to grep for staticPod
- cd into the static pod path and create a vi document with the desired name of the pod
- use declarative approach to create the pod using the given parameters and save the file
- use ctlr d to log out of the node and return to the control plane
- you can use kubectl get pod to inspect and wait for the see the result of the static pod you just created.
Demo 2: What is ETCD
ETCD is a distributed key – value store that is secure, fast and reliable . The formation stored in etcd is usually in the format key=valueThe first three words ETC are taken from linux ; in linux you might have come across /etc directory, which is where all all configuration files are stored . D stands for distribution.
K8s objects like deployments are there so that we are able to make sure our desired states are matched with actual states, since this is very critical we would then need a place where state information is stored reliably. Backup and restores in case any disasters occur are only possible with the help of ETCD. So, knowing how to use ETCD to do Backup and Restore as a Kubernetes adminstrator is important and this skill is tested in CKA examination as well and it is one of the questions with a high mark.
What does ETCD Store
Etcd stores information about the cluster like nodes, pods, config, secrets, roles, account, bindings and others.
One thing to note is that every bit of information we interact with as we use the command line tool Kubelet is taken from the ETCD datastore. The service from etcd listens on port 2379
K8 Demo Challenge
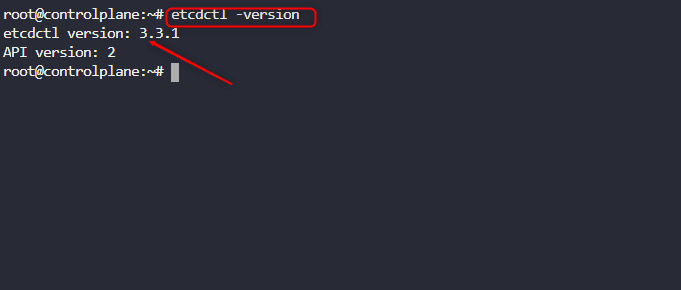
Do a backup of the etcd serverThe first thing to do is to check the version of etcdctl and also the kube-api server
At this point we want to locate etcd and where it’s located. So to make life easier, we would check the default namespace where kubernetes would automatically place objects it creates which is kube-sytem
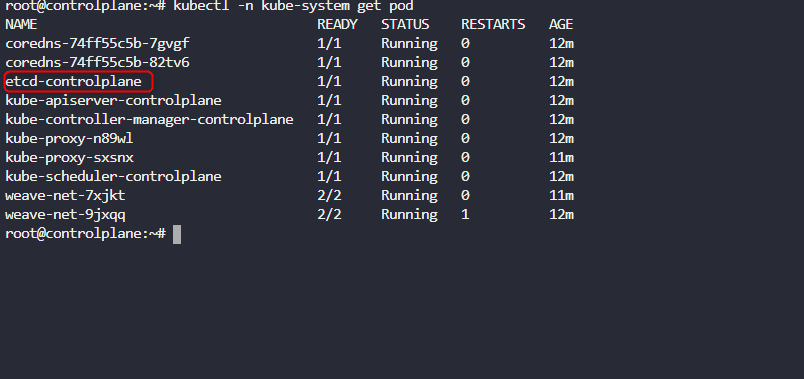
If you remember from our demo on static pod, a static pod would take the name of the pod with a hyphen and the name of the place where it is placed. So, as we can see, all the pods in the kube-sytem namespace are static pods.
Now that we know where etcd is located, we need certain information to be able to carry out the backup successfully and we can do this by running
kubectl -n kube-system describe pod etcd-controlplane Get Controlplane Information
We located it initially in the kube-system namespace that’s why it is right to describe it from there as well. Running the describe command provided us with the following:
   endpoint  =https://10.59.194.12:2379
   cert-file=/etc/kubernetes/pki/etcd/server.crt
   key-file=/etc/kubernetes/pki/etcd/server.key
   trusted-ca-file=/etc/kubernetes/pki/etcd/ca.crt
This can be seen from the image

To proceed with the backup, consult the Kubernetes documentation and copy the command from there. This is allowed even in the examination. So there’s no need to memorize the command for performing etcd backup.
We just need to replace the endpoint, cacert, cert-file and key-file from the result we got when we ran the describe command as seen in fig 11 above into the snapshot save command that is shown in black in below that was copied from the documentation . The solution with fully inserted keys and certs are shown all back solution below. We are assuming that we are saving the backup to a location called /opt/etcd-backup.db
ETCDCTL_API=3 etcdctl --endpoints=https://127.0.0.1:2379 \
  --cacert=<trusted-ca-file> --cert=<cert-file> --key=<key-file> \
  snapshot save <backup-file-location>


ETCDCTL_API=3 etcdctl --endpoints=https://127.0.0.1:2379 \
  --cacert=/etc/kubernetes/pki/etcd/ca.crt --cert=/etc/kubernetes/pki/etcd/server.crt --key=/etc/kubernetes/pki/etcd/server.key \
  snapshot save /opt/etcd-backup.db

As we can see from fig 12 above the backup was successful.
You might come across a scenario where the endpoint, cacert, cert-file and key-file are already provided for you. In that case, just check the kubernetes documentation and copy the command and insert it appropriately.
Demo 3: Upgrading a Kubernetes cluster
Ability to upgrade a Kubernetes cluster is a handy skill that you should have in your cloud-native skill tool kit regardless of whether you are preparing for CKA or not
upgrade the cluster from 1.19.0 t0 1.20.0 drain both nodes(master & worker nodes) and make them available after upgradefirstly we concentrate on the master node . We need to drain it before we start the upgrade using the command
kubectl drain controlplane --ignore-daemonsets
next run
apt update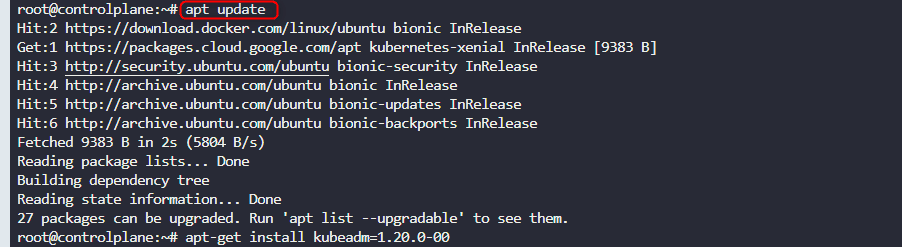
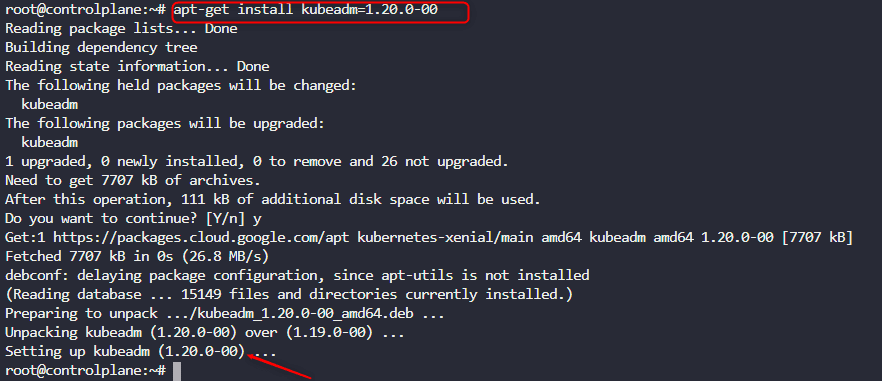
apt-get install kubeadm=1.20.0-00Next run
next run
kubeadm upgrade apply v1.20.0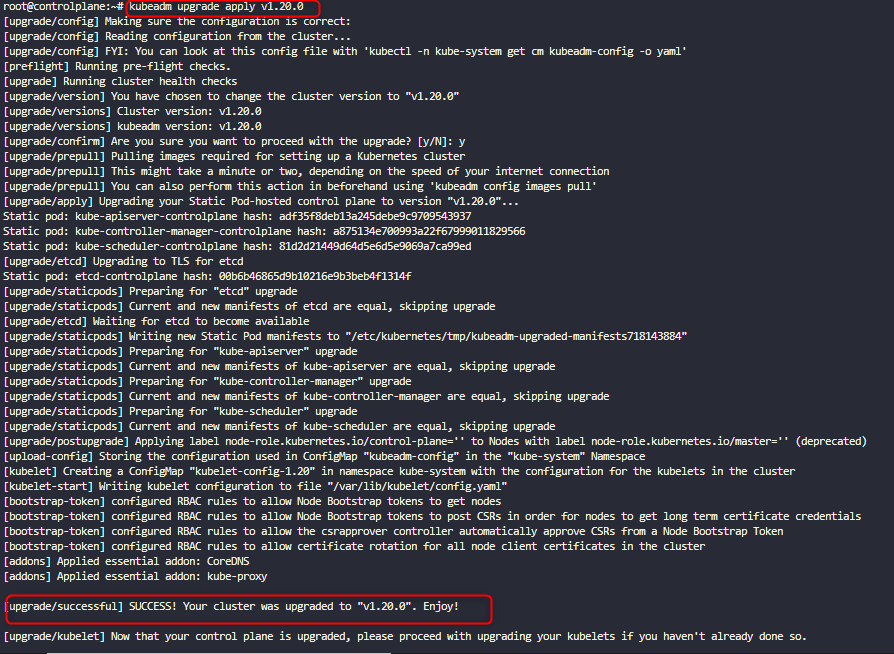
Next we need to upgrade kubelet
apt-get install kubelet=1.20.0-00
If we pay close attention to what the output of the console is telling us, we should already know that we need to restart the system before kubelet can run as indicated by the red arrow in the image above
systemctl restart kubeletNext step is to undo the drain command we ran at the beginning of the process that evicted all pods in the node
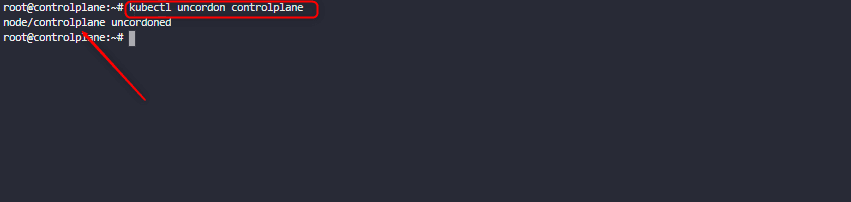
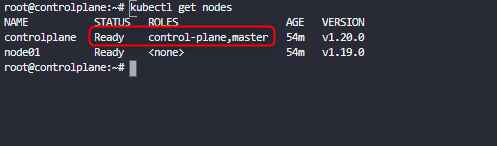
kubectl uncordon controlplaneif we inspect the node now we will see that the control plane is not disabled anymore
We have fulfilled the requirements for the controlplane now we need to do same for the worked node
kubectl drain node01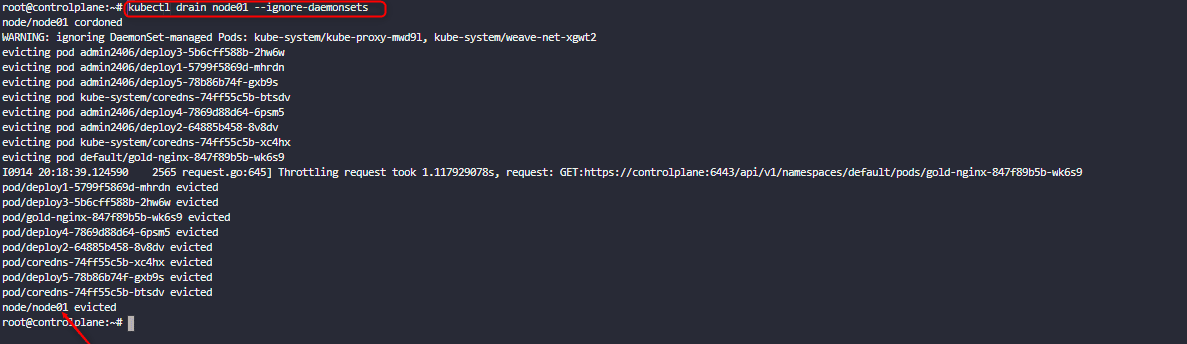
if we inspect the pod with kubectl get node , we will see that the node has been disabled for scheduling
We need to ssh into node01 before we start the upgrade
apt update
install kubeadm=1.20.0-00
kubeadm upgrade node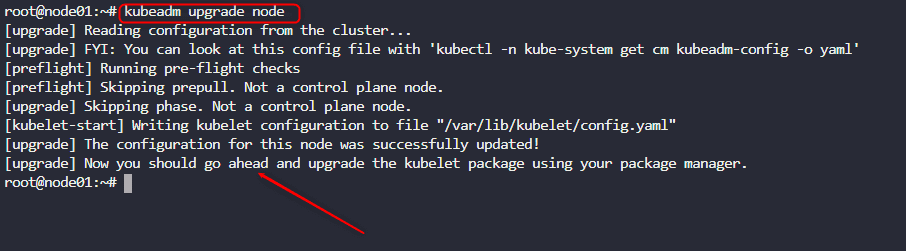
apt install kubelet=1.20.0-00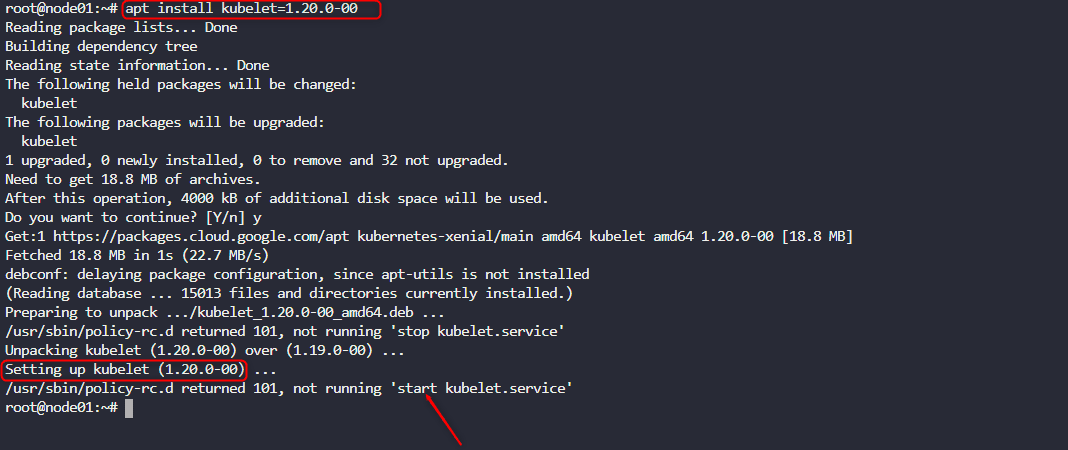
kubelet is set up but from the arrow shown in fig 26 we have been told to restart kubelet.service. This can be done by runing systemctl restart kubelet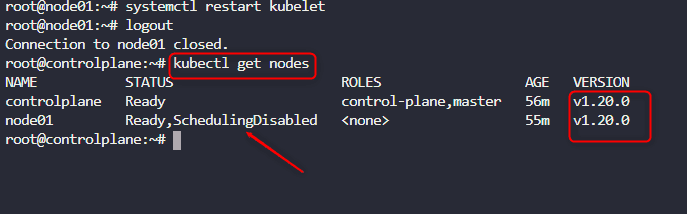
Next, we come out of the worker node and stay in the controlplane using CTRL D on our keyboard.
If we inspect the nodes using kubectl get nodes. We will see that both the control plane and worker node are having upraded version of 1.20.0. But the worked node is still disabled. So we need to uncordon the worker node
kubectl uncordon node01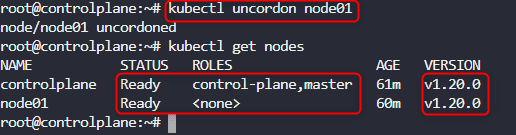
Summary on creating a static pod in Kubernetes
Static pods ensure the fault tolerance of our application because they cannot be killed at any point in time.
Once they are killed, they get automatically recreated without any intervention from the control plane. First point of when dealing with a static pod is to find the path where they are placed. ETCD is the default storage solution in kubernetes and the data in it is stored in the format key=value.
To do a backup of our cluster we need to insert the endpoint, cacert, cert-file and key-file and the backup location into the snapshot save command that can be gotten from the kubernetes documentation
Ability to uprade a kubernetes cluster is an invaluable skill that every administrator should have under their skill-tool kit. To uprade, you need to drain the individual nodes, install kubeadm to the required version.
Install kubeadm and uncordon the required node. The process must be done for the master and also the worker node.
* If this guide helps you to become better at kubernetes and cka and you would want us to work on more demos please leave us your feedback and comments in the comments section.I hope you found this blog post helpful on how to create a static pod in Kubernetes. If you have any questions, please let me know in the comment session.