
In this article, you will learn how to Create and monitor Apps using the Azure Kubernetes Service manifest. Azure Kubernetes Service (AKS) is a Kubernetes service that lets you quickly deploy and manage master and worker nodes in clusters. Also here are some of my related guides: How to manage azure resource manager resource groups by using Azure CLI, how to configure azure resources with tools, how to install and configure Ansible on Ubuntu, how to install Ansible on Windows with Cygwin, and how to deploy Azure VMware solution private cloud.
Creating an AKS cluster is easy and there are more than enough manuals that will guide you through the process. It is an effortless process to create a cluster by following the steps given below in this article.
In this article, you will learn how to create an AKS cluster using the Azure portal alongside the following listed below. Here are some exciting guides: How to automate infrastructure deployments in the cloud with ansible and azure pipelines, how to install Kerberos packages in Windows via Cygwin, how to configure a remote server (windows) to Support Ansible,
- Kubernetes Cluster Service.
- Node Pools.
- Authentication.
- Networking.
- Integration.
- Review & Create.
Create Kubernetes Cluster Service
Go to the Azure Portal. From the search bar, type and select Kubernetes Services. Click on Create a Kubernetes Cluster, and type the below:
- Select the subscription.
- Give the Resource Group name as per your requirement.
- Specify a name to your cluster in the Kubernetes cluster name field.
- Choose a Region in which you want to create your AKS cluster. In the specified region, the master node will be created.
- Choose a Availability zones in which you want to create your AKS cluster. In the specified Availability zones.
- Select the Kubernetes Version.  Here I am choosing the default, i.e., 1.20.9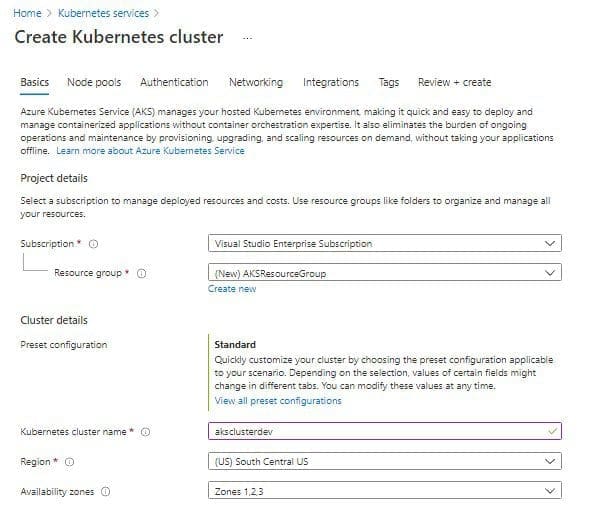
Next, comes the size and count of the nodes of the AKS cluster that we are gonna create. These can be updated as per the requirements.
- Select the Node Size. We are choosing Standard Ds2 v2 which has the following configuration: 2 vCPUs, 7 GiB RAM, 8 Data Disks, 14 GiB Temp Storage.
- Give the Node Count value which specifies how many Worker Nodes we want.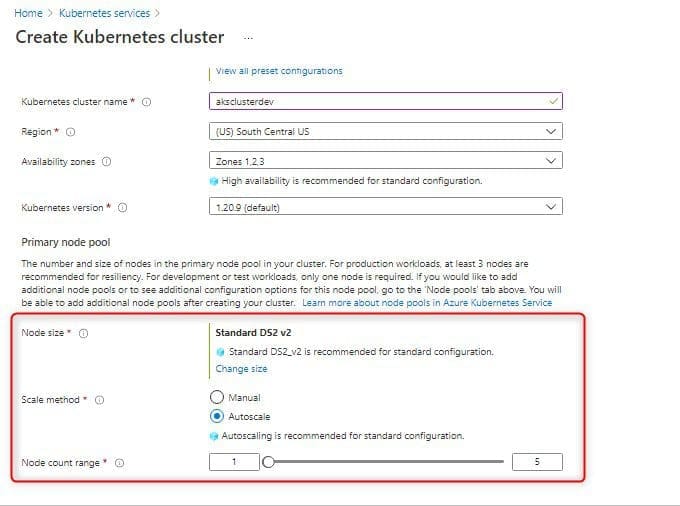
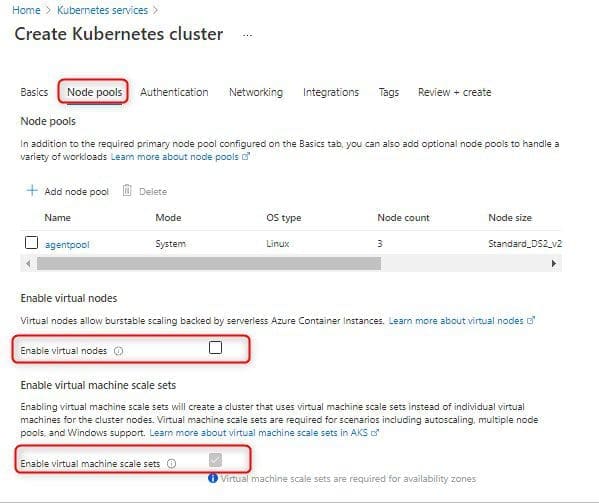
Create Node Pools
The Virtual nodes are a type of Serverless container instance. As we want to create the Worker nodes as Virtual Machines, so we will Uncheck this option. The VM scale sets provide an auto-scaling option. Hence, we will keep it Enabled.
Creating an Authentication
The cluster infrastructure authentication specified is used by Azure Kubernetes Service to manage cloud resources attached to the cluster.
- Choose the System-assigned managed identity.
- If you want to go for Role-based Access Control (RBAC) then select Enabled.
- For the AKS-managed Azure Active Directory, leave it unchecked
- Choose the Encryption Type of your choice, I will use the Default one.

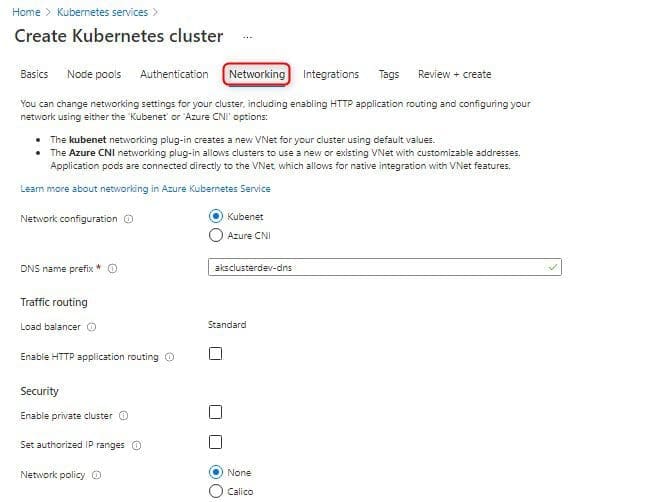
Creating a Networking
In Private Cluster, the communication between the nodes and the API server happens internally. So, leave it Unchecked / Disabling the Private Cluster.
Keep the Network Policy to None. HTTP application routing to No.
Creating Integration
Here we keep all settings to default and move to the next step

Review and Create
The final step is to click on Review & Create. If you click on Create, it will first Validate your AKS Cluster and if everything is fine then the cluster will be created.

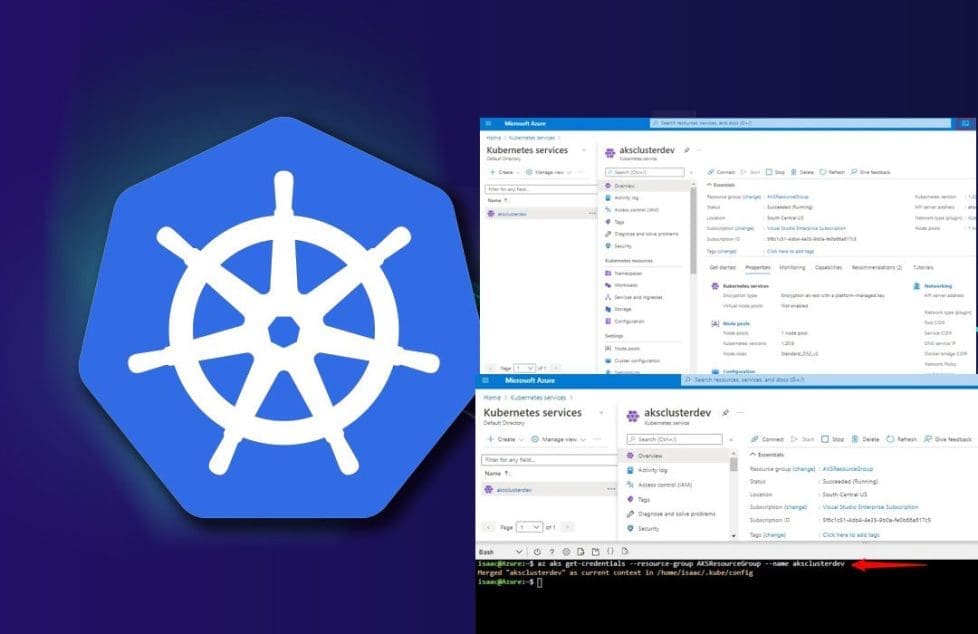
To view the cluster, go to Kubernetes services from the Azure Portal search bar and there you can access the AKS cluster.

Connect To The Azure Kubernetes Cluster
There are two ways to connect the AKS cluster:
I) Using Cloud Shell
II) Using Azure CLI
I am going to cover how do we connect using Cloud Shell. We can see the option on top of our screen (marked red in the below image)

Step 1: Click on the Azure bash shell: Run the following command, on the Azure bash shell:
az aks get-credentials --resource-groups AKSResourceGroup --name aksclusterdev
Step 2: Click on the Azure bash shell. To get the Nodes running in your cluster, run the following command, on the Azure bash shell and you will see all the nodes in your AKS cluster.
$ kubectl get nodes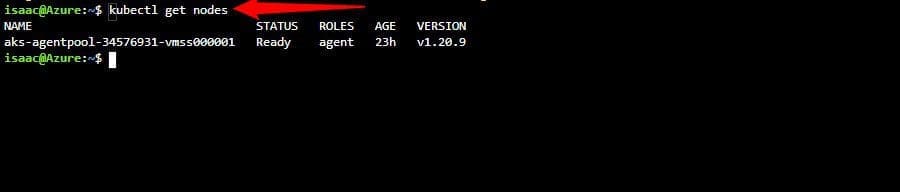
Please refer to the following related articles: How to Install Kubectl on Windows 11, how to use container insights to get the full benefits of Azure, how t fix failover Cluster Manager failed while managing one or more, how to create a static pod in Kubernetes, Azure DevOps and GitHub integration for Docker and Kubernetes deployment, and how to fix the following error “Docker image OS”windows” cannot be used on this platform: No matching manifest“.
Create a simple app using the Kubernetes Service manifest
Kubernetes provides a distributed platform for containerized applications. From the beginning of this article, we have built and deployed our own applications and services into a Kubernetes cluster. It also allows the cluster to manage the availability and connectivity. Right in this article, I will be showing you how you can deploy an application into a Kubernetes cluster.
The following below will be carried out before deploying an application into your Kubernetes cluster
- Update a Kubernetes manifest file
- Run an application in Kubernetes
- Test the application
Before Getting Started
I will be using the pre-created azure-vote-all-in-one-redis.yaml Kubernetes manifest file of which I will be cloning the repo into this project, after cloning and installing I’ll change the directory into the cloned repo directory.
To clone the application into your environment, use the below code as it’s shown below:
git clone https://github.com/Azure-Samples/azure-voting-app-redis.gitUpdate The Manifest file
To deploy the application, you must update the image name in the Kubernetes manifest file to include the ACR login server name using the Azure CLI, and with the help of the Azure Container Registry (ACR) instance. It helps to store the container image for the sample application. use the below code as it’s shown below:
az acr list --resource-group AKSResourceGroup --query "[].{acrLoginServer:loginServer}" --output tableNEXT: From the sample manifest file from the git repo cloned earlier, you need to navigate into the cloned azure-voting-app-redis directory, then open the manifest file with a text editor, such as vi: use the below code as it’s shown below:
cd azure-voting-app-redis
vi azure-vote-all-in-one-redis.yaml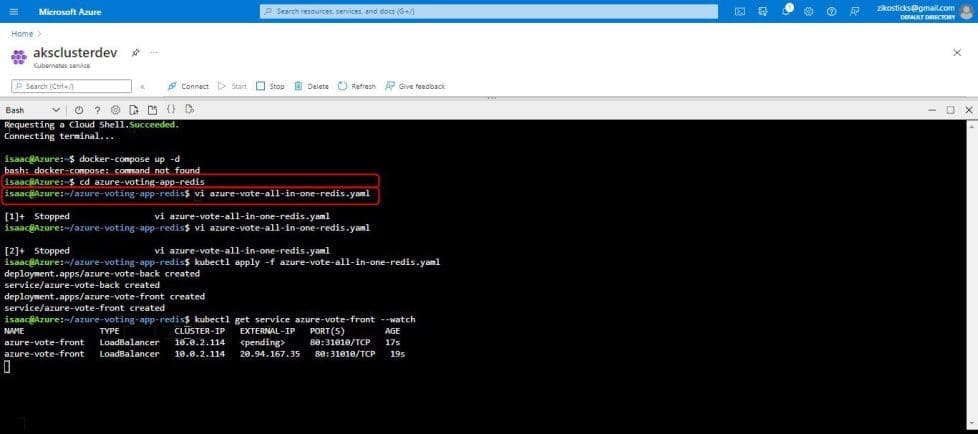
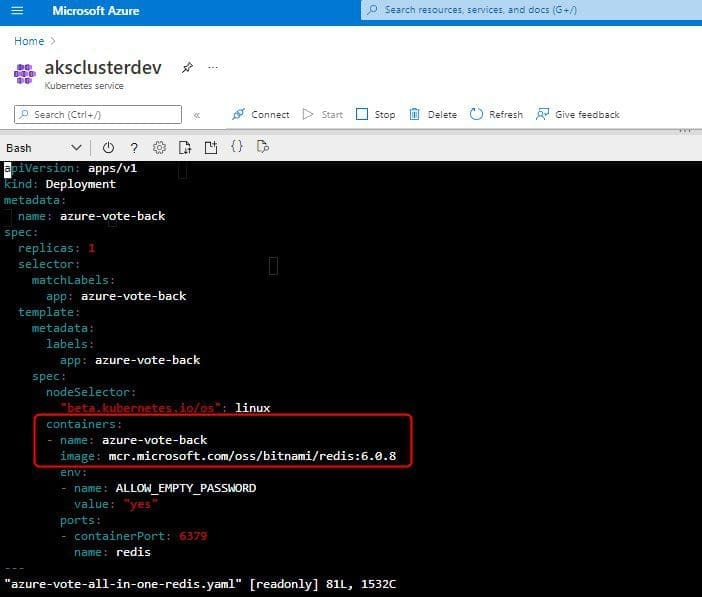
To Save and close the file editor. In vi, use :wq
Let’s Deploy The Application
In order to deploy your k8 application, you make use of the Kubectl apply command. Kubectl applies command parses the manifest file and creates the defined Kubernetes objects. use the below code as it’s shown below:
kubectl apply -f azure-vote-all-in-one-redis.yaml
Monitor Apps using the Azure Kubernetes Service
Run the Application Deployment
To confirm that the application runs, the Kubernetes service exposes the application front end to the internet using the public IP address that will be created after deployment.
We will be using the Kubectl get service command with the --watch the argument to monitor the progress of the application, use the below code as it’s shown below.
kubectl get service azure-vote-front --watch
NOTE: Initially the EXTERNAL-IP for the azure-vote-front service shows as pending:
And when the EXTERNAL-IP address changes from pending to an actual public IP address, use CTRL-C to stop the Kubectl watch process. The following example output shows a valid public IP address assigned to the service:

To see the application running in action, open a web browser and type in the external IP address of your application service deploy, just like how it is shown below:

If you want to be successful in orchestrating containers, Kubernetes is the way to go. If you have followed the above steps in this article you will have an AKS cluster up and running.
I hope you found this blog post helpful on how to create and monitor Apps using the Azure Kubernetes Service manifest. Please let me know in the comment section if you have any questions.