

In this post, you will learn about the meaning of Secure Boot and how to disable or enable it on Windows 10 & 11. Over the years, the security of enterprise and Personal Systems has been a major concern for computer users. You do not only risk losing your data, but you also risk having your privacy compromised when attacked by the man in the middle. It is on this premise that Microsoft introduced Secure Boot to safeguard to boot process when you start your computer. It’s found on newer PCs that come loaded with UEFI firmware. Secure Boot’s job is to prevent unsigned UEFI drivers and bootloaders from loading during the startup process.
You may also learn more about how to Solve “The parameter is incorrect” problem on External Hard Disk in Windows, how to Clear Cache on Windows 10, Domain Controller: How to install and configure Active Directory Domain Services on Windows Server 2022, how to Decrypt Files and Folders Encrypted with Encryption File System in Windows 10, how to create and configure a Shared Folder on Windows Server and Network File System: How to install NFS Server on Windows Server.
What is Secure Boot?
Microsoft Secure Boot is a component of Microsoft’s Windows 8 extended with more security advancement to Windows 10 & 11 operating systems that relies on the UEFI specification’s secure boot functionality to help prevent malicious software applications and “unauthorized” operating systems from loading during the Computer start-up process.
Although having it activated will make it difficult to install Linux or other operating systems on the computer, the secure boot functionality is primarily designed to protect users from rootkits and other low-level malware attacks by blocking unauthorized activities and drivers from being loaded during the start-up process. Modern computers come with the feature enabled. This is a platform feature in UEFI, which replaces the traditional PC BIOS.
If you have heard of the word “Dual-Booting” and hoping to try it out on your computer and found that you need to disable secure boot in order to achieve your goals. Then, this post is coming to you at the right time. The aim of trying out dual-booting is to have more than one Operating System on your PC. You can have Windows 11, 10, and Unix/Linux Operating systems all installed on one PC and be selecting which of the OS you wish to use during the boot-up process.
What is Dual-Booting?
Dual-booting is simply the act of installing multiple operating systems on a single computer, and being able to choose which one to boot. The term dual-booting refers to the common configuration of specifically two operating systems. Multi-booting may require a custom boot loader.
Check if Secure Boot Is Enabled or Not
Before we jump to disabling or enabling Secure Boot, let us first check if it’s already enabled or not. Most PCs and laptops have secure boots turned on. If you want to check its status,
- Press the Window + R key to open the Run Window
- Type the command
"msinfo32"
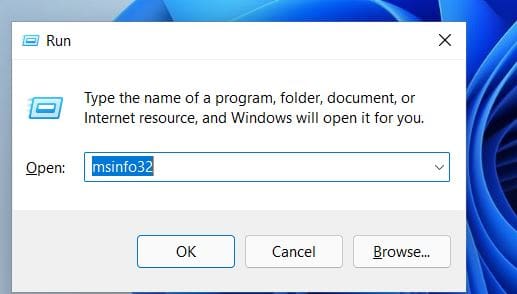
3. In the system summary, look for “Secure Boot State.” as shown below.

How to Disable Secure Boot on Windows 11
The steps to turn off the secure boot feature are almost similar for both Windows 11 and Windows 10 systems.
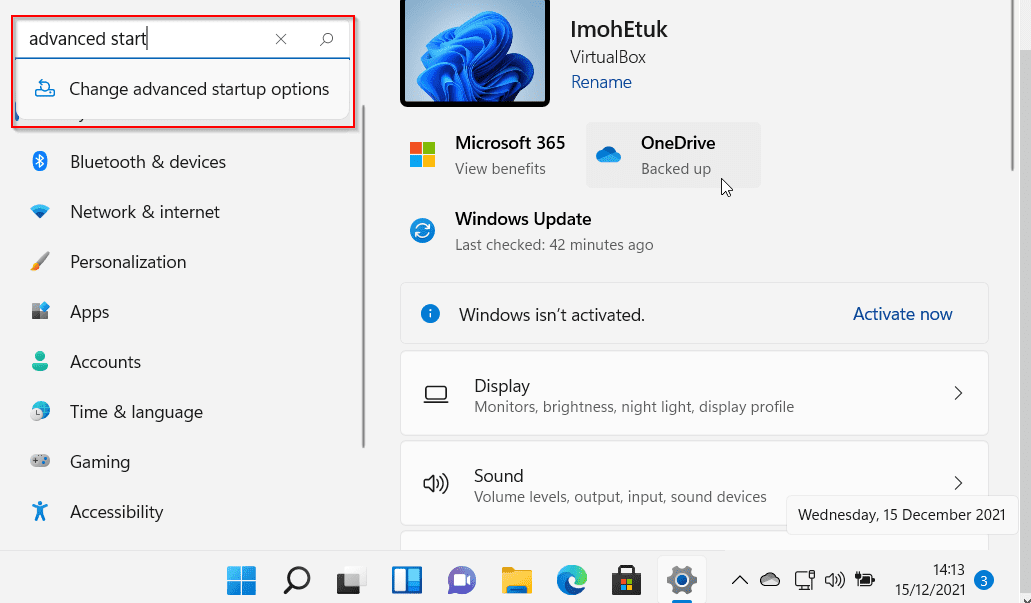
1: Search for Advanced startup Option in the search option at the taskbar of the Windows. Then, select Change advanced Startup Options as shown below in the snapshot or you can press Ctrl + Alt + Delete keys on the keyboard at the same time to open the Task Manager menu. Then click Power button, press and hold Shift key on the keyboard and click Restart button.
Step 2 – Once you click on the “change advanced startup options”, the following screen will appear. You just have to click Restart now under the Advanced startup.

Step 3 – The above command will restart your PC in the advanced mode which comes with lots of advanced options to let you configure your Windows. Some of the advanced options are using an external device, troubleshooting your Windows using advanced options, or resetting your PC, etc. The screen appears something like this. Click on Troubleshoot.

Step 4 – You can see above that Troubleshoot option had two options–Reset your PC and Advanced options. So, once you click on Troubleshoot, you will the same two options coming up. Click on Advanced options as shown below.

Accessing UEFI Firmware Settings for Secure Boot Configuration
Step 5 – The advanced options look exactly like the screenshot shown below. Select UEFI Firmware Settings.

Step 6 – Once you click on the UEFI firmware settings, it will restart your system once again or ask you to restart the system in the case of Windows 11. So, click on the restart on the next screen.

However, the above action will start your PC in BIOS and you will see a different BIOS setup. As shown in the screenshot below, you will only need to use your Up and Down Arrow Keys to move between Disable and Enable.

The steps mentioned above are applicable to both Windows 10 and Windows 11, with the only distinction lying in the visual interface between the two versions. Now, let’s delve into the process of how to enable or disable Secure Boot in Windows.
Alternatively, you can access the motherboard firmware or BIOS settings by pressing the F12 key multiple times as soon as your PC starts. It might be a different key to open the firmware settings depending upon the device manufacturer. Some PC manufacturers do assign Keys like F2, or Del.
What happens after you disable secure boot
After deciding whether to enable or disable Secure Boot in Windows, it’s important to understand the consequences. When you choose to disable this security feature, your PC will no longer verify whether the operating system you’re running is digitally signed or not. Despite this change, your experience while using Windows 11 or 10 on your device will remain unaffected.
Below are some of the conditions that would be allowed on your PC after disabling the Windows secure boot option:
- Booting Windows on your PC from an external device like USB or CD.
- Dual OS booting like Windows with Linux, macOS, Ubuntu, or Fedora.
- Booting Windows using Windows password recovery tools
- Running the previous versions of Windows etc.
I trust that you discovered this blog post to be of assistance in understanding how to enable or disable Secure Boot in Windows. Should you have any inquiries or require further clarification, kindly feel free to share them in the comment section. Your feedback is greatly valued.