

Samba assists in providing shared access to files and printers across multiple networked machines. Meanwhile, on the remote server, a CIFS client application can read, write, edit, and even delete files. Please see How to install SAMBA file shares for Servers and Clients. The de facto CIFS standards are Microsoft implementations. Please see How to use container insights to get the full benefits of Azure Monitor for Azure Kubernetes workload/ and How to Install LAMP Stack on Ubuntu 18.04.
So, what exactly is SMB?
“Server Message Block” is the acronym for “Server Message Block.” It’s an IBM-developed file-sharing protocol that’s been around since the mid-1980s.
If you’re troubleshooting, seek the application that claims to implement the SMB protocol, as it’s a protocol (an agreed-upon manner of communication between systems) rather than a specific software application.
Other guides can be found here: A-Z of Domain Name System: All you need to know about DNS/, and How to Install and Configure Postfix as a Send-Only SMTP Server/, also How to install Apache Tomcat on Ubuntu/, and How to install MariaDB on Ubuntu
The SMB protocol was created to allow machines on a local area network to read and write files to a remote host (LAN). "Shares" are the directories on distant hosts that are made available via SMB."Common Internet File System" is the acronym for "Common Internet File System." SMB has a dialect called CIFS. To put it another way, CIFS is a unique system.
Features That Support Installation of Samba (SMB) File Shares
1: Samba can create file or printer shares.
2: Samba version 3.x can act as a WindowsNT domain controller.
3: Samba version 4.x can act as an Active Directory domain controller.
4: Samba version 4.x is available on most distributions.
Prerequisites for Installing SAMBA File Shares
Below are the requirements for the installation: Linux server, and a folder or directory that you want to share with clients
Steps to Install SAMBA File Shares
Follow the steps below for a successful installation and configuration.
We need to install samba:
Install samba:
$apt install samba
verify Samba is running:
$sudo systemctl status smbd

We would need to make a directory to enable us to share samba
$ mkdir /srv/smbshare
Then, we can take a look at the main configuration file with the command.
$vim /etc/samba/smb.conf
In the configuration file, there is a global section which applies to the entire samba server. Then, there is a workgroup name, and this is the same as a domain name amongst others. If we scroll down the configuration file, we will see other shares that are meant for other purposes.
If on your own config file, you see a printer for example, that makes sure that any printer that is configured on the system is accessible as a samba share. Furthermore, there are specific shares.
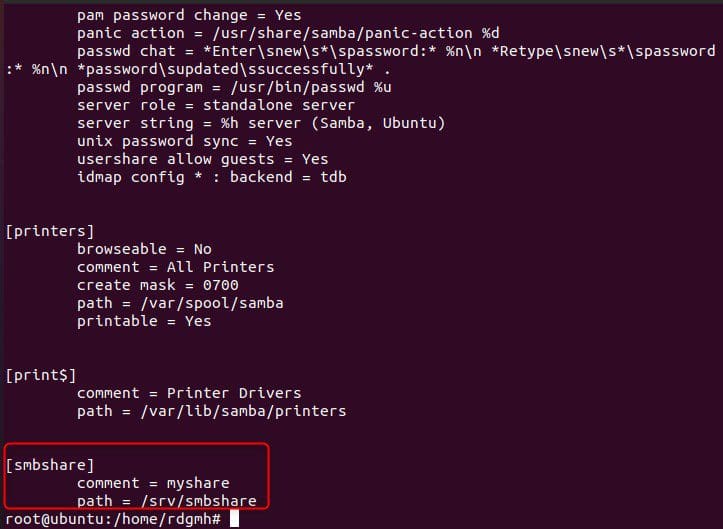
But for the purpose of this article, we will add our own share and call it [smb share] and this is the label. In addition, It needs to be outlined to the left and needs to be indented. The minimum configuration for this specifies a comment.

So, let’s evaluate the configuration that we have just added to the smbshare with:
$testparmtestparm accesses the configuration and it sends a warning signal if there is any issue.

Since there is no complain, then we didn’t make any syntax errors, we can proceed, and the dump file is shown below
systemctl enable --now smbAdd user Noah to a group
sudo useradd -M -d /samba/noah -s /usr/sbin/nologin -G sambashare noah
The following are the meanings of the useradd options:
-M: omits the creation of the user’s home directory. This directory will be manually created.
-d : Set the user’s home directory to /samba/noah with the -d option.
-s: /usr/sbin/nologin – prevents this user from accessing the shell.
-G: Add the user to the sambashare group using -G sambashare.
Furthermore, we need to create an smb password for the user:

Create an Admin user as well
sudo useradd -M -d /samba/users -s /usr/sbin/nologin -G smbshare sysadminsudo smbpasswd -a sysadmin
sudo smbpasswd -e sysadminCreate a directory for users
sudo mkdir /samba/users
Then, set the owner of the directory to sysadmin and the sambashare be group owner:
sudo chown sysadmin:sambashare /samba/usersGive read and Write access to users
sudo chmod 2770 /samba/usersFurther configuration of Samba share
sudo vim /etc/samba/smb.conf
sudo systemctl restart smbd
sudo systemctl restart nmbd
Using Linux to connect to a Samba Share
After installing the SAMBA file shares, we’ll have to connect Linux to it. smbclient is a command-line utility that allows you to connect to Samba.
Because the smbclient package isn’t pre-installed on most Linux distributions, you’ll need to use your distribution’s package manager to install it. Run the following commands on Ubuntu and Debian to install smbclient:
sudo apt install smbclient
our ip address can be gotten with: ip address show. Login to the client using the command:
smbclient -L 192.168.125.160 -U noah
Mounting the Samba share
On Linux, you must first install the cifs-utils package before mounting a Samba share. Run the following commands on Ubuntu and Debian:
$sudo apt install cifs-utilsCreate a mount point next:
$sudo mkdir /mnt/smbmountMount the share with the command:
$sudo mount -t cifs -o username=username //samba_hostname_or_server_ip/sharename /mnt/smbmountsudo mount -t cifs -o username=noah //192.168.125.160/noah /mnt/smbmount

GUI
We can actually connect to the smbshare we created using GUI as Gnome’s default file manager, Files, offers a built-in option for accessing Samba shares. To access use the following steps:
- Open Files and go to the sidebar and select “Other Locations.”
- Enter the Samba share’s address in the format smb:/samba hostname or server ip/sharename in “Connect to Server.”
- When you click “Connect,” you’ll see the following screen as shown below
- Select “Registered User”, enter the Samba username and password and click “Connect”
- The files on the Samba server will also show

Conclusion
Congratulations, you’ve learned how to install Samba file shares on Ubuntu 20.04. Consequently, it can work with other versions of Ubuntu as well. Furthermore, we built several types of shared and user folders in this article and show you how to use Linux to connect to the Samba server.
I hope you found this article useful on How to install SAMBA file shares for Servers and Clients. Please feel free to leave a comment below.