

We’ll install WordPress on Azure App Service for Linux in this tutorial. Though there are several ways to deploy WordPress on Azure, such as using Bitnami WordPress or WordPress for Azure App Service, we will use the standard web deployment approach to maintain complete control over the app resources on Azure. Please see how to Set up Jenkins Pipelines Environment for Docker Container Deployment, and How to Install and Setup WordPress into a cPanel and Configure Your First WordPress Theme.
This article is intended for Azure Architects and Administrators who wish to learn about various Azure Cloud functionalities that apply to any web application hosted on the Azure App Service. This includes learning how to use Azure App Service’s SSH, configuring SSL for a web application hosted on Azure App Service, and scaling web applications for different workloads, among other things.
Before proceeding, you may also like the following posts; How to Serve Private S3 Bucket Contents Via CloudFront, and Disk Drill: How to Recover Deleted Temp Files on Windows 10 and 11.
To have a clear understanding of what Azure App Service is all about, we will start by explaining what Azure App Service is all about.
What is Azure App Service
The Azure App Service is a Platform as a Service (PaaS) solution that allows developers to quickly build, distribute, and scale apps. It aids in the rapid development of enterprise-ready applications, shortening time-to-go-live and decreasing total platform management responsibilities.
It makes no difference what programming language or framework you use. The Azure App Service can host web applications and services written in any of the programming languages or frameworks listed below. It supports quite a huge number of programming languages, such as.NET,.NET Core, Java, Ruby, Node.js, PHP,, and Python.You may want to see these interesting guides: How to Enable WMI Traffic Using Separate Rules for DCOM, WMI, Callback Sink and Outgoing Connections.
Why Use Azure App Service?
Scaling, load balancing, patch management, configuration management, and security/compliance are just a few of the problems that come with setting up a web application. It is critical to deploy apps with minimal in-service capacity in order for them to run without problems and without downtime. It’s also critical to keep the operating system and platform versions current.
However, this is a time-consuming procedure that necessitates a significant amount of operational overhead and skill.
A lot of cloud services must be implemented in order to make an application highly accessible in Microsoft Azure. For example, an application gateway is critical for traffic distribution. Virtual machines that scale up and down in response to demand are also crucial. Individual resources must be provisioned, but combining them can take a long time.
The following are some of the most common Infrastructure as a Service (IaaS) issues:
- Dependencies: Platforms for any web application must comply with their own set of requirements connected to the underlying framework before any application can be deployed.
- Platform patches and upgrades: DevOps engineers must keep VMs up-to-date on a frequent basis to improve an application’s security and stability.
- Scalability Issues: This is frequently done by hand. Slow reaction times can be caused by poor load distribution. Underutilized resources can result in higher expenses if suitable scaling capacities are not in place.
- Excessive traffic might cause servers to slow down, causing the website’s performance to suffer. In instances like this, there is no recovery process, hence direct intervention is required to return to the previous stable state.
Azure App Service aids in the resolution of these challenges and eliminates operational overhead, allowing developers to focus on developmental aspect of the web application rather than infrastructure setup.

When it comes to deploying our app, we often have to choose between control, flexibility, and convenience of use. Cloud services provide developers more control over their projects, but they also increase their responsibility.
Having done some explanations of what Azure App Service is all about, it’s time to get started with deploying WordPress on the Azure App Service tasks.
Prerequisites
If you wish to follow along with the exercise, you should first meet the prerequisites listed below:
- You must have a PC with Internet connectivity.
- You must have a web browser installed on your PC.
- You must have MySQL Workbench installed on your PC.
- Active Azure Subscription that allows you to create App Service Plans
- Some basic knowledge of web hosting and WordPress Hosting
Creating App Service Plan
To create a WebApp, you will need an active App Service plan. A service plan defines a set of compute resources for a WebApp to run on. They are prices in tiers:
- Shared Compute: Free & Shared: – Used for developing or testing purposes, these are shared with other customers. These tiers allocate CPU quotas to each app that runs on the shared resources, and the resources cannot scale out. Also note, that these tiers have a certain number of compute minutes per day (Free: 60 CPU mins, Shared: 240 CPU mins, and cannot scale out).
- Dedicated compute: The Basic, Standard, Premium, and PremiumV2 tiers run apps on dedicated Azure VMs
- Isolated Compute: Runs on dedicated Virtual Machines in a dedicated Virtual Network
We’ll build an Azure App Service using the Linux operating system and the PHP 7.4 runtime stack. This will allow us to host the popular PHP-based CMS WordPress. Create an Azure App Service by following the steps below:
- Sign in to Azure Portal
- Wait for the portal to load and display fully. Click on
Wrench Icon -> Create Resource

3. Search for and click on App Service Plan and click on "Create"

4. Select an existing Resource Group or create a new one. Here, I gave the name as myAppPlan. You can name yours with any name you see fit for your purpose.

5. Give a unique name to the App Service Plan and choose Linux as the operating system. Choose a region. Understand that you will need the App Service Plan to create App Service

Creating App Service
To create App Service, repeat steps 1 & 2 above and then search for and click on App Service. You might see it as a Web App click on it and then click"Create"
Next, select the Resource Group to be the same as the one you chose for the App Service Plan.

As shown above, the same Resource Group used for the App Service Plan was selected. We selected Linux as the OS and the Runtime stack as PHP 7.4. Choose the Region that is geographically located to your user. Here we chose the East US location.
Next, Give a unique name to the App Service which will be accessible to your users at YourWebAppName.azurewebsites.net. Review and Create it

Change the App Service Plan SKU according to your budget and needs. You can choose B1 Basic that has support for SSL and custom domains.Allow a few minutes for the Azure App Service to be created and deployed. Once the app service has been successfully created, you will receive an alert. So you can use the Azure Portal for other things.
Scaling up/out App Service Plan
The App Service Plan shown above is Premium V2 P1v2. This is very high and will incur a higher amount of charges. So let’s see how we can scale it down to reduce cost.
To do so, click on the App Service, under the Settings blade click on Scale up (App Service Plan) and select Dev/Test, then choose B1 basic and click on Apply

Creating & Configuring MySQL Database Server on Azure
The MySQL database server is used by the WordPress CMS to store data generated in the form of Posts, Pages, and Comments, among other things. For MySQL, we’ll establish a new Azure Database.
In addition, we’ll set up our database server in such a way that it will be able to connect to all web apps hosted on Azure, and MySQL Workbench installed on our local PC should also be able to connect to the Azure Database for MySQL.
Take the steps below to create an Azure Database for MySQL:
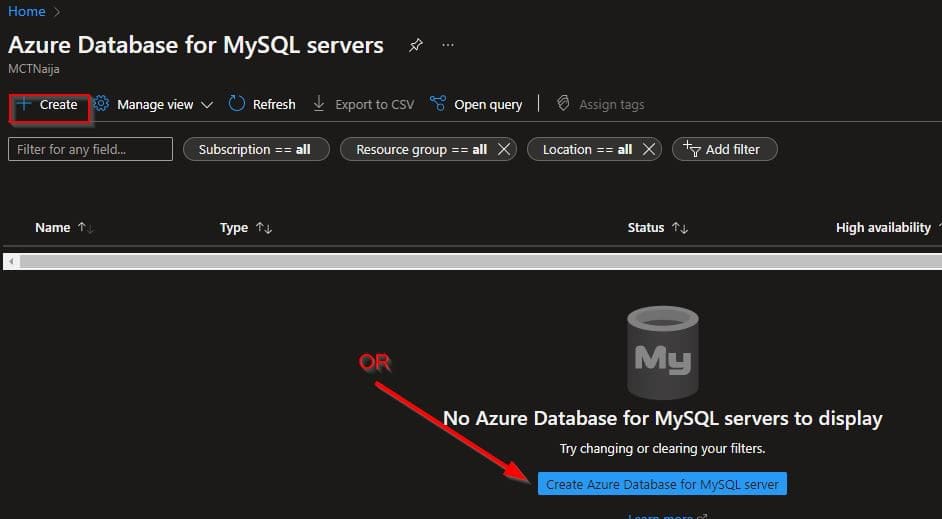
Step 1 – Type MySQL in the top-right search bar of Azure Portal, and then select the Azure Database for MySQL that appears in the Services portion of the search result.

Step 2 – Click on Add button with a + sign to create a new Azure Database for MySQL Server one or click the horizontal blue below it to create it. Select Flexible or Single server
Step 3 – On the Create MySQL server blade under Basics tab, fill in the necessary details. It is better to choose the same Resource Group as the one chosen for App Service where you want to deploy WordPress.
In case you have multiple subscriptions, choose the Subscription where you want to create the MySQL database server
Server Details
Give the server a relevant and available name. After that, you can’t modify the name of the Azure Database Server.

Check for development or hubby projects since it’s just a demo session
Choose a nearby location where the majority of your user base is located. As a result, the response time between requests from the web app to the database will be significantly reduced.
Select the MySQL server Version as 5.7Choose the Compute + storage according to your needs. Click on Configure server and explore the various available Pricing tiers.
For the purposes of the demo exercise, I’m choosing Burstable B1ms with 1 vCore, 2 GiB RAM, 20GB Storage and 360 IOPS. Uncheck the Storage Auto-growth to turn it off and click on OK

Please note that changing to and from the chosen compute and storage tier or changing the backup redundancy options after server creation is not possible.Setting up Azure Database for MySQL Administrator account
To access the Azure Database for MySQL, create an Administrator account by following the instructions below.
Provide an admin username of your choice that satisfies the Azure criteria. Some basic criteria for choosing a username are: the value must not be empty, the admin username must be at least 1 character and at most 16 characters and the admin username must only contain characters and numbers.

Enter the Password and Confirm Password that meets the conditions set by Azure for Passwords, such as the value must not be empty, the password must be at least 8 characters and at most 128 characters, and the password must contain characters from three of the following categories: – English uppercase letters, English lowercase letters, numbers (0-9), and non-alphanumeric characters (!, $, #, %, etc.).
After you’ve finished entering these details, click Review + Create. After the last validation conducted by the server creation process is successful, click Create. At this point, you will be prompted to create a server without a firewall rule or return to add a firewall rule.

If you haven’t added the firewall rules, click return to add firewall rules or create a server without firewall rules.

Note: It is recommended that you don't create a firewall rule using the above method if the server isn't meant for test or temporary useThe MySQL Server creation normally takes 6-8 minutes, and you can do other things until you receive notification of the formation status.
Configuring Azure Database for MySQL Server
Navigate to the MySQL server you just created by clicking on "Go to resource" to head to the Overview page. Under Settings, click on the Connection string.

Leave the Allow public access from any Azure service within Azure to this server checked, which is the default, if you want all Azure Services across Azure Portal to have access to this database server, including resources that aren’t in an active subscription where this server is located.
Here, I’ll uncheck it, since my web app will be part of the same database server subscription.
Enable Access to Azure Database for MySQL server to allow connections via MySQL Workbench on local PC
To use MySQL Workbench on your local PC to connect to the MySQL Database Server on Azure, still, under the setting blade of the Database Server click on Networking and click + Add current client IP address [YourPCIPAdress].
This will create a Firewall rule with the IP address of the PC / Laptop from which you want to connect to the database server using MySQL Workbench.

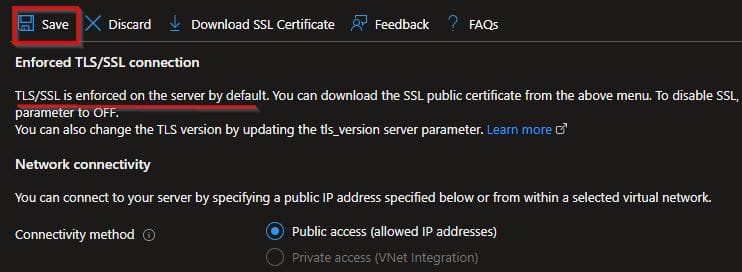
The SSL is enforced by default, leave the settings as is unless you want to turn it off for reasons best known to you. Finally, click on Save the button located at the top of the Networkingpage.
Connect Azure MySQL Database from MySQL Workbench
As stated in the prerequisite section above, by now you must have had your MySQL Workbench installed on your computer.

Open the Overview page of the MySQL database server on Azure and follow the instructions below to submit values for Connection information.
1: Open MySQL Workbench on your own computer as shown above. The MySQL Connections pop-up box will appear when you click the + symbol.

2. Supply the Connection name of your choice
3. Leave the Connection Method to default Standard (TCP/IP)
4. In the Parameters tab, supply theHostname with the value of theServer name that you specified while creating the Azure Database for MySQL on Azure.
This can be found in the Overview blade of the Azure Database Server. Use the fully qualified domain name (*.mysql.database.azure.com). For example, our server name is appservicedatabase so the FQDN is appservicedatabase.mysql.database.azure.com
5. Do not modify the port. Leave it as is to default 3306
6. Provide Username with the value labelled as Server admin login name obtained from the Azure Database server’s Overview blade. The format is username@servername. E.g. mysqldatabase@appservicedatabase is the name we supply as the username.
7. Provide a Password by clicking on Store in Vault... button and input the Password with the value given when creating an Administrator account and click on OK
8. Leave the Default Schema option empty

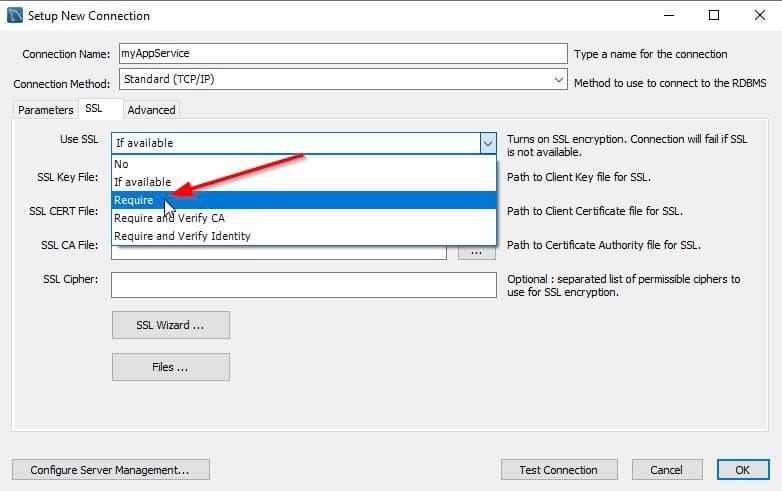
Note: If you forgot the password, go to the Overview pane of Azure database for MySQL server, locate and click Reset password and then provide Password and Confirm password and save it and provide the same in password text box of Store Password For Connection window of the MySQL Workbench Store in Vault... option9. Click on the SSL tab and for Use SSL choose Require option if you have Enforce SSL set to Enabled which could be found in Networking blade of Azure database for MySQL Server
10. Click on the button Test Connection to validate the connection from local PC MySQL Workbench to Azure Database for MySQL Server. Click on Ok

Create a database Schema for WordPress
We’ll establish a database schema for the MySQL server in Azure Database so that our WordPress website that is hosted on Azure App Service can use it. The Azure Database for MySQL allows you to create an unlimited number of databases. However, it comes at the expense of shared resources across databases.
Let’s design a schema to be consumed by the WordPress application now that we’ve connected to the Azure database for MySQL via MySQL Workbench.
1: In the Navigator pane of MySQL Workbench, locate SCHEMAS section.
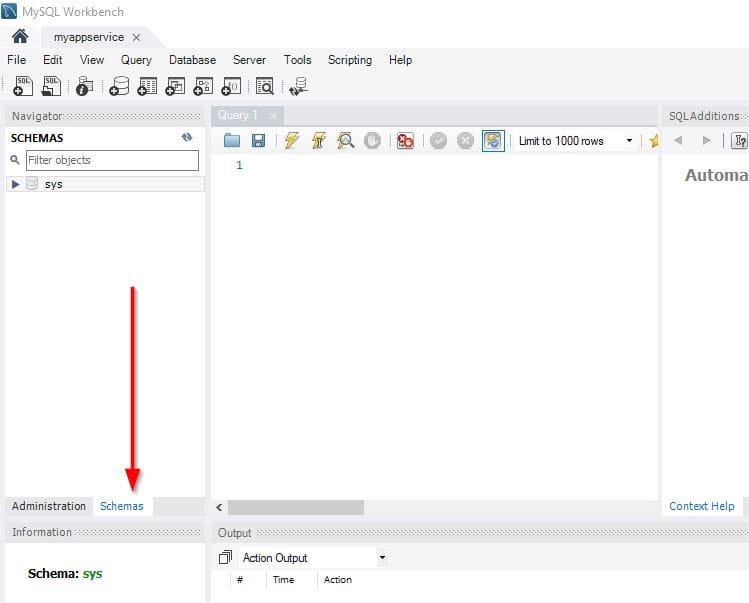
Right click on the default sys schema and click Create Schema...
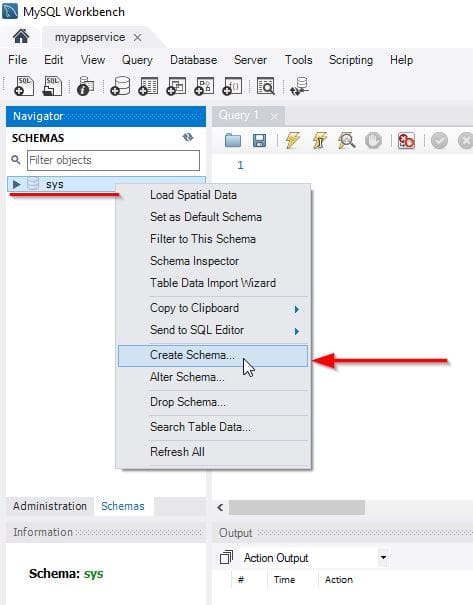
Provide a name for the new schema in the Schema creation page that appears in the main window, such as wordpress_mysqldatabase.

Click on Apply and then a pop up appears to confirm Apply SQL Script to Database.

Confirm the creation of the new schema again by clicking on Apply.

Click Finish to close out the prompt window

Now the schema has been created, ensure you save the name of the new schema you just created as it will be used when installing WordPress and the Configuration of the initial steps.
Deploy WordPress on Azure App Service (Linux)
Now Access Secure Shell (SSH) of Azure App Service. To do so, open the App Service created to deploy WordPress. Here the name of our App Service is myappservice-1.
Under Development Tools locate SSH and click on it

To launch the SSH instance connected to the App Service in a new tab, click the hyperlink Go -> in the detailed blade of SSH.

Download the latest WordPress to Azure App Service
To download the latest WordPress, run the following scripts in the Secure Shell to download the WordPress archive.
cd /home/site/wwwroot
wget -c http://WordPress.org/latest.tar.gz
tar -xzvf latest.tar.gz
mv WordPress/* /home/site/wwwroot/
rm -rf WordPress
rm -rf latest.tar.gz
The download may take a little while to complete depending on your internet speed. While that is ongoing, take a little coffee and relax
Configure WordPress Installation
Now open the App Service and look for the Browse button on the Overview blade, which will open your-web-app-name.azurewebsites.net in a new tab.

To configure our WordPress installation, follow the instructions below. Keep your database connection details, such as server name/hostname, database schema name, and credentials, such as admin user name and password, handy because this is a one-time action. In the meantime, select English (United States) and click on Continue

Click on Let's go! to continue

Now, navigate to the database connection details page and provide the following details:
Database Nameis the new database schema that we created in MySQL WorkbenchUsernamecan be found viaOverviewblade ofAzure database for MySQL serverlabelled asServer admin login name- Use the
Passwordprovided when creating the Administrator account. If you forgot your password, you can reset it from theReset passwordoption available at the top of the Overview blade ofAzure database for MySQL server Database Hostcan be located viaOverviewblade ofAzure database for MySQL serverlabelled asServer name- Leave the
Table Prefixas is, unless you want to have a custom table prefix - Click submit

You will be presented with an Error Establishing Database Connection as shown below.

TLS/SSL is enforced on the server by default. Now, head back to the MySQL Server on Azure and disable the TLS/SSL under Server Parameter.
When you’re there, search for require_secure_transport and turn it off and click Try again to continue with the configuration.

Database connection established successfully

Run the WordPress Installation
Now that the DB connection has been established, go ahead and click on Run the installation button as shown above to finish setting up your site
After you have clicked on the Run the Installation button, you will be taken to next screen where you will supply all the details, provide the necessary information by following the instruction below.
In the Site Title text box, enter a suitable name for your site

Provide a Username and Password. These are the credentials that you will use to access the WordPress Admin Dashboard which is typically available on URL your-web-app-name.azurewebsites.net/wp-admin

Enter your email and leave the option Search Engine Visibility as un-checked. Click on Install WordPress button to begin the installation.

Once the installation completes, login with Username or Email Address and Password provided during the installation of WordPress.

Once you login, you will be landed on your WordPress Admin Dashboard where yo can manage and customize your site to your test.

Configure SSL for WordPress on Azure
This can be done in two ways; that’s enabling HTTPS only Protocol On App Service and installing Really Simple SSL Plugin for WordPress
Enabling HTTPS only Protocol On App Service
To enable HTTPS only Protocol on Azure App Service, do the following:
- Navigate to App Service created on Azure Portal
- Click on
Settings->TLS/SSL Settings - Under
Protocol Settingstoggle theHTTPS onlyflag toOn

Installing Really Simple SSL Plugin for WordPress
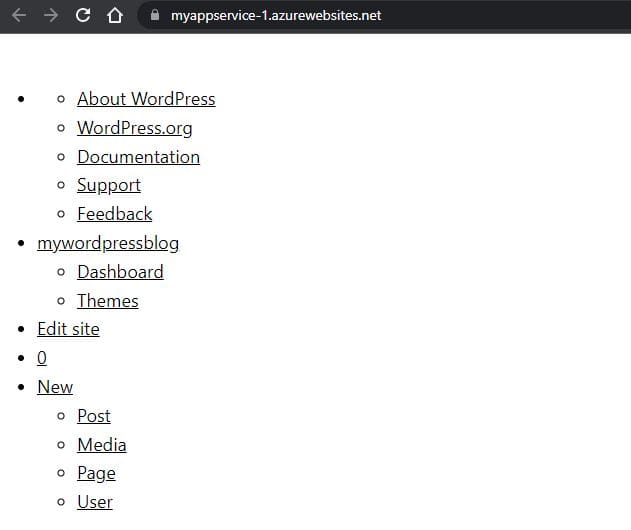
You will have problems browsing the WordPress installation once you enable HTTPS only protocol on Azure App Service, hence it is recommended that you login to the WordPress Admin Dashboard using modern browserlike Google Chrome or Firefox. The site will be badly rendered as shown below.
To correct this, click on Not secure text in the URL bar of your browser and click on Site settings, a new browser windows opens up.

While on the new browser window, locate Insecure content under Privacy and Security settings and select Allow from the drop-down list of options.

Next, refresh your site to get gain access to the Admin Dashboard.

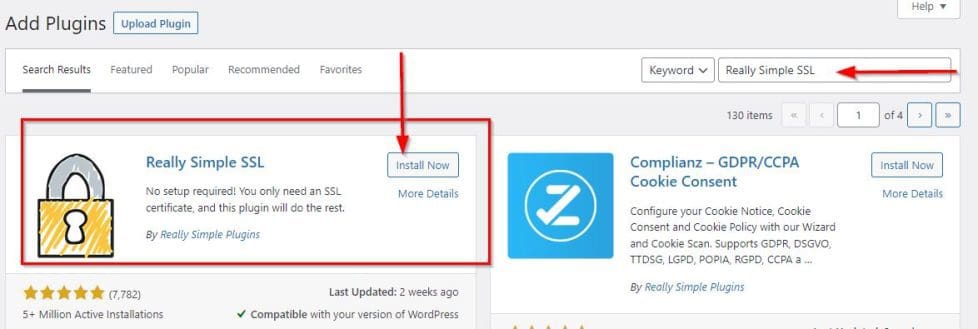
In WordPress admin dashboard, perform the following steps to install Really Simple SSL plugin. Go to Plugins, click Add new.

Search for and install Really Simple SSL plugin in the horizontal keyword search bar
After the installation and activation of the plugin, go tosettings of the Really Simple SSL plugin

Toggle the Enable WordPress 301 redirect to On

Now, browse to your site to see that the connection is secure. Look to see the padlock 🔒 icon URL bar of your browser.

Point Azure App Service to a Custom Domain
You can add a custom domain to you WordPress Site to make it more unique. That’s instead of having the URL of your site as https://your-site.azurewebsites.net/, you will have it as https://yourdomain.com.
Adding or mapping a custom domain to your App Service is very simple. Follow the steps below to do it:
1: To do this, you must have your domain registered with either Godaddy or any other domain registration of your choice.
2: Copy the App service ID, IP Address and the URL of to your App Service into a text Editor by going to the App Service setting blade and locating Custom domains.

3. Go to your domain provider website and open your DNS records – If you want to use the root domain such as yourdomain.com then create an A record, if you want to use a subdomain such as www.yordomain.com, then create a CNAME record.
4. In the name column, type @ which means the name of your app service and type in the IP Address of your app in the value field.
5. Under the CNAME column, set the details to www and set the URL under the value field to the existing URL of your App service e.g., yourdomain.com and click save.
6. Set a TXT record for each of them – A txt record is just an informational record. It doesn’t affect the resolution of your domain name
Adding a txt record
To add a txt record, do the following:
- Set the name to
asuid– App Service Unique Identifier under the Name field and set the value to the custom domain verification ID you copied from App Service - For the subdomain, set the name column to asuid.www and paste in the same custom domain verification ID
- Now head back to the App Service page, and click on Add custom domain, enter the custom domain name you just configured and click on validate. Azure will check for the DNS record that you have added. If it works, your app will become accessible using the custom domain name.

To successfully add a custom domain to your app, you must have some basic understanding of Domain Name System (DNS)Congrats, you have just successfully deployed WordPress on Azure App Service by creating App Service Plan, App Service Linux, MySQL Database Server, access Secure Shell SSH, deploy WordPress connect Azure MySQL Database from MySQL WorkBench, create a Database for WordPress Application, configure WordPress Installation, Scale Up/Out App Service Plan, configure SSL for WordPress on Azure and add a custom domain to your WordPress Website.
Now it’s time to clean up all the resources by deleting the Resource Group. I hope you found this blog post helpful. If you have any questions, please let me know in the comment session.