

We’ll go through how to create Desktop Stickers in Windows 11, as well as how to use them on your desktop. Introducing Windows Stickers: Among the visual enhancements that Windows 11 offers, the upcoming 22H2 update is set to bring further visual improvements and bug fixes. Please see Fix Hyper-V VM Stuck in Stopping State, MDT deployment failed and Stuck at Command Prompt: Windows installation does not proceed via PXE boot, and how to get the Windows 10 Version 22H2 Update.
A recently unveiled feature is the addition of desktop stickers. This playful and experimental functionality enables you to adorn your current desktop background with creative stickers. While it’s initially deactivated, a simple Registry tweak can activate this feature, offering a personalized touch to your desktop experience.
It’s rare for an operating system to have Windows stickers, which are often seen in instant messaging and chat apps. However, if you want to further customize your desktop, you should give it a try.
Here are other related guides you should see: How to Clear Cache in Windows 11, How to Make the Default System Icons Visible on Windows 11 Desktop Environment, and How to disable Ads in Windows 11.
Requirements to Use Stickers in Windows 11
The stickers feature is included in the Windows 11 22H2 release. At the time of writing, this build is only available in the Windows Insider program’s Beta and Dev channels. To use the stickers, you must download the most recent Insider build.
However, Microsoft intends to make the build available to PCs globally. So, if your PC has this update, you can unlock stickers using the Registry editor.
Also, see how to install Windows Subsystem for Android (WSA) in Windows 11, and how to fix “An error has occurred in the script on this page: HTA applications report a Script error after upgrading to ADK for Windows 11, version 22H2“
How to Enable Windows Stickers on Windows 11
To enable desktop stickers in Windows 11, follow the steps below:
To check that you are running Windows 11 build 22H2, press Windows key + R to open the Run dialog and type winverand click “OK.”

A screen will appear displaying the version of Windows you are using. If your version is 22H2, you can proceed.

Next, press the Windows Key + R keyboard shortcut to open the Run dialog. Enter regedit and press OK.

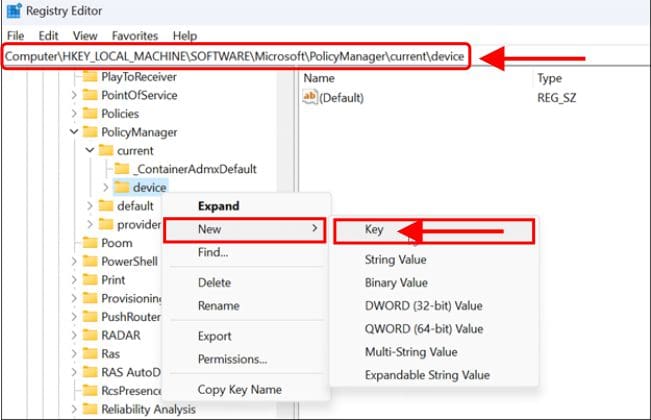
When the Registry Editor opens, go to the following location:
HKEY LOCAL MACHINE\SOFTWARE\Microsoft\PolicyManager\current\device
Right-click the device key and select New > Key from the option menu, then name the new key Windows stickers and press Enter.
Right-click the newly created Stickers key and choose New > DWORD (32-bit) Value.

Name the new DWORD (32-bit) value “EnableStickers”.

Change its value from 0 to 1 and click OK to save.

When complete, close out of the Registry Editor and restart Windows 11.
Also, see how to Fix Windows Stuck on System Restore, and Fix “Getting Windows Ready” Don’t turn off your computer stuck on Windows.
How to Use Windows stickers on Windows 11
Once you get back from the restart, you can begin using the desktop sticker features.
To use Windows stickers on Windows 11, right-click an empty area on the desktop and select Add or edit stickers.

The option brings up the Stickers picker user interface. You can select from several different stickers to add to the desktop. You can scroll through other options or search for specific types of Windows stickers.

Once you select a sticker, it adds it to the desktop where you can resize it and move it around to different locations. To remove the sticker, click the trash bin icon.
After you add Windows stickers, they’ll display behind your desktop icons like they’re part of the wallpaper.
You can also navigate to Start > Settings > Personalization > Background to add stickers when using the Picture option.

Conclusion
It is crucial to note that Windows stickers are currently an experimental feature in Windows 11. As a result, the feature does not always work as intended.
When you add stickers, your desktop icons and taskbar do not appear while you are selecting stickers. If you have any issues, a fast restart should fix them.
It’s unclear whether Microsoft will make this a permanent feature in Windows 11, but you can play with it for the time being.
I hope you found this guide useful on How to create Desktop Stickers in Windows 11. Please feel free to leave a comment below.