

The AWS Management Command Line Interface (AWS CLI) is a centralized management tool for AWS Management. You can control multiple AWS services from the command line and automate them using scripts with just one tool to download and configure. Amazon Web Services (AWS) is the market leader and a leading innovator in cloud computing. In this article, we shall learn how to Access AWS Management Console and Create Resources with AWS CLI on Windows. Please see how to sync S3 Bucket with an EC2 instance.
It assists businesses with a wide range of workloads, including game development, data processing, warehousing, archive, development, and many others. However, AWS is more than just an eye-catching browser console. It’s time to take a look at how you can access the AWS Management Console and create your favorite resources via Amazon’s Command Line Interface—AWS CLI.
As a tool that combines all AWS Management into a single central console, allowing you to control multiple AWS services with a single tool, it gives you the opportunity to manually control services or automate them with powerful scripts. The acronym signifies Amazon Web Services Command Line Interface. Users interact through the command line.
The AWS CLI empowers you to utilize command shell programs—bash, tsch, zsh—for executing commands on various OS. For Windows, you can operate in PowerShell or the command prompt. Amazon EC2 commands can also be managed remotely using tools like PuTTY or SSH. AWS Management can even be used to automate operational tasks across AWS resources.
What we will cover AWS Management:
In the articles, we will cover the following areas:
- How to create an IAM User on the AWS Management Console and set the login option to programmatic method only.
- How to install AWS CLI on Windows and add it to the system path.
- How to programmatically used IAM User credentials via AWS CLI
- How to create an S3 Bucket via AWS CLI
To learn more about the AWS CLI, feel free to check out the following related articles: AWS Command-Line Interface: How to configure AWS CLI [Part 1], Understanding AWS CLI: How to configure Command Line Interface [Part 2], and AWS CLI Error: All commands return Unknown output type [None].
Create an IAM User
To create an IAM User, take the following steps:
Step 1 – The user with permission logs into the AWS Management Console to create another user. It could be a Root User or an ordinary IAM user with the required permission.

Step 2 – Search for and click on IAM, and then click on Users.

Step 3 – Click on Add Users

Step 4 – In the add user interface, supply the user name. In the “Select AWS credential type” field, select “Access key – Programmatic access“. This means that this user cannot log into the AWS Management Console with a username and password.

Step 5 – In the Add User to Group screen, jump to the attach existing policies directly tab.
Note: For the purpose of this article, we don't set permission boundary. In real-world scenarios you have to as this will ensure maximum compliance with security best practices put in place by the AWS.In the set permission tab, keeping the attach existing policies directly blade selected, check the box beside AdministratorAccess. Note, that this will grant the user an administrator access.

Step 6 – Ignore the tag section and move straight to review and create user.
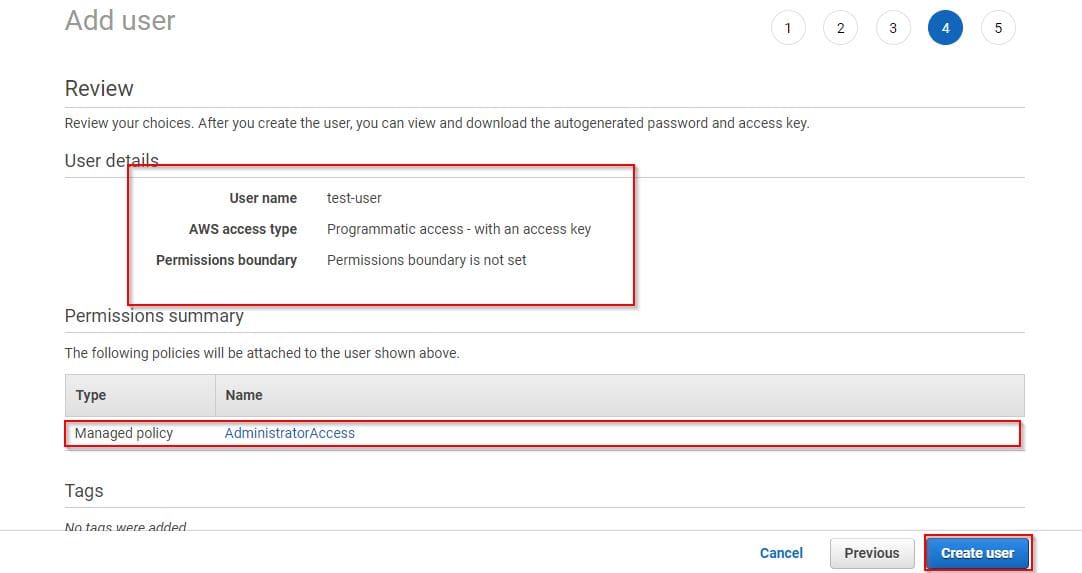
Step 7 – After successfully creating the user, download the Access key ID and Secret Access key in CSV format to your PC, then close the window.
Note: AWS doesn't keep a copy of your Access key ID and the Secret Access key. Therefore, if you fail to download it, the user will not be able to log into the AWS Management console and there is no way to recover it if lost. The only solution is to delete and regenerate a new key.
Installing the AWS CLI in Windows
To install AWS CLI on Windows, you need to have the admin right to install the software. Follow the steps below to install it.
Step 1 – Download and run the AWS CLI MSI installer for Windows (64-bit) or run the command below in your Command Prompt window to run the MSI installer.
msiexec.exe /i https://awscli.amazonaws.com/AWSCLIV2.msi
Step 2 – The installation wizard will take a little while to bring up the page where you will click next to continue.

Step 3 – Accept End-User License Agreement and click next to continue.

Step 4 – In the custom setup page, leave everything at default and take note of the default path. Click next to go to the next phase

Step 5 – Click “Install,” then observe the installation progress. Click “Finish” once the progress bar loads fully.


Also, see How to manage and use Amazon S3 access points using the AWS Management Console, and How to uninstall AWS CLI in Windows.
Adding the AWS Management CLI to the System Path
Adding the AWS CLI to the system path will make it available to you anywhere in the system. To do so, follow the steps below:
Step 1 – Search for System Environment in the Windows search bar. You may likely encounter an error similar to the one below if you don’t add it to the system path.
'aws' is not recognized as an internal or external command, operable program or batch file.
Step 2 – Click to open the system environment and then, click on Environment variables -> Path -> Edit

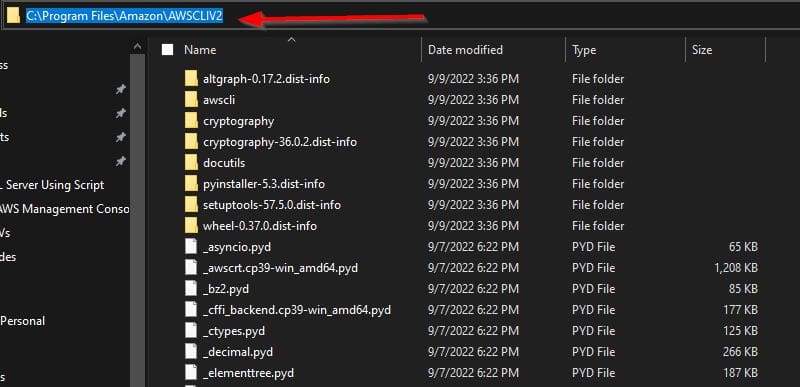
Step 3 – Locate and copy the path as C:\Program Files\Amazon\AWSCLIV2 in your local drive.
Step 4 – In the "Edit Environment variables" windows, click New -> Past the path copied above and click Okay.

Step 5 – Restart your windows command prompt and check by typing aws or aws --version to see if it’s now been recognized.

Accessing the AWS Management Console Programmatically
The next section in this writeup is to use the access key id and the secret key id to programmatically gain access to the AWS Management Console.
AWS Access Key ID
There are two ways in which a user can access the AWS Management Control. One is through the use of username and password and the second one is the programmatic access which is the focus of this writeup. The AWS Access Key ID consists of a 20-character uppercase alphanumeric combination.
They can be created for any IAM User who requires programmatic authentication to the AWS services. And once created, you’ll only need to download them once.
It is not possible to retrieve lost secret access keys as AWS does not retain copies of your it for security reasons to prevent them from being compromised by unauthorized persons. The access key must be applied and associated with the system or app that you require for development purposes.
Configure the Credentials and Default Preferences
Before we can use the access keys, we need to configure the credentials and default preferences we will like to use which will grant us access to the AWS Management Console with administrative permission attached to the IAM User named test-user. To do this follow the step below:
Step 1 – Launch your Windows Command Prompt and type:
aws configureAfter pressing Enter, the system will prompt you to provide the access key ID, secret access keys, default region, and default output format. The available output formats include text, JSON, YAML, and Table. In this write-up, we are choosing text as the output format.

Now that we have configured access, it’s time to interact with AWS resources via AWS CLI.
Please see AWS CLI in Windows: Uninstallation Guide, How to grant public access to S3 Bucket using Policy, and how to sync S3 Bucket with an EC2 instance.
Creating and Interacting with AWS Resources via AWS CLI
To showcase the capabilities of AWS CLI, we will craft and engage with an AWS S3 Bucket. Firstly, we will list the available Buckets in the account and then proceed to create one. Run:
aws s3 ls
As you can see, we currently do not have any Bucket. To create an S3 Bucket via the command line, type:
aws s3 mb s3://techdirectarchivebucket1Replace the name of the bucket with any name suitable for you.

In the command above, the S3 means the AWS resources we are creating while the mb means make bucketLet’s attempt to upload a file to the Bucket we just created. We have a file on our Desktop named techdirectfile.txt
$aws s3 cp C:\filepath\techdirectfile s3://techdirectarchivebucket1
If we go to the AWS Management Console, the uploaded file should show up in the Bucket

Similarly, with a minor modification, we can use the same CLI script to upload all files from the folder (source) to the destination S3 bucket. For uploading multiple files at once, we add the --recursive parameter:
$aws s3 cp S3bucketfiles s3://techdirectarchivebucket1 --recursiveWe have created a folder on our Desktop called S3bucketfiles and created 4 .txt files inside it.

Now the output screen should look similar to the one below:

Check to confirm that the files are available in your S3 Bucket

Delete the bucket using:
aws s3 rb s3://techdirectarchivebucket1Note: You can’t delete Bucket with files inside it. Empty it before deletion.


I hope you found this article useful on how to Access AWS Management Console and Create Resources with AWS CLI on Windows. Please feel free to leave a comment below.