Skip to content

TechDirectArchive

Hands-on IT, Cloud, Security & DevOps Insights

  • Home
  • About
  • Advertise With US
  • Reviews
  • Contact
  • Toggle search form
Home » Linux » How to install a software package from source file in Linux
  • Burn ISO on MAC   Proxmox installation
    Create a bootable USB on Mac: Proxmox VE Setup Virtualization
  • maxresdefault 2
    AWS CodeCommit: A Guide to Efficient Usage Version Control System
  • disableautomaticoffload
    How to Disable Automatic Offloading of Apps on iPhones Mac
  • virtualbox guest additions rcm480x270u
    How to install virtual machine Guest Addition Virtualization
  • Root
    Change your root password: Manage the root user on your macOS Mac
  • File Share in Windows
    Create Folders and Enable File sharing on Windows Windows Server
  • feature photo terraform
    How to install Amazon RDS using Terraform Linux
  • Edge browser
    Enable or disable Microsoft Edge from showing Web Content Windows

How to install a software package from source file in Linux

Posted on 14/11/202107/12/2023 Raphael Gab-Momoh By Raphael Gab-Momoh No Comments on How to install a software package from source file in Linux
how-to-install-software-packages-from-source-files-

A source file is a file that is written in the C programming language. In this post, I will be pointing you to the steps to take to be able to use software downloaded from a source file. Although we might not run into situations where we work with source files. But just in case you have to, with this post you should know what to do. Learn how to install a software package from a source file in Linux. Please see “There has been a critical error on this website please check your site admin email inbox for instructions“, and how to fix “Failed to remove network for the build, Job failed error: Invalid volume specification: “/cache”.

Kindly refer to some of my previous guides are available in the links:

The data that is taken from the source system before it is translated to the Common Data Format is stored in source files. The data in source files is usually in its raw form. The data can be separated into any number and kind of files, based on how it is stored in the source system. Source files, for example, might be structured in a star schema, with some files carrying business facts and others containing business dimensions

Steps to Installing Software Package From Source File

Typically users of open-source software would download from a place like sourceforge. So after downloading the file, what next? How do you make sense of it or how does it sitting in your download folder become of any value.

Obtain the Source File in Linux

The first thing to do would be to extract the file. for the purpose of demonstration. I have downloaded nmapsi so, you can also download and follow along. We will use the command shown below to extract it.

Before extracting make sure you are in the directory where the downloaded software is located. So the next thing to do is a cd into the download directory, then after that, we extract.

tar xvf < name >
How to install a software package from a source file in Linux-extract
decompressed file nmap

Extract Code for Source File

The next thing to do would be to look into the folder and check for the README.txt for any instructions on what to do and also the Make file. In our case, it’s a README.md

How to install a software package from a source file in Linux-cmake
contents of decompressed file

checking the README.md file

How to install a software package from a source file in Linux-README.md_
readme

The file is showing instructions for what needs to be done for the creating of the binary. Typically we are been shown the dependencies that the file needs for us to run before we can use the source file

So let's download another program called Pascal and see what's inside.

If we cd into the downloads directory, we will see that there is a file called pc-3.2.0-x86_64-linux.tar that we just downloaded. Now, we are to decompress the file to see what’s inside it with the format as shown below.

#tar xvf <name of file 

X is for extract, V for verbose, and File is file. Since we downloaded pc-3.2.0-x86_64-linux.tar, the format will be as shown below

#tar xvf pc-3.2.0-x86_64-linux.tar.

We can choose to decompress the file elsewhere by adding the -C option and the place you want to place the decompressed materials

#tar xvf pc-3.2.0-x86_64-linux -C /temp

tar xvf pc-3.2.0-x86_64-linux -C /temp. The decompressed materials will be sent to the temp directory

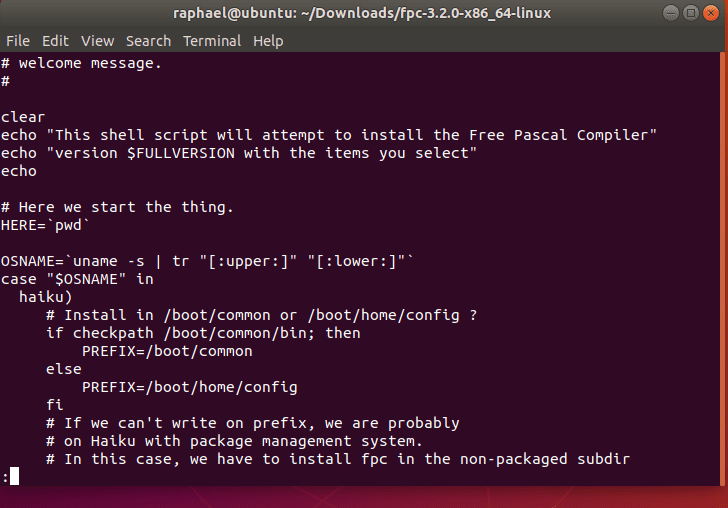
Check below for the decompressed file. If we cd into the decompressed tar xvf pc-3.2.0-x86_64-linux file as shown below, we will see that there are a number of files including a script, so we need to run the script.

less2
contents of the decompressed file

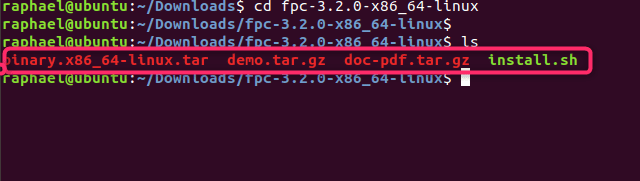
So the first thing to do is to view any accompanying document, so we need to uncompress doc-pdf.tar.gz

documents
documents in decompressed file

Install the Software Package From the Source File

We then need to view them to see if we need any information to help us run the program. Other than this, the only thing we need to do again is to run any other program in the decompressed file.

cdocment
doc in compressed file

Content of the script in the download folder

content-of-script
script installation instruction in the command ” less install.sh”

Summary

Congratulations! You’ve successfully installed a software package from a source file in Linux. In summary, we might not be able to directly run a source linux package directly out of the box the same way we would with exe files.

So we will do is to decompress the file. Check the file and its content for any further instructions; most of the time, we will have to deal with dependencies before we will finally be able to run the program.

I hope you found this article useful on how to install a software package from source file in Linux. Please feel free to leave a comment below.

Rate this post

Thank you for reading this post. Kindly share it with others.

  • Share on X (Opens in new window) X
  • Share on Reddit (Opens in new window) Reddit
  • Share on LinkedIn (Opens in new window) LinkedIn
  • Share on Facebook (Opens in new window) Facebook
  • Share on Pinterest (Opens in new window) Pinterest
  • Share on Tumblr (Opens in new window) Tumblr
  • Share on Telegram (Opens in new window) Telegram
  • Share on WhatsApp (Opens in new window) WhatsApp
  • Share on Pocket (Opens in new window) Pocket
  • Share on Mastodon (Opens in new window) Mastodon
  • Share on Bluesky (Opens in new window) Bluesky
  • Share on Threads (Opens in new window) Threads
  • Share on Nextdoor (Opens in new window) Nextdoor
Linux Tags:Linux distro

Post navigation

Previous Post: Fix LDAP Connection Error 81: Cannot open connection via the ldp.exe tool
Next Post: Block Upgrade to Windows 11 via Group Policy or Registry

Related Posts

  • Generate SSH Keys
    Associate SSH Public key with Azure Linux VM AWS/Azure/OpenShift
  • greywireshark
    How to install WireShark on a Linux Ubuntu System Linux
  • Screenshot 2020 06 30 at 18.04.49
    How to install and configure Jitsi video conferencing server on Ubuntu Linux
  • Webp.net resizeimage 1
    Automate Infrastructure Deployments in the Cloud with Ansible and Azure Pipelines AWS/Azure/OpenShift
  • Rport
    RPORT the free and open source remote management tool Linux
  • 2FA For SSH in Linux
    Set Two-Factor Authentication for SSH in Linux Linux

More Related Articles

Generate SSH Keys Associate SSH Public key with Azure Linux VM AWS/Azure/OpenShift
greywireshark How to install WireShark on a Linux Ubuntu System Linux
Screenshot 2020 06 30 at 18.04.49 How to install and configure Jitsi video conferencing server on Ubuntu Linux
Webp.net resizeimage 1 Automate Infrastructure Deployments in the Cloud with Ansible and Azure Pipelines AWS/Azure/OpenShift
Rport RPORT the free and open source remote management tool Linux
2FA For SSH in Linux Set Two-Factor Authentication for SSH in Linux Linux

Leave a Reply Cancel reply

You must be logged in to post a comment.

Microsoft MVP

VEEAMLEGEND

vexpert-badge-stars-5

Virtual Background

GoogleNews

Categories

veeaam100

sysadmin top30a

  • Burn ISO on MAC   Proxmox installation
    Create a bootable USB on Mac: Proxmox VE Setup Virtualization
  • maxresdefault 2
    AWS CodeCommit: A Guide to Efficient Usage Version Control System
  • disableautomaticoffload
    How to Disable Automatic Offloading of Apps on iPhones Mac
  • virtualbox guest additions rcm480x270u
    How to install virtual machine Guest Addition Virtualization
  • Root
    Change your root password: Manage the root user on your macOS Mac
  • File Share in Windows
    Create Folders and Enable File sharing on Windows Windows Server
  • feature photo terraform
    How to install Amazon RDS using Terraform Linux
  • Edge browser
    Enable or disable Microsoft Edge from showing Web Content Windows

Subscribe to Blog via Email

Enter your email address to subscribe to this blog and receive notifications of new posts by email.

Join 1,832 other subscribers
  • RSS - Posts
  • RSS - Comments
  • About
  • Authors
  • Write for us
  • Advertise with us
  • General Terms and Conditions
  • Privacy policy
  • Feedly
  • Telegram
  • Youtube
  • Facebook
  • Instagram
  • LinkedIn
  • Tumblr
  • Pinterest
  • Twitter
  • mastodon

Tags

AWS Azure Bitlocker Microsoft Windows PowerShell WDS Windows 10 Windows 11 Windows Deployment Services Windows Server 2016

Copyright © 2025 TechDirectArchive


Loading Comments...
 

You must be logged in to post a comment.