Skip to content

TechDirectArchive

Hands-on IT, Cloud, Security, Veeam & DevOps

  • Home
  • About
  • Advertise With US
  • Reviews
  • Contact
  • Toggle search form

How to install Googler on a Linux System

Posted on 31/10/202215/08/2026 Raphael Gab-Momoh By Raphael Gab-Momoh No Comments on How to install Googler on a Linux System
  1. Home /
  2. Linux /
  3. How to install Googler on a Linux System
Gfeature

The Googler command-line utility is used to open various movies, navigate to various URLs, and also to browse news. It is a robust open-source tool for performing Google searches, Googler is also Python-reliant, so before downloading it, check sure Python is up to date on your operating system. In this article, we shall be looking at how to install Googler on your Linux machine.

Find other useful articles here: How to Install and use Minikube on a Linux System and How to launch a free WordPress test site with TasteWP? and How to Perform Load Test on Mobile App using Apache JMeter installed on your Windows System also How to install Redis on a Linux System

Prerequisites for installing Googler on Linux

The following prerequisites are required in order to install Googler on Linux.

  1. A Linux machine especially Ubuntu ( the commands will work on any version from 18 and higher)
  2. Command line
  3. A user account with Sudo privileges.

Please also see How to use the Widgets feature on Windows 11, how to set a browser as default in Windows, and how To Install Google Cloud SDK on a Linux System.

Approach 1: Installation using the default repository

Ubuntu’s default repository contains the Googler package; to verify this, we will use the command to see if the package is present there.

apt show googler
googler-show
googler show

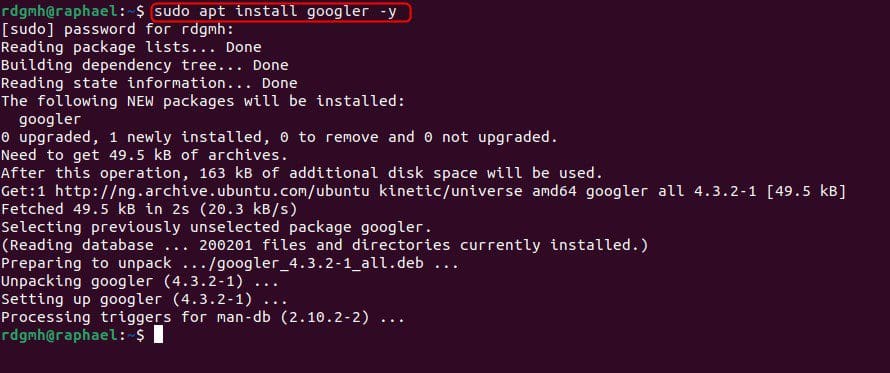
The information about the Googler package that is now available has been displayed; now, we will use the apt package manager to install the package:

sudo apt install googler -y
apt-install-g
apt install googler

Use the following command to check the installed version of Googler:

googler --version
gversion
Googler version

Using the command: once you install the package, we will use Googler to search for “clear.” or even “hello world”

googler clear
googler-clear
search result for the word “clear”

Use the following command to access the Googler manual to learn more about how to use Googler:

man googler
man-g
man googler

Use the following command to delete Googler from Ubuntu:

 sudo apt purge googler -y
delete-1
delete

Please also see how to make Cortana use your default web browser such as Google Chrome, and how to set a browser as default on macOS.

Approach 2: Install from Snapcraft

Googler can also be installed on Ubuntu by downloading the package as a snap from the Snapcraft store. We’ll use the following command to achieve this:

 sudo snap install googler
googler-1
installed from snap store

Using the snap utility, delete Googler:

sudo snap remove googler

Running the command successfully removed googler

googler-2

Summary: How to install Googler on a Linux System

Googler is Google’s command-line utility for searching for websites as well as browsing videos and news. You can learn how t install and use googler by following the steps laid out in the article.

I hope you found this blog post helpful on how to install Googler on a Linux System. Please let me know in the comment session if you have any questions.

Thank you for reading this post. Kindly share it with others.

  • Share on X (Opens in new window) X
  • Share on Reddit (Opens in new window) Reddit
  • Share on LinkedIn (Opens in new window) LinkedIn
  • Share on Facebook (Opens in new window) Facebook
  • Share on Pinterest (Opens in new window) Pinterest
  • Share on Tumblr (Opens in new window) Tumblr
  • Share on Telegram (Opens in new window) Telegram
  • Share on WhatsApp (Opens in new window) WhatsApp
  • Share on Mastodon (Opens in new window) Mastodon
  • Share on Bluesky (Opens in new window) Bluesky
Linux

Post navigation

Previous Post: Useful Tutorial on CBackup Software
Next Post: Find BIOS Serial Number and System Information on Windows 11

Related Posts

  • selinux in production
    How to locate directory file context and restore it with SELinux Linux
  • screenshot 2020 04 23 at 00.30.09
    How to mount a USB Drive in Linux Linux
  • sdfdghjk
    How to fix “Job for Mattermost service failed” error Linux
  • APACHECASS FEATURE
    How to Install and Configure Apache Cassandra on Linux Server Linux
  • feature image
    How to Configure Advanced PAM in Linux Linux
  • finalelastic
    How to Install and Configure Elasticsearch on Linux  Linux

More Related Articles

selinux in production How to locate directory file context and restore it with SELinux Linux
screenshot 2020 04 23 at 00.30.09 How to mount a USB Drive in Linux Linux
sdfdghjk How to fix “Job for Mattermost service failed” error Linux
APACHECASS FEATURE How to Install and Configure Apache Cassandra on Linux Server Linux
feature image How to Configure Advanced PAM in Linux Linux
finalelastic How to Install and Configure Elasticsearch on Linux  Linux

Leave a Reply Cancel reply

You must be logged in to post a comment.

Microsoft MVP

VEEAMLEGEND

vexpert-badge-stars-5

Virtual Background

GoogleNews

Categories

veeaam100

Veeam Vanguard

  • images 1
    How to Monitor Windows Hosts via Nagios Network | Monitoring
  • powershell commands lede 1024x276 1
    Enable WinRM on Windows Servers and Windows PCs Scripts
  • MachineAccountQuota
    Change the number of MachineAccountQuota a user can add to AD Windows Server
  • sql 1
    Editions of MSSQL Server: What are the differences between various Editions of Microsoft SQL Server Oracle/MSSQL/MySQL
  • Screenshot 2024 02 09 at 1.06.54 PM
    Programmatically Deploying App Service Resources in Azure AWS/Azure/OpenShift
  • image 10
    Change Visual Studio Code UI language JIRA|Confluence|Apps
  • screenshot 2020 04 06 at 04.12.00
    How to install and Configure Pleasant Reset Password Virtualization
  • How to fix Windows Update Fails with Error 0x80092004
    How to fix Windows Update Fails with Error 0x80092004 Windows

Subscribe to Blog via Email

Enter your email address to subscribe to this blog and receive notifications of new posts by email.

Join 1,762 other subscribers
  • RSS - Posts
  • RSS - Comments
  • About
  • Authors
  • Write for us
  • Contact
  • Advertise with us
  • General Terms and Conditions
  • Privacy policy
  • Feedly
  • Telegram
  • Youtube
  • Facebook
  • Instagram
  • LinkedIn
  • Tumblr
  • Pinterest
  • Twitter
  • mastodon
  • Bsky

Tags

Active Directory Azure Bitlocker Microsoft Windows PowerShell WDS Windows 10 Windows 11 Windows Deployment Services Windows Server 2016

Copyright © 2026 TechDirectArchive

Loading Comments...

You must be logged in to post a comment.