Skip to content

TechDirectArchive

Hands-on IT, Cloud, Security & DevOps Insights

  • Home
  • About
  • Advertise With US
  • Reviews
  • Contact
  • Toggle search form
Home » Windows » How to restore quarantined files in Microsoft Defender Antivirus
  • hero activedirectory
    How to move a computer object from one container (OU) to another Windows Server
  • Microsoft 365 Developer Program instant
    Get your free Microsoft 365 E5 Sandbox today AWS/Azure/OpenShift
  • banner 3
    How to Set Network Adapter Priority on Windows 11 Network | Monitoring
  • Credential Sync acrosss devices
    How to sync your passwords across iOS and Mac devices Mac
  • Interactive logon Message for Users
    Display interactive logon messages for Windows PCs via GPO Windows
  • Norton AV
    Enable or disable Norton silent mode on Mac Anti-Virus Solution
  • Webp.net resizeimage 5
    How to create a Traffic Manager Profile in Azure AWS/Azure/OpenShift
  • Windows 10 new Start menu
    Make Cortana search with a different web browser instead of Edge Windows

How to restore quarantined files in Microsoft Defender Antivirus

Posted on 25/07/202211/08/2023 Matthew By Matthew No Comments on How to restore quarantined files in Microsoft Defender Antivirus

Learn how to restore quarantined files after encountering false positives or malware issues with Microsoft Defender Antivirus. Malicious documents or infected executables can disrupt your system.

Featured-image-8
Windows Security threat flag

Ensuring computer users’ safety and preserving PC health, antivirus software diligently thwarts potential threats, aiming to neutralize them proactively. Occasionally, this vigilance may lead to unintended file losses, prompting the need to know ‘How to restore quarantined files.’ Additionally, antiviral tools can produce false positives, triggered by factors such as digital signature mismatches, revocation, or expiration.

There are several forms of viruses that can infiltrate and deactivate our devices’ built-in antivirus software. In a situation like this, you can use the built-in Windows Security Offline feature designed to help remove tough viruses, see How to find and remove Malware with Microsoft Defender Offline to learn more.

So how can you restore files quarantined by Microsoft Defender antivirus, and how can you reduce the number of future incidents?

Here are other related guides: How to find and remove Malware with Microsoft Defender Offline, How to turn on Windows 10 Tamper Protection for Microsoft Defender, Microsoft Endpoint Manager: How to manage Microsoft Defender Antivirus with Group Policy and Microsoft Malware Protection via the Command Line Utility, and Smart App Control and how to enable Phishing Protection: Windows 11 New Security Features.

In this informative guide, we’ll explore How to restore quarantined files using Microsoft Defender. Plus, discover the savvy trick of adding files to the Exclusion list to safeguard them from quarantine, all in the context of Windows 11 (though equally effective on Windows 10).

View and restore quarantined files in Microsoft Defender Antivirus

Windows Security always quarantines any suspicious file before deleting it, briefly outlining the nature of the probable threat and the potential threat level that threat may pose.

By default, the virus storage in Windows Security is located under the following path: C:\ProgramData\Microsoft\Windows Defender\Quarantine. However, we advise that you only interact with them through the Windows Security interface since it is far more reliable.

Unlock the secret to recovering your system’s safety! Embrace the power of How to restore quarantined files. Begin by invoking the magic with a press of the Windows key + I key combo, revealing the Settings menu. Navigate to Privacy and Security, and there, on the right side, lies the key to your digital fortress—select the Windows Security item.

file recovery
Windows Settings

Under Windows Security, select the Open Windows Security option.

antivirus quarantine
Opening Windows Security in Settings

In the Windows Security click Virus and Threat Protection.

restore deleted files
Windows Security

Under Current threats click Protection history. Here you can see the complete list of available and eliminated threats that Windows Defender placed in quarantine. Quarantined items are absolutely harmless while they’re held in quarantine.

Microsoft Defender
Opening Protection history

If you are certain a quarantined file is not a threat, and you want to restore it. In the list of all recent items, filter on Quarantined Items. Select an item you want to keep, and take an action, such as restore.

Restore file from quarantine using Command Prompt

You can roll back and remove a file from quarantine if you’ve determined that it’s clean after an investigation. Run the following command on each device where the file was quarantined.

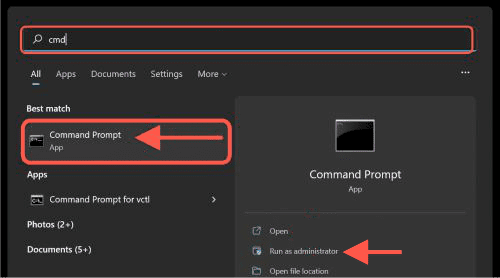
Go to Start and type cmd. Then right-click Command prompt and select Run as administrator.

file recovery
Opening command prompt in Start

Enter the following command, and press Enter:

"%ProgramFiles%\Windows Defender\MpCmdRun.exe" -Restore -Name EUS:Win32/CustomEnterpriseBlock -All
antivirus quarantine
Command Prompt

How to add files to Exclusions

Imagine you’re eager to know how to restore quarantined files when you’re certain a specific file is harmless. Here’s the trick: manually tackle false positive detections by adding the file to the exclusions list, preventing future removal by Windows Security.

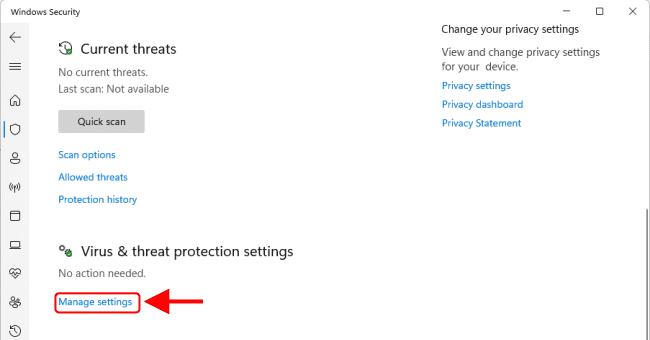
In the Virus and Threat Protection window, please scroll down and find Virus and Threat Protection Settings, under it click on Manage settings.

image4.0
Opening manage setting for Virus & threat protection settings

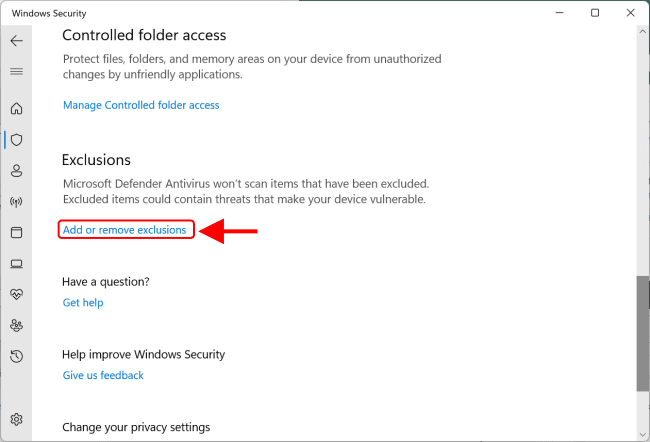
Scroll down and find the Exclusions option and click on Add or remove exclusions.

image4.01
Adding files to Exclusions in Windows Security

Click Add an exclusion and select the type.

image4.1
Exclusion window

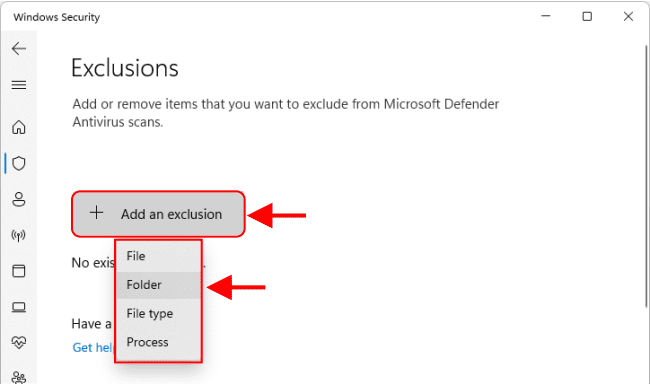
Discover the art of exclusion: Choose How to restore quarantined files, and pinpoint the path to the file, folder, file type, or process you want to protect.

image4.2
Exclusion added

If you’ve found yourself grappling with Windows Defender’s false positives, here’s a nifty trick: gather those mistakenly flagged programs, and within this bundle of digital underdogs, lies a secret. Craft a sanctuary for them within a special folder, a place where misjudgment won’t tread. This ingenious move ensures that, moving forward, these files shall dance free, untouched by future detections. How to restore quarantined files? This is how.

Important: We strongly advise you not to upload files obtained from unreliable sources to the Exclusion folder. Nobody wants a virus to take control of their computer. Such negligence can have far-reaching effects.
Rate this post

Thank you for reading this post. Kindly share it with others.

  • Click to share on X (Opens in new window) X
  • Click to share on Reddit (Opens in new window) Reddit
  • Click to share on LinkedIn (Opens in new window) LinkedIn
  • Click to share on Facebook (Opens in new window) Facebook
  • Click to share on Pinterest (Opens in new window) Pinterest
  • Click to share on Tumblr (Opens in new window) Tumblr
  • Click to share on Telegram (Opens in new window) Telegram
  • Click to share on WhatsApp (Opens in new window) WhatsApp
  • Click to share on Pocket (Opens in new window) Pocket
  • Click to share on Mastodon (Opens in new window) Mastodon
  • Click to share on Bluesky (Opens in new window) Bluesky
  • Click to share on Threads (Opens in new window) Threads
  • Click to share on Nextdoor (Opens in new window) Nextdoor
Security | Vulnerability Scans and Assessment, Windows Tags:AntiMalware, AntiVirus, malware, Microsoft Defender Antivirus, Microsoft Windows, scan, Windows 10, Windows 11, Windows Defender, Windows Defender Antivirus

Post navigation

Previous Post: How to Run a Program in Windows as the Local System Account
Next Post: Create and Delete Registry Keys via PowerShell in Windows

Related Posts

  • Hide or Show User Accounts from Login Screen on Windows 10 and 11
    How to Hide or Show User Accounts from Login Screen on Windows 10 and 11 Windows
  • WonderFox Video Watermark
    Install and use WonderFox Video Watermark Windows
  • Group Policy Error
    How to Fix Failed to open the Group Policy Object on this Computer Windows
  • drivelock 1280x720 1
    The server could not be reached or validated: Timeout expired. The Time out expired prior to obtaining a connection from the pool Security | Vulnerability Scans and Assessment
  • maxresdefault
    Install and manage IP Address Management on Windows Server Windows
  • What Happens if You Turn Off Your Computer During windows update
    What Happens if You Turn Off Your Computer During an Update Windows

More Related Articles

Hide or Show User Accounts from Login Screen on Windows 10 and 11 How to Hide or Show User Accounts from Login Screen on Windows 10 and 11 Windows
WonderFox Video Watermark Install and use WonderFox Video Watermark Windows
Group Policy Error How to Fix Failed to open the Group Policy Object on this Computer Windows
drivelock 1280x720 1 The server could not be reached or validated: Timeout expired. The Time out expired prior to obtaining a connection from the pool Security | Vulnerability Scans and Assessment
maxresdefault Install and manage IP Address Management on Windows Server Windows
What Happens if You Turn Off Your Computer During windows update What Happens if You Turn Off Your Computer During an Update Windows

Leave a Reply Cancel reply

You must be logged in to post a comment.

Microsoft MVP

VEEAMLEGEND

vexpert-badge-stars-5

Virtual Background

GoogleNews

Categories

veeaam100

sysadmin top30a

  • hero activedirectory
    How to move a computer object from one container (OU) to another Windows Server
  • Microsoft 365 Developer Program instant
    Get your free Microsoft 365 E5 Sandbox today AWS/Azure/OpenShift
  • banner 3
    How to Set Network Adapter Priority on Windows 11 Network | Monitoring
  • Credential Sync acrosss devices
    How to sync your passwords across iOS and Mac devices Mac
  • Interactive logon Message for Users
    Display interactive logon messages for Windows PCs via GPO Windows
  • Norton AV
    Enable or disable Norton silent mode on Mac Anti-Virus Solution
  • Webp.net resizeimage 5
    How to create a Traffic Manager Profile in Azure AWS/Azure/OpenShift
  • Windows 10 new Start menu
    Make Cortana search with a different web browser instead of Edge Windows

Subscribe to Blog via Email

Enter your email address to subscribe to this blog and receive notifications of new posts by email.

Join 1,839 other subscribers
  • RSS - Posts
  • RSS - Comments
  • About
  • Authors
  • Write for us
  • Advertise with us
  • General Terms and Conditions
  • Privacy policy
  • Feedly
  • Telegram
  • Youtube
  • Facebook
  • Instagram
  • LinkedIn
  • Tumblr
  • Pinterest
  • Twitter
  • mastodon

Tags

AWS Azure Bitlocker Microsoft Windows PowerShell WDS Windows 10 Windows 11 Windows Deployment Services Windows Server 2016

Copyright © 2025 TechDirectArchive


Loading Comments...
 

You must be logged in to post a comment.