

Introducing the world of Groovy! As an object-oriented language for the Java platform, Groovy Installation Guide becomes your gateway to exploring its dynamic nature. Just like Python, Ruby, Smalltalk, and Pero, Groovy shares many features with these languages. For Groovy source code to seamlessly run on any JRE-equipped platform, it undergoes conversion into Java Bytecode. Dive into this comprehensive Guide to learn how to install Groovy on Linux and Windows today. Please see How to Switch between Users in Linux, how to use Systemd Timers on Linux, How to Install PlayonLinux on a Linux System.
Moreover, its JVM-based Scripting Language aspect contributes to heightened agility and dynamism, handling tasks in the background. Unlock the potential of Groovy as a scripting language for Java, almost resembling a supercharged Java version with additional corporate features.
Groovy offers several productivity tools including dynamic typing, closures, and DSL support. It is not intended to replace Java, but rather to work in conjunction with it, unlike some other languages.
For the Java virtual machine Java virtual machine (JVM), JVM-based Scripting Language is a dynamic object-oriented programming language that may be used anywhere Java is used. Additionally, this language can be used to create new programs, extend already-existing Java applications, and integrate Java components.
In addition, as a developer, you are constantly looking for ways to improve application features. If you mostly work on Java-based applications, get to know and install Groovy on your Linux and Windows machine.
The Groovy language seamlessly integrates with any Java program and adds powerful features such as scripting capabilities for Java programs. In this post, you’ll learn how to install JVM-based Scripting Language on either an Ubuntu or a Windows machine.
Why Groovy?
Here, are major reasons why you should use and learn JVM-based Scripting Language
- Groovy is an agile and dynamic language
- Seamlessly integration with all existing Java objects and libraries
- Feels easy and natural to Java developers
- More concise and meaningful code compares to Java
- You can use it as much or as little as you like with Java apps
See also Linux Shell Scripting: How to write a Shell Script that Counts Lines and Words in a File, and Microsoft releases Linux Desktop Management Support to Intune.
Installing Groovy on Linux Ubuntu
Since Groovy runs on its built-in Java servlet container server, you must first install Java on your Ubuntu machine before installing JVM-based Scripting Language. Also, when working with a JVM-based Scripting Language, you can use a variety of Java implementations, the most popular of which is OpenJDK. To install Java on your Ubuntu machine, follow these steps:
Step 1: Launch your favorite SSH client and connect to your Ubuntu machine using the pattern shown below:
ssh -i ~/.ssh/<keyname>.pem username@<PublicIPAddress>
Step 2: Use the apt update command to update your system packages.
$sudo apt update
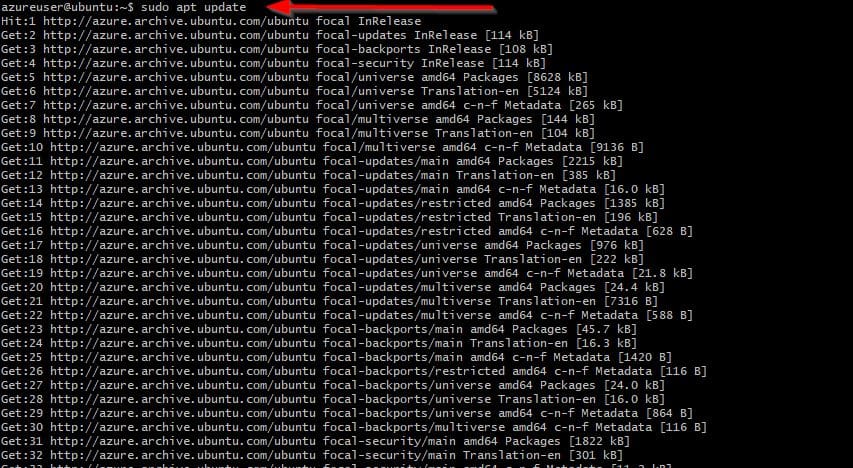
Step 3: After updating your system packages, run the following commands to create a directory (mkdir) named ~/ groovy_demo_install and change directory (cd) to that directory.
These commands produce no output, but the /groovy_demo_install the directory is where Java is installed.
$sudo mkdir ~/ groovy_demo_install && cd ~/groovy_demo_install

Steo 4: Now, run the apt install command below to install Java (default-jdk) on your machine.
# Installing Java Version: Java SE 11 (LTS)sudo apt install default-jdk
Immediately after the installation is complete, run the command below to check the Java version installed in your machine:


The output above shows that you’ve successfully installed Java.
Step 5: Next, run the below command to install JVM-based Scripting Language on your machine
$sudo apt install groovy

Verify the version of the Groovy you just installed by running:
groovy --version

Executing a JVM-based Scripting Language Script on Ubuntu
Awesome! Groovy has been successfully installed on your Ubuntu machine. But how do you know JVM-based Scripting Language is effective?
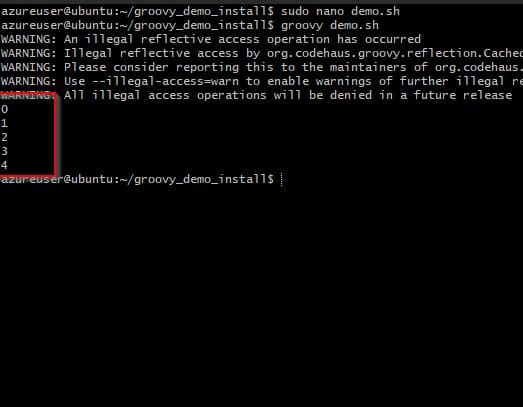
In this example, you will run a test by executing a simple script to determine whether JVM-based Scripting Language is properly installed.
Within the ~/groovy_demo_install directory, create a script named demo.sh which when executing prints (printLn) all the numbers starting from 0 to 4 as shown below:
#!/bin/bash0.upto(4) {println "$it"}
Get Groovy on Windows
Windows users can also so enjoy using Groovy. Begin by following our comprehensive Groovy installation guide. Install Groovy on your Windows PC and unlock its power. Just a few steps away – let’s get started!
Step 1: Open JVM-based Scripting Language official website, click on the download tab and scroll down to the download section and then select “Windows Installer” under the stable release, JVM-based Scripting Language 4.0 as shown below:

Step 2: Click on the .msi installer’s link at the right-side of the screen to download Groovy

Step 3: After downloading it, go to your download folder and run Groovy’s Windows installer.

Step 4: Click on Next when you see the “welcome” page as shown below.

Step 5: Ensure you select the checkbox at the bottom to accept the End-User License Agreement (EULA), and click Next to continue.

Step 7: On the next screen, select the Groovy setup as Typical and click on Next. Selecting Typical Installation type, installs only the common features.

Step 8: Click on Install to run the installation

The next screen shows you the installation progress.

Finally, Groovy installation is complete. Click on Finish to quit the setup window

Running a JVM-based Scripting Language Command on Windows
Now that Groovy is installed on your Windows computer, everything ought to function as it should. You must, however, verify that JVM-based Scripting Language functions properly in order to be safe. How?
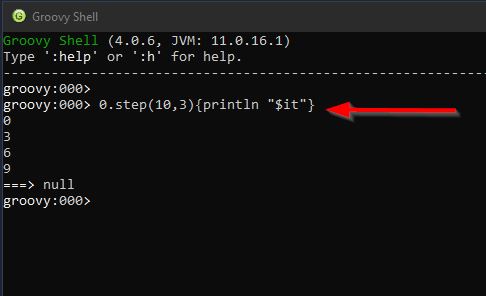
You’ll run a Groovy command on your Windows machine, much like you did on Ubuntu. But to execute commands, you’ll utilize theJVM-based Scripting Language Shell rather than Windows PowerShell.
Now, launch JVM-based Scripting Language shell from your Desktop or the Start menu, as shown below.

Let’s run the below command to print all numbers (printLn) between 0 and 10 with an increment of 3.
You learned how to install Groovy, a versatile language for the Java platform, on Ubuntu and Windows in this guide. We mentioned running a JVM-based Scripting Language command and launching a JVM-based Scripting Language script, both of which perform related tasks.
I hope you found this blog post on installing Groovy on Linux and Windows helpful. If you have any questions, leave a comment below.


