Skip to content

TechDirectArchive

Hands-on IT, Cloud, Security & DevOps Insights

  • Home
  • About
  • Advertise With US
  • Contact
  • Reviews
  • Toggle search form
Home » Windows » Check the Size of Video Random Access Memory (VRAM) in Windows
  • image 43
    Configure GPS location “Google Map” on your Android Studio Emulator Windows
  • View installed Updates on Windows
    Get lists of installed Microsoft Windows Updates Windows
  • Local System Account
    How to Run a Program in Windows as the Local System Account Windows
  • image 79
    How to import SSL Certificate to Windows Server using DigiCert Utility Windows
  • Veeam Agent Error Fix
    Fixing AIX Veeam agent job startup delay issue Network | Monitoring
  • 517443 637286201540125528 16x9 1
    User account and process management in Linux Linux
  • Featured image new
    How to update the BIOS on your Dell system Security | Vulnerability Scans and Assessment
  • esd convert wim 1280x720 1
    Differences between Capture image, Discover image, Install and Boot images Windows Server

Check the Size of Video Random Access Memory (VRAM) in Windows

Posted on 05/03/202304/06/2025 Imoh Etuk By Imoh Etuk No Comments on Check the Size of Video Random Access Memory (VRAM) in Windows
VRAM-on-Windows-1

Video graphics refer to the creation, manipulation, and rendering of visual content in digital format. It involves the use of computer hardware and software to create, process, and display images, animations, and videos. In this post, I will show you How to Check the Size of Video Random Access Memory (VRAM) in Windows otherwise known as the Video Random Access Memory on your Windows PC. Please see How to run Windows Memory Diagnostics Tool on Windows. Also, see What to do after increasing the Memory of Oracle Database.

In particular, a graphics card or video card is a specialized component of a computer that is responsible for processing and rendering visual content. It works by taking digital data from the computer’s CPU and converting it into images that can be displayed on a monitor or other output device. The graphics card has its own memory, called video memory or VRAM. Which is used to store and manipulate image data.

See also How to check graphics card temperature on Windows 11, How to Open NVIDIA Control Panel and Troubleshoot NVIDIA Control Panel Not Opening, How to Check if your Windows Computer Can run a Game, How to Optimize Windows 11 for Gaming, and how to fix the external display not working on Windows 11

The quality and performance of video graphics are determined by factors such as the resolution, colour depth, and refresh rate of the display, as well as the processing power and memory capacity of the graphics card. High-quality graphics are essential for many applications, including gaming, video editing, and graphic design.

Checking the Size of VRAM in Windows

To determine how much memory your video card has, you can follow these steps:

Step 1: On a Windows computer, right-click on the desktop and select “Display settings.”

Right-click-on-the-desktop
Display settings

Step 2: Scroll down to the bottom of the page and click on “Advanced display settings.”

Scroll-to-Advance-settings
Advanced settings

Step 3: Under “Display information,”. You should see information about your graphics card, including its name and the amount of dedicated video memory it has.

Display-properties
Display information

You can click on the “Display adapter properties to display more information about your VRAM.

Display-properties1
Display properties

Alternatively, you can use system information software to view detailed information about your graphics card, including its memory. On a Windows computer, you can use the DirectX Diagnostic Tool. Here’s how:

Step 1: Press the Windows key + R to open the Run dialog box.

Dxdiag
Running DirectX Diagnostic Tool

Step 2: Type "dxdiag" and press Enter and then click on “Yes”.

Dxdiag-tool
Checking VRAM Size with Dxdiag

Step 3: Click on the “Display” tab.

Click-on-Dsiplay
Checking the VRAM Size

As shown above, you can find information about your graphics card, including its name, manufacturer, and memory size under the “Device” section.

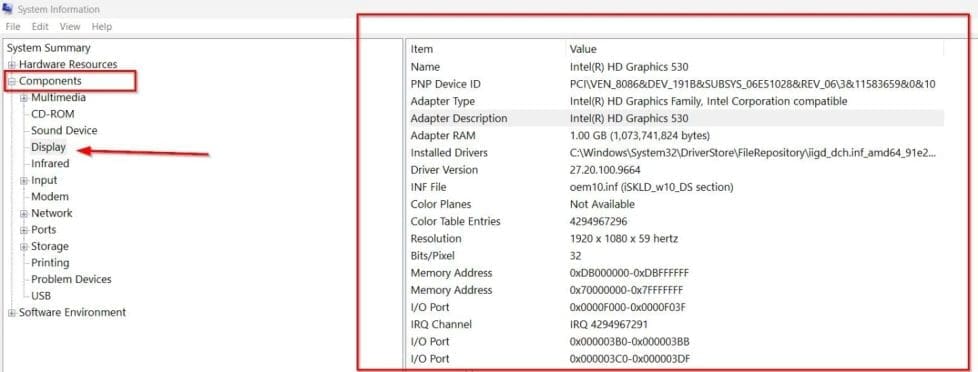
You can also check the size of your Windows PC’s video graphics card by running the “msinfo32” command using the Run dialog box as shown below:

msinfo32
Running msinfo32

When the system information dialog box opens up, click on Components and click on Display to display information about your video graphics card.

Msinfo-Display-Graphics

I hope you found this guide useful on How to Check the Size of Video Random Access Memory (VRAM) in Windows. Please feel free to leave a comment below.

5/5 - (1 vote)

Thank you for reading this post. Kindly share it with others.

  • Click to share on X (Opens in new window) X
  • Click to share on Reddit (Opens in new window) Reddit
  • Click to share on LinkedIn (Opens in new window) LinkedIn
  • Click to share on Facebook (Opens in new window) Facebook
  • Click to share on Pinterest (Opens in new window) Pinterest
  • Click to share on Tumblr (Opens in new window) Tumblr
  • Click to share on Telegram (Opens in new window) Telegram
  • Click to share on WhatsApp (Opens in new window) WhatsApp
  • Click to share on Pocket (Opens in new window) Pocket
  • Click to share on Mastodon (Opens in new window) Mastodon
  • Click to share on Bluesky (Opens in new window) Bluesky
  • Click to share on Threads (Opens in new window) Threads
  • Click to share on Nextdoor (Opens in new window) Nextdoor
Windows Tags:Display

Post navigation

Previous Post: How to Disable Chrome Browser Notifications on Windows
Next Post: Install and License Devolutions Remote Desktop Manager

Related Posts

  • whatsappImage
    How to add WhatsApp UWP on Windows 11 Windows
  • Windows11
    Windows 11 System Requirements Windows
  • Install RSAT on Windows 11 today
    Install Remote Server Administration Tools on Windows 11 Windows
  • Cross Domain Folders Access
    Cross Domain Folders Access: Reference account is Locked out Windows
  • vcx
    Fix Error code 0x4 Session disconnected: Your session ended because of an error, if this keeps happening, contact your system administrator Windows
  • any
    Install AnyDesk on Windows for remote Connections Windows

More Related Articles

whatsappImage How to add WhatsApp UWP on Windows 11 Windows
Windows11 Windows 11 System Requirements Windows
Install RSAT on Windows 11 today Install Remote Server Administration Tools on Windows 11 Windows
Cross Domain Folders Access Cross Domain Folders Access: Reference account is Locked out Windows
vcx Fix Error code 0x4 Session disconnected: Your session ended because of an error, if this keeps happening, contact your system administrator Windows
any Install AnyDesk on Windows for remote Connections Windows

Leave a Reply Cancel reply

You must be logged in to post a comment.

Microsoft MVP

VEEAMLEGEND

vexpert-badge-stars-5

Virtual Background

GoogleNews

Categories

veeaam100

sysadmin top30a

  • image 43
    Configure GPS location “Google Map” on your Android Studio Emulator Windows
  • View installed Updates on Windows
    Get lists of installed Microsoft Windows Updates Windows
  • Local System Account
    How to Run a Program in Windows as the Local System Account Windows
  • image 79
    How to import SSL Certificate to Windows Server using DigiCert Utility Windows
  • Veeam Agent Error Fix
    Fixing AIX Veeam agent job startup delay issue Network | Monitoring
  • 517443 637286201540125528 16x9 1
    User account and process management in Linux Linux
  • Featured image new
    How to update the BIOS on your Dell system Security | Vulnerability Scans and Assessment
  • esd convert wim 1280x720 1
    Differences between Capture image, Discover image, Install and Boot images Windows Server

Subscribe to Blog via Email

Enter your email address to subscribe to this blog and receive notifications of new posts by email.

Join 1,839 other subscribers
  • RSS - Posts
  • RSS - Comments
  • About
  • Authors
  • Write for us
  • Advertise with us
  • General Terms and Conditions
  • Privacy policy
  • Feedly
  • Telegram
  • Youtube
  • Facebook
  • Instagram
  • LinkedIn
  • Tumblr
  • Pinterest
  • Twitter
  • mastodon

Tags

AWS Azure Bitlocker Microsoft Windows PowerShell WDS Windows 10 Windows 11 Windows Deployment Services Windows Server 2016

Copyright © 2025 TechDirectArchive


Loading Comments...
 

You must be logged in to post a comment.