It’s important to keep an eye on the temperature of your graphics card because it can help you figure out if there are any problems with your hardware. If the temperature of your graphics card gets too high, it can cause performance issues and even damage the card. The graphics card, also known as a graphics processing unit (GPU), is a hardware component in a computer that is responsible for rendering images, videos, and other visual content. It is an important part of any computer that is used for things like gaming, editing videos, or making 3D models because it enables the computer to display high-quality graphics and smoothly render complex visual effects. In this article. ypu will learn how to check graphics card temperature on Windows 11.
Graphics card temperature on Windows 11
You may need to know the temperature of your graphics card on Windows 11 to fix problems with performance or overheating. We’ll show you how to do this without using third-party tools in this set of steps. Even though GPUs can run hot without affecting performance when they reach a certain temperature. They can cause a number of problems, which you will usually notice when gaming, running graphics-intensive applications, watching ultra-high-definition videos, or driving a multi-monitor setup.
For more on Windows, read: How to Add a Device to your Microsoft account, Add Hardware and Peripherals: How to add a device to a Windows 10 Computer, how to remove a Bluetooth device and connect a new Bluetooth device to Macbook, Microsoft Phone Link: How to Link and Unlink an Android Phone to Windows 11.
Windows 11 makes it easy to check the temperature of every GPU installed on your computer. Here is a step-by-step guide on how to check the temperature of your graphics card on a Windows 11 computer.
How to check graphics card temperature on Windows 11
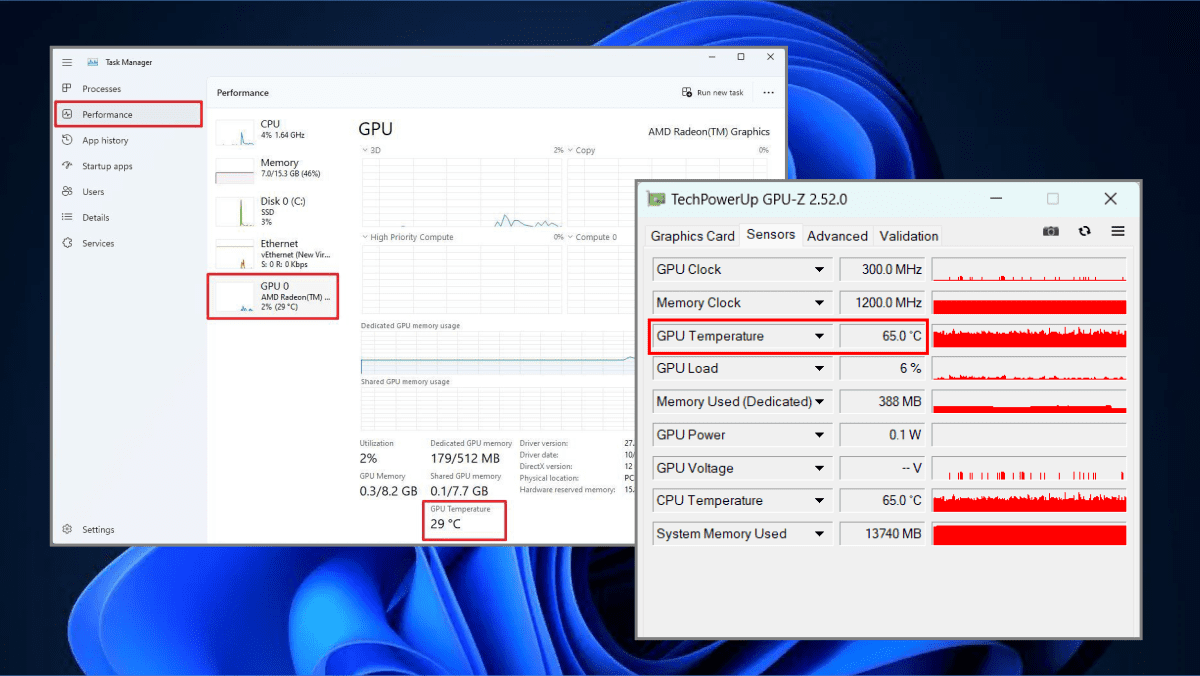
To view the graphics card temperature on Windows 11, use these steps:
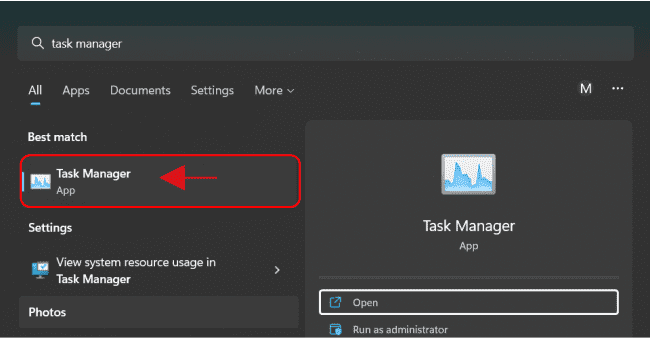
Press the Windows key to open Start menu. Search for Task Manager and click the top result to open the app. Or click the keyboard shortcut “Ctrl + Shift + Esc” at once to open the app.
Click the Performance tab. Select the GPU from the left side.

Under the “GPU Temperature” section, confirm the current hardware temperature. (The temperature will also be shown on the left side.)
After you finish the steps, Task Manager will tell you the temperature of the graphics card in Celsius.
Please see the following related articles: How to fix the external display not working on Windows 11, How to Add or Remove Network Interface from a VM in Azure, How to use the Widgets feature on Windows 11, Change the default start page for File Explorer on Windows 11, and how to Check the Size of Video Random Access Memory (VRAM) in Windows.
How to check GPU temperature using third-party app
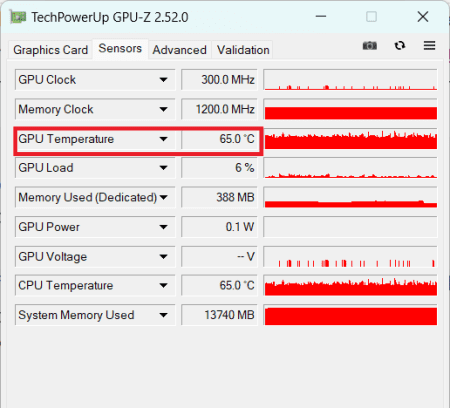
Download and install a graphics card temperature monitoring tool. There are several free tools available that can help you monitor the temperature of your graphics card, such as MSI Afterburner, EVGA Precision XOC, and GPU-Z. Choose a tool that works with your graphics card and operating system, then download and install it on your PC.
Launch the temperature monitoring tool. Once the tool is installed, open it from the Start menu or by double-clicking its icon on the desktop.
Monitor the temperature of your graphics card. The main interface of the temperature monitoring tool should show the temperature of your graphics card at the moment. The temperature will be displayed in degrees Celsius (°C) or degrees Fahrenheit (°F).
Check the temperature while the GPU is under load. To get an accurate reading of your graphics card’s temperature, it’s important to check it while the GPU is under load. You can do this by running a resource-intensive program, such as a game or a benchmarking tool.
Check the manufacturer’s recommended temperature range. Most graphics card manufacturers provide a recommended temperature range for their hardware. You can check this range by looking at the documentation that came with your graphics card or by visiting the manufacturer’s website. Check if the temperature of your graphics card is within the acceptable range by comparing it to the recommended range.
Take action if the temperature is too high. If your graphics card’s temperature is always above the recommended range, you should take steps to lower the temperature. This could include cleaning the graphics card and the inside of your PC, improving airflow in the case, or replacing the thermal paste on the graphics card.
Conclusion
Monitoring the temperature of your graphics card is an important part of maintaining the health of your PC. By following these steps, you can easily check the temperature of your graphics card and take action if necessary to keep it running smoothly. Please see how to demote and remove a Domain Controller on Windows Servers, and how to Fix “There was a problem starting logilda.dll” in Windows.
I hope you find this guide helpful on how to check graphics card temperature on Windows 11. If you have any questions, feel free to leave them in the comment section below.


