ePO Server Settings: Trellix ePO AD integration and ENS Agents Installation

Trellix ePolicy Orchestrator (ePO) is a centralized security management platform that helps orchestrate and manage your endpoints from a single console. In this article, we shall discuss “Trellix ePO AD integration and ENS Agents Installation”. Not limited to these bt Trellix Account creation, and Trellix agent update etc. Please see Manage BitLocker and FileVault with Trellix Native Encryption, and how to Disable SQL Auto Close: Auto Close is enabled for both ePO and ePO Events Databases.
After Trellix ePolicy Orchestrator Installation on Windows Server. You might want to upgrade Trellix ePolicy Orchestrator. If there areissues during the setup, you will find this guide on “Fixes to Trellix ePolicy Orchestrator Installation Errors” very useful.
Server Task
we shall discuss some more settings in details later. but ensure you define the frequency for your desired tasks as shown below.

Integrate Active Directory with Trellix
Trellix ePO on-premise simplifies the process of managing users by automatically creating Windows authentication users based on their Active Directory group membership.
After the setup of ePO, you might want to integrate it with Active directory. Below are the steps to integrate Trellix ePO with Active Directory. This step assumes you have setup a Domain Controller as Recommended by Microsoft. See how to setup a Domain Controller.
Log in to your Trellix administrative interface. Under Configuration, select “Registered Servers”.

On the Registered Servers, select LDAP.


Populate the field below and click Save.

As you can see, the fields are populated. To confirm everything is working correctly, hit the test connection button below. It the credentials are fine, you should see “successfully connected to the LDAP server”.

Yes, we have our ePO correctly bonded with the LDAP Server.

Please, see Fix MSIEXEC returned 1602: Trellix Setup cannot use this account, and How to enable FIPS mode on Windows Server.
Add Domain users
To add AD users on Trellix, click the Trellix menu and under user management. Select Users.

Click “New User”

I am interested in creating a new account with Windows authentication. Please populate the field below. You can also create an account with ePO authentication or certificate-based authentication

Now, you should be able to login to the ePO console with your domain credential.Enable Active Directory User Logon on Trellix
We have discussed more of these steps here: Selfservice Recovery: Trellix BitLocker and fileVault Recovery. If you do not want to import an AD user as we have done above, you will have to enable allow Active Directory users to log on if the have at least one permission set.
To do this, click on Menu and under Configurations, select Server Settings. Edit the settings and click Yes.

Note: If Active Directory User Login is enabled when an unknown user tries to log on. Trellix ePO server checks to see any permission sets mapped to Active Directory groups for which the user is a member. If there are, Trellix ePO creates a Windows authentication user and assigns the mapped permission sets to it. To enable this feature, you must do the following:
- Active Directory User Login must be enabled as shown above.
- At least one permission set must be mapped to the user’s Active Directory group
- A registered LDAP server must be configured for the domain, so that Trellix ePO can determine the user’s group membership.
Delete or Disable an Imported AD User
To do this, you will follow the same method as if you were editing a use. Select “Actions” and then delete. Click the OK to confirm deletion.

Trellix Agent Checkin (Installation on ePO)
Trellix ENS intercepts threats, monitors overall system health, and reports detection and status information. Client software is installed on each system to perform these tasks.
There are numerous ways to load Trellix Agents unto ePO. You could check them in using extension or the repository. But, I have decided to use the Software Catalog. The Trellix Software Catalog removes the need to access the Trellix Product Download website to retrieve new Trellix software and software updates.
Note: You can use the Software Catalog to install, upgrade, and remove Trellix Endpoint
To do this, click on the Trellix menu and under software. Select Software Catalog. After deploying ePO, you are required to deploy Trellix agents to endpoints as a prerequisite for other deployments. As shown below, I will select all packages relating to Trellix agents and checked them all in.

Accept the license terms and check them in as shown below.

The Trellix Endpoint extensions and endpoint package are installed and updated on the Trellix ePO server.

You can take a look at the Server task Details for more information.

Here is how to checkin Trellix Management for Native Encryption as well.

Create a custom McAfee Agent installation package in ePO
This steps involves using a distribution method other than ePO deployment. To create an ePO custom agent installation package, please follow the steps below.
Method 1:
Log on to the ePO console. If the agent package is not checked in, go to the Software Catalog and check in the embedded package version of the agent. Next, click Menu, Systems Section, System Tree.

Select New Systems from the top-left corner.

Under how to add systems, you can see you have different options.
In my case, I am interested in showing the steps to "create and download agent installation packages". Also, I am interested in Trellix agent for Windows and Mac and click ok.
You are prompted to download the file. You can click on the link or right click and select save link as.

Method 2: Link My Organisation to Active Directory
The “My Organization group” is the root of your System Tree. It contains all systems added to or detected on your network (manually or automatically). Until you create your own structure, all systems are added by default Group. The My Organization group has these characteristics as they cannot be deleted, and cannot be renamed.
If your network runs Active Directory, you can use Active Directory synchronization to create, populate, and maintain parts of the System Tree.
Once defined, the System Tree is updated with any new systems (and subcontainers) in your Active Directory.
So let’s perform the synchronisation. Click on my Organisation and under group details, select edit close to the Synchronisation button. Also, this step assume you have integrated your ePO with AD as shown above.

Select Active Directory and other settings that pertain to you. To integrate a contain (OU), click the Browse button to select the OU you wish to integrate on ePO.

When all fields have been populated. Enter your service account and password as this will be used to install the agents on the PC. Click Save when complete.

If you were to configure agent policy, you would do it from here as shown below when syncing group details. I will do these at a later time. Just showing you the steps to. You will see this step again when we wish to push the agent.

Create a Sub-group
Now that we have synced the “My Organisation Group”, lets create an OU structure on ePO to reflect our AD environment.
Note: There is no single way to organise a System Tree, and because every network is different, your System Tree organisation can be as unique as your network layout. You can use more than one method of organisation
To do this, click the Trellix Menu, Systems and System Tree. Select your organisation and click on “New Subgroup”.

Enter the New Subgroup name and click OK.

Note: If you delete systems from the System Tree, make sure that you select the option Remove agent from all systems. If the McAfee Agent is not removed, deleted systems reappear in the Lost and Found group because the McAfee Agent continues to communicate to Trellix ePO Cloud. Also, unless you select Remove agent installed products from all systems, the product software remains installed on the systems deleted from the System Tree.
Assign the Service Account to the Computer Administrator Group
The PCs should be discovered by Trellix. Depending on your AD setup/permission, you may have to set up a service account and assign it to the PCs in order to be able to push the agents.
Connect to the PC interactively or remotely.You could use the Computer Manager to connect as shown below.

Expand local Users and Groups and right click or double click on Administrators. Now that we have configured the permission, let’s proceed with the agent deployment.

Trellix Agent Deployment
This steps require the manual deployment of agents. Click on the PC under Systems. from Actions, select Agent and then Deploy agents.

In the Trellix Deploy Agent window, click on OK.

Let’s review the Server task to see the progress of the Agent Deployment. As you can se, it is in progress.

The agent deployment has succeeded and completed successfully.

The PC is recognised as managed. Now, deploy the agent to the rest devices manually or follow the steps below to assign the agent via automatic assignment..

Automatic Agent Assignment
This can be achieved by using the Assigned Client Tasks under the system tree. Luckily, I did not have to create a Policy using the Policy catalogue. See Manage BitLocker and FileVault with Trellix Native Encryption for more information on this topic.
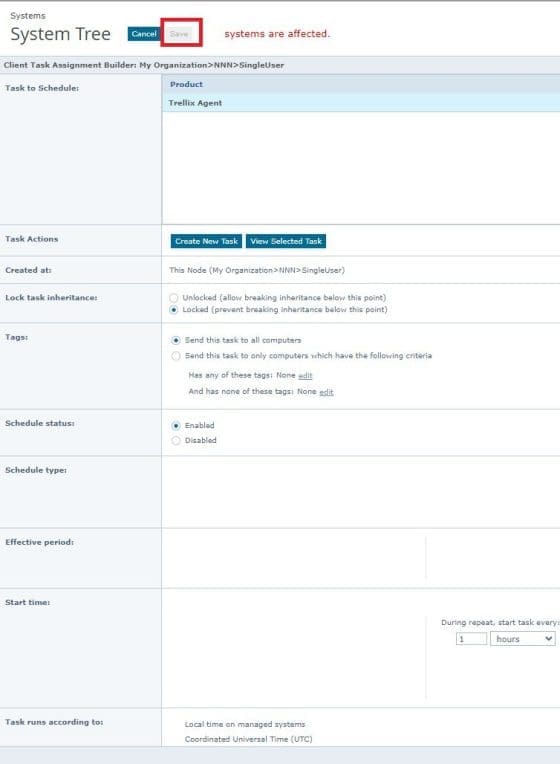
Assign Client Task. When this is done by following the prompts and selecting the right OU or group etc. The assignment field will change to 1 Assignment.

Edit the assignement

Define the schedule as shown below
Trellix Product Deployment
In this section, we will discuss deployment tasks for installing products on managed systems.
Note: Product packages must be checked in before deploying them. By now, you should be familiar with the process of deploying a package.To do this, click on Trellix Menu, and under Software, select “Product Deployment”.

Select new deployment

Populate the fields for product deployment window as shown below.

Automatic Task Synchronisation
Server tasks are scheduled management or maintenance tasks that you run on your Trellix ePO – on-prem server.
Server tasks enable you to schedule and automate repetitive tasks. Use server tasks to monitor your server and software., We can verify the ePO server tasks to ensure the smooth operation. From the Trellix Menu, click Server Tasks.

Click New Task.

We will configure automatic AD and ePO synchronisation as shown below.

You can select a select OU (container) to synchronise with and click OK.

Define the schedule as you wish

On the summary page, do not forget to click save.

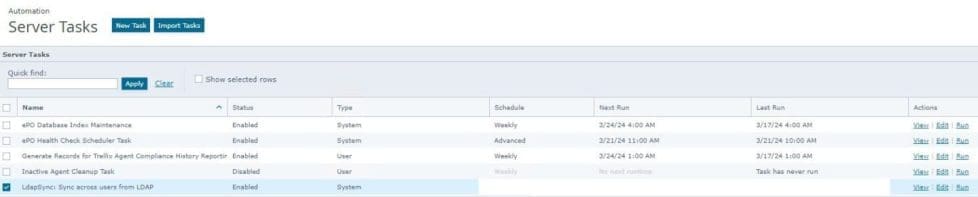
Below are some server tasks and the newly created server task.
ePO Server Custom SSL Certificate Configuration
All the necessary settings specific to your ePO server are in Server Settings.
The Server Certificate option will enable you to protect and secure the connection to the ePO server and ensure it is trusted. To do this, log on to the ePO console, click Menu, under Configuration, and select Server Settings.

Click Server Certificate under Setting Categories, and then click Edit.

Select Use the provided certificate and private key.

Click Browse in the Certificate (P7B, PEM) field. Locate and select the certificate file (.p7b or .cer). Then, click Open. Also, click Browse in the Private key (PEM) field.

Please save the settings

Restart the following ePO services, and close the services manager when complete.
Trellix ePolicy Orchestrator x.x.x Application Server
Trellix ePolicy Orchestrator x.x.x Event Parser
Trellix ePolicy Orchestrator x.x.x Server
FAQs relating to Trellix ePO AD integration and ENS Agents’ Installation
What authentication types are supported with BitLocker on Trellix ePO?
MNE supports TPM, TPM+PIN, and Password authentication. Password authentication is only available with Windows 8 and later.
How do I make McAfee agent unmanaged?
To change from managed to unmanaged mode on Windows systems (ePO On-Premises), select Menu → Systems → System Tree. Select the systems to change to unmanaged mode. Click Actions, select Directory Management, then click Delete.
Select Remove McAfee Agent on next agent-server communication and confirm the deletion.
I hope you found this article on “Trellix ePO AD integration and ENS Agents Installation” useful. Please feel free to leave a comment below.


