Windows voice input feature also known as speech-to-text is a useful but underutilized feature that may be used to give instructions, start apps, dictate text, and do other operations in Windows. You can accomplish this using built-in speech recognition. After training Windows to recognize the sound of your voice, you can interact with the operating system to get it to respond to your requests. The speech recognition feature is especially useful for persons who are unable to use a keyboard or mouse. In this article, you will learn how to use voice input instead of typing on Windows. Here are some exciting articles: How to fix unable to access microphone on Zoom, how to grant or deny Microphone access on Mac, and how to work with Azure Cognitive Service.
However, it is open to anyone who wants to try dictating to Windows instead. The function even provides a reference guide so you know what commands and other things you can perform with your voice on Windows. Windows 11 and 10 have a dictation feature that allows you to create documents, emails, and other files by dictating into the computer. When the dictation feature is enabled, you can dictate text, punctuation marks, special characters, and cursor movements.
How to turn on the speech recognition feature on Windows
The first thing you will need to check is if the speech recognition setting is turned on by default, so you need to enable it before you start dictating to Windows.
For more on Windows read these: How to Remove a Device from your Microsoft Account, how to Add a device to your Microsoft account, how to add Hardware and Peripherals: How to add a device to a Windows 10 Computer, how to remove a Bluetooth device and connect a new Bluetooth device to Macbook, and how to Link and Unlink an Android Phone to Windows 11.
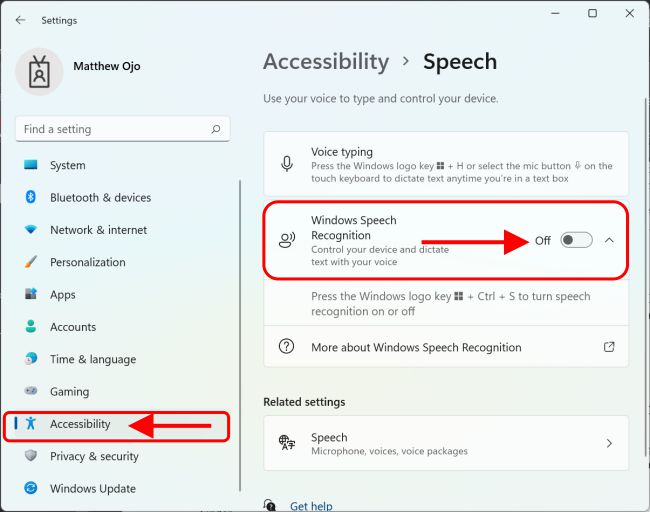
Enable Speech-to-text on Windows 11
On Windows 11 press the Windows logo key + I to open the windows Settings. Select Accessibility. In the navigation pane on the right under Interaction, click Speech.

Turn on the Windows Speech Recognition button.
If you’ve never set up your microphone, you will see a prompt asking you to Set up Speech Recognition for your Microphone. Follow the instructions to speak into the microphone, which calibrates it for dictation.

Alternatively, you can use the Windows shortcut key to turn on and off the Windows Speech Recognition feature. To do this, press the Windows logo key + Ctrl + S.
Please see How To Use Azure Key Vault secrets in Azure Pipelines, and Windows Display Language: How to add languages to your Personal PC.
Enabling Speech-to-text on Windows 10
- On Windows 10 press the Windows logo key + I to open the windows Settings. Then click on Time & Language.
- In the navigation pane on the left, click Speech. If you’ve never set up your microphone, do it now by clicking Get started in the Microphone section. Follow the instructions to speak into the microphone, which calibrates it for dictation.
- Scroll down and click “Speech, inking, & typing privacy settings” in the “Related settings” section. Then turn “On” the button for Online speech recognition.

How to use speech-to-text on Windows 11 or 10
Once you’ve enabled speech-to-text, you can begin dictating into any window or field that takes text. You can dictate into word processing programs, Notepad, search boxes, and other applications. The following steps works in both Windows 11 and 10.
- Open the app or window you want to dictate into.
- Press Windows logo key + H. This keyboard shortcut opens the speech recognition control on the screen.
- Press the microphone icon on the voice typing menu to start dictating.

- In some Microsoft office version, the voice to text can be triggered within the program as shown below.

- To stop voice typing, simply press the microphone button on the voice typing menu. Or say “Stop listening“
How to install and use a different Language for voice typing in Windows 11
You can use a voice typing language that’s different than the one you’ve chosen for Windows. Follow the steps below to change your voice typing language.
- Open the windows Settings > Time & language > Language & region.

- Find Preferred languages in the list and select Add a language. Search for the language you’d like to install, then select Next to install the language and its features.

- To use your new language for voice typing, select the language switcher icon in the bottom right corner of your taskbar. Or press Windows logo key + Spacebar shortcut key to quickly switch between windows languages.

- Once you’ve switched to your preferred language, press Windows logo key + H to begin voice typing.
Punctuation Commands
Here are the punctuation characters and symbols you can dictate, according to Microsoft:
| To Insert This: | Say This: |
| @ | at symbol; at sign |
| # | Pound symbol; pound sign; number symbol; number sign; hash symbol; hash sign; hashtag symbol; hashtag sign; sharp symbol; sharp sign |
| $ | Dollar symbol; dollar sign; dollars symbol; dollars sign |
| % | Percent symbol; percent sign |
| ^ | Caret |
| & | And symbol; and sign; ampersand symbol; ampersand sign |
| * | Asterisk; times; star |
| ( | Open paren; left paren; open parenthesis; left parenthesis |
| ) | Close paren; right paren; close parenthesis; right parenthesis |
| _ | Underscore |
| – | Hyphen; dash; minus sign |
| ~ | Tilde |
| \ | Backslash; whack |
| / | Forward slash; divided by |
| , | Comma |
| . | Period; dot; decimal; point |
| ; | Semicolon |
| ‘ | Apostrophe; open single quote; begin single quote; close single quote; close single quote; end single quote |
| = | Equal symbol; equal sign; equals symbol; equal sign |
| (space) | Space |
| | | Pipe |
| : | Colon |
| ? | Question mark; question symbol |
| [ | Open bracket; open square bracket; left bracket; left square bracket |
| ] | Close bracket; close square bracket; right bracket; right square bracket |
| { | Open curly brace; open curly bracket; left curly brace; left curly bracket |
| } | Close curly brace; close curly bracket; right curly brace; right curly bracket |
| + | Plus symbol; plus sign |
| < | Open angle bracket; open less than; left angle bracket; left less than |
| > | Close angle bracket; close greater than; right angle bracket; right greater than |
| “ | Open quotes; begin quotes; close quotes; end quotes; open double quotes; begin double quotes; close double quotes; end double quotes |
Conclusion on using voice input instead of typing on Windows
The Windows voice-to-text feature is a great tool that reduces the stress of typing every time whenever we want to type on our devices. If you have any questions on how to use voice input instead of typing on Windows, please leave them in the comments section below.