
It is worth noting that Microsoft SQL Server 2019 takes full advantage of OpenShift and Linux Containers etc. SQL Server 2019 has the same underlying database engine on all supported platforms, including Linux. Therefore, many existing features and capabilities operate the same way on Linux. For those who are still wondering about this integration and support, it has been supported since 2017 on RedHat Enterprise Linux. In this article, we shall discuss “Install Microsoft SQL Server 2019 and MSSQL Command line tools on Ubuntu Linux’. See the following guide on how to download and install Microsoft SQL Server 2019 and Microsoft SQL Server Management Studio on Windows 10 and Windows Server.
For editions and supported features of SQL Server 2019 on Linux. Microsoft SQL Server 2019 offers a host of quality-of-life improvements for users. These include faster query processing, in-memory database improvements and a new feature Microsoft is calling Big Data Clusters. See the following article on how to uninstall Microsoft SQL Server on Windows 10 and Windows Server.
Install MSSQL Server on Ubuntu 20.04
Before proceeding with the installation, it is worth noting that the installation requirements vary based on your application needs. The different editions of SQL Server accommodate the unique performance, runtime, and price requirements of organizations and individuals. The SQL Server components that you install also depend on your specific requirements.
- See the following links for some MsQL-related topics
- How to use a dedicated MsSQL Db for Pleasant Password.
- How to migrate Veeam MsSQL Database to a new MsSQL Server.
- How to reset MSSQL Server SA Password on Ubuntu via the command line and SQL Server Management Studio.
Part A: Install MsSQL on Ubuntu 20.04: Follow the following steps to install the mssql tools on Ubuntu.
Step 1: Update Ubuntu System: Ensure all system packages are updated before adding any new packages and reboot afterwards. For more information on the differences between Linux system Update, Upgrade, and Dist-upgrade.
sudo apt-get update
sudo apt-get -y upgrade
Step 2: Ensure you have curl installed using the command “sudo apt install curl” as shown below

Step3: On the Ubuntu server, run the following commands in a terminal to install the mssql-server package

Phase 4: Register the Microsoft SQL Server Ubuntu repository for SQL Server 2019
sudo add-apt-repository "$(wget -qO- https://packages.microsoft.com/config/ubuntu/18.04/mssql-server-2019.list)"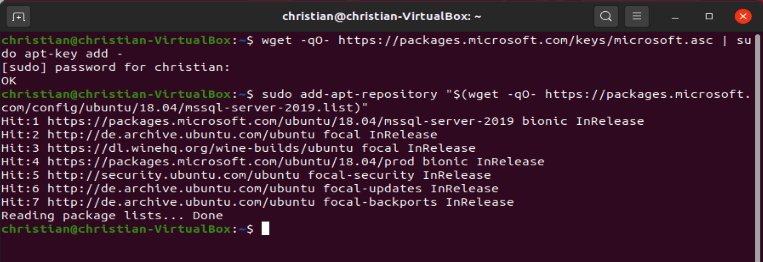
Step 5: Run the following commands to install SQL Server.
sudo apt-get update
sudo apt-get install -y mssql-server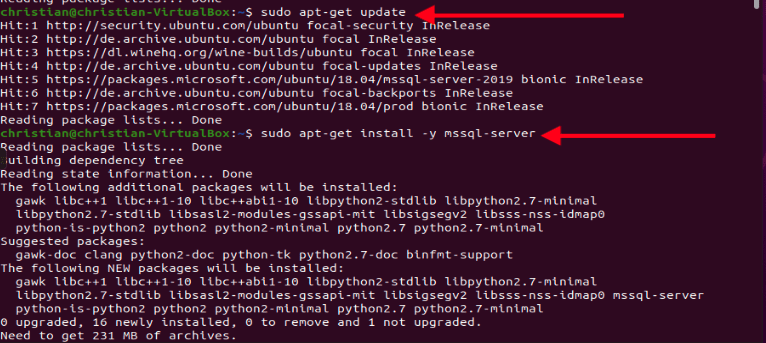

Step 6: Initialize MS SQL Server 2019 on Ubuntu 20.04
Note: After the package installation finishes, run mssql-conf setup as shown below and follow the prompts to set the SA password and choose your edition.
sudo /opt/mssql/bin/mssql-conf setup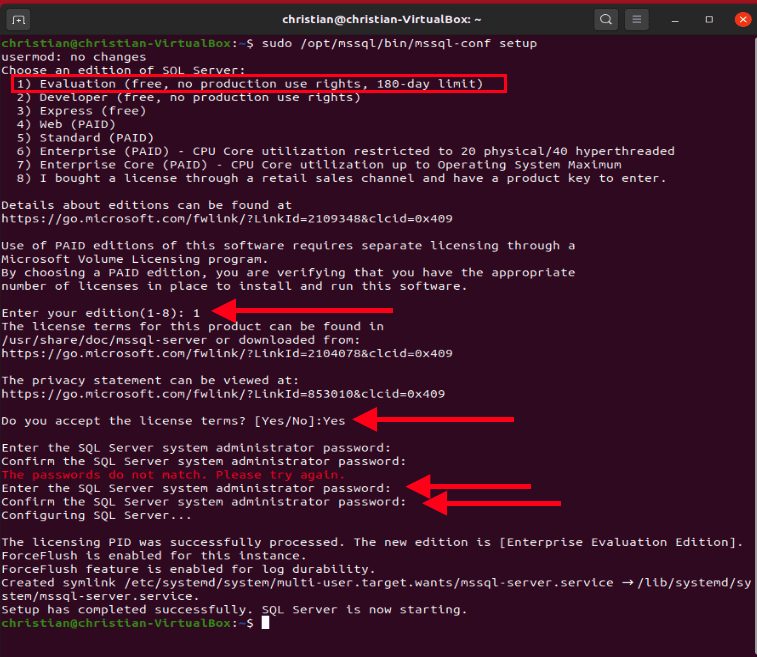
Verify the MySQL service
As we can see, the service is starting. The MS SQL service should be started. Once the configuration is done, verify that the service is running
systemctl status mssql-server --no-pager 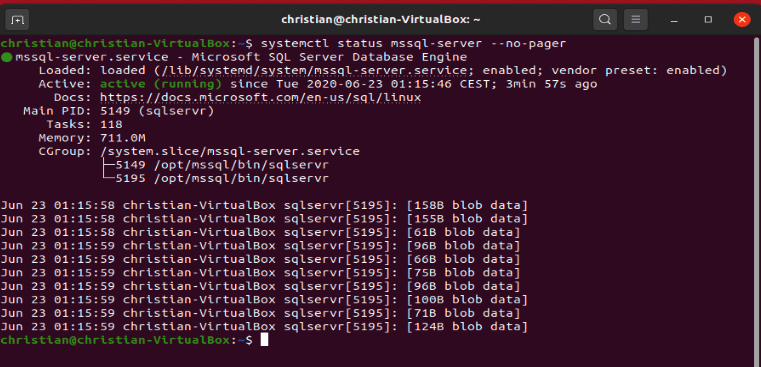
Step 7: Add Firewall rules to open default ports of MS SQL Server for remote connection if you plan to connect remotely, you might also need to open the SQL Server TCP port (default 1433) on your firewall.
sudo ufw allow 1433
sudo ufw allow 1434
Now let’s proceed with part B below to complete the MsSQL tool.
Create MSSQL database
Part B: To create a database, you need to connect with a tool that can run Transact-SQL statements on the SQL Server. The following steps install the SQL Server command-line tools: sqlcmd and bcp. Install the SQL Server command-line tools and the unixODBC plugin
Step 1: Import the public repo:
Import the public repository GPG keys.
curl https://packages.microsoft.com/keys/microsoft.asc | sudo apt-key add -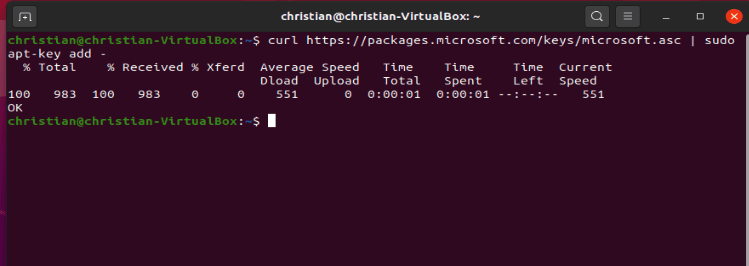
Step 2 – Register the Microsoft SQL Server Ubuntu
Register the Microsoft SQL Server Ubuntu repository for SQL Server 2019
curl https://packages.microsoft.com/config/ubuntu/18.04/prod.list | sudo tee /etc/apt/sources.list.d/msprod.list
This is Step 3 – Update the sources list
Update the sources list and run the installation command with the unixODBC developer package.
sudo apt-get update
sudo apt-get install mssql-tools unixodbc-dev
You may run into the following error “Unable to install msodbcsql17 on Ubuntu“, do not panic, use the following link to fix the issue. After the issue was fixed for me, I could install MsSQL tools on the server as shown below.
– Accept the license as well. by clicking on yes.
sudo apt-get update
sudo apt-get install mssql-tools

Alternatively, you could also use the following command below to install the SQL Tool (unixODBC developer package).
christian@christian-VirtualBox:~$ sudo ACCEPT_EULA=Y apt-get install msodbcsql17
Reading package lists... Done
Building dependency tree
Reading state information... Done
msodbcsql17 is already the newest version (17.5.2.1-1).
0 upgraded, 0 newly installed, 0 to remove and 1 not upgraded.
christian@christian-VirtualBox:~$
Step 4: Configure PATH for MS SQL binaries
Add /opt/mssql-tools/bin/ to your PATH environment variable in a bash shell. To make sqlcmd/bcp accessible from the bash shell for login sessions, modify your PATH in the ~/.bash_profile file with the following command.
echo 'export PATH="$PATH:/opt/mssql-tools/bin"' >> ~/.bash_profile
To make sqlcmd/bcp accessible from the bash shell for interactive/non-login sessions, modify the PATH in the ~/.bashrc file with the following command.
echo 'export PATH="$PATH:/opt/mssql-tools/bin"' >> ~/.bashrc
source ~/.bashrc
Part C: Connect locally to the MSSQL Console
To have this done, run sqlcmd with parameters for your SQL Server name (-S), the user name (-U), and the password (-P).
You are connecting locally using the server name “localhost”. The user name is SA and the password is the one you provided for the SA account during setup.
sqlcmd -S localhost -U SA -P '<YourPassword>'If Succeed to login, the prompt will be like this below

Then you can try all the SQL Command then, like Create Database, Query, Delete data, or database etc.
create database TechDirectArchiveDBTest and perform a remote connection using SQL Server Management Studio (SSMS) from your local machine.

I hope you found this blog post helpful on how to Install Microsoft SQL Server 2019 and MSSQL Command line tools on Ubuntu Linux. If you have any questions, please let me know in the comment session.


Hello Christian,
I did not get SSMS as shown by you in the last pic of this article. Could you please help me with that.
Hi Gaurav,
You will need to download and install the SQL Server Management Studio (SSMS) on your local machine and then initiate a connection to your Db. You can download it from here
For more information, see https://docs.microsoft.com/en-us/sql/ssms/download-sql-server-management-studio-ssms?view=sql-server-ver15