Skip to content

TechDirectArchive

Hands-on IT, Cloud, Security, Veeam & DevOps

  • Home
  • About
  • Advertise With US
  • Reviews
  • Contact
  • Toggle search form

No valid offer received: WDS PXE-E16 error when booting clients

Posted on 25/08/202004/10/2023 IT Expert By IT Expert 2 Comments on No valid offer received: WDS PXE-E16 error when booting clients
  1. Home
  2. Windows Server
  3. No valid offer received: WDS PXE-E16 error when booting clients

Windows Deployment Services (WDS) is the revised version of Remote Installation Services (RIS). WDS enables the deployment of new clients with a network-based installation without requiring that administrators visit each computer or install directly from CD or DVD media. For how to set up and install WDS role, and how to configure Windows Deployment Services on Windows Server 2019. Also, see how to configure Windows Deployment Services on Windows Server 2019. In this article, you will learn how to fix the “No valid offer received: WDS PXE-E16 error when booting clients”.

When prompted with this error below, as I always say, there are many factors that can be responsible for this. Below is what I did to resolve my issue. Please see How to remove Windows Deployment Services role via the GUI and PowerShell, and how to fix WinRM cannot complete the operation, verify that the specified computer name is valid.

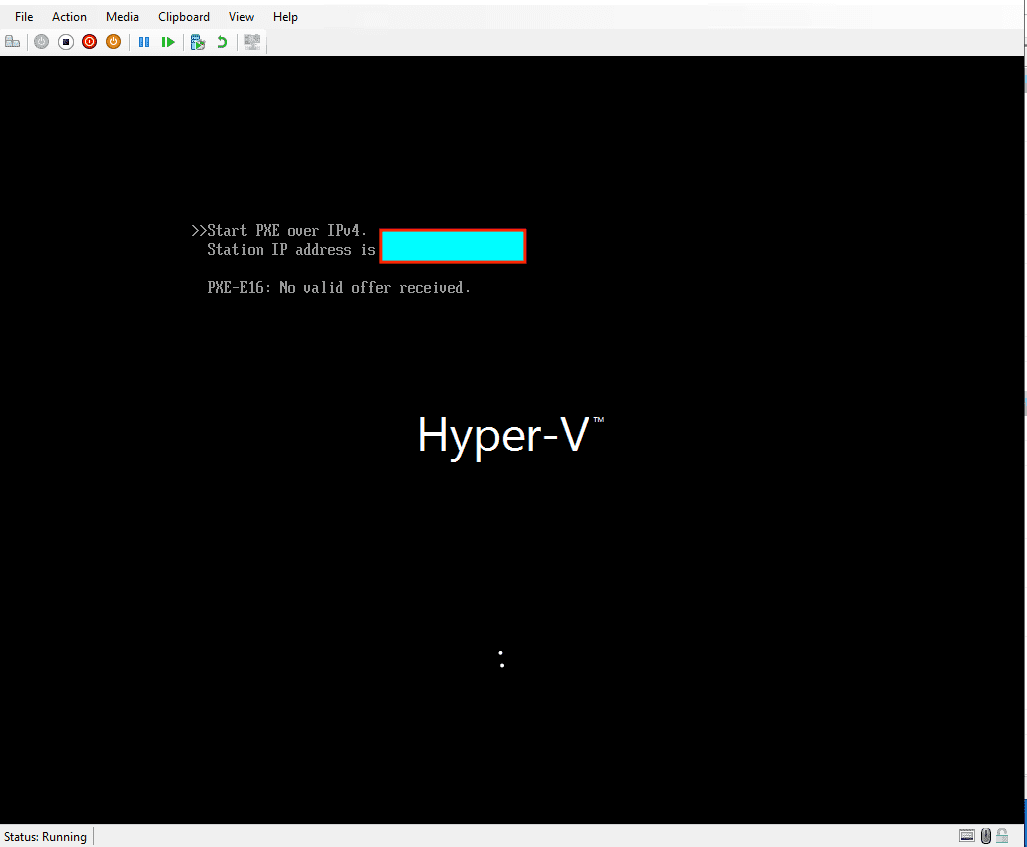
The solution to fixing no valid offer received: WDS PXE-E16 error when booting clients

Ensure the Windows Deployment Server Services are running. To verify this, log on to the WDS Server, and launch the Windows Deployment Services Tool.

Right-click on the server, select “All Tasks” and click on Start. Please see What are the differences between MDT and WDS?, and how to fix “The service could not be started either because it is disabled or because it has no enabled devices associated with it.“

The Windows Deployment Services have started successfully.

There are numerous reasons why this error is prompted. If the solution discussed above does not resolve your issue, kindly visit WDS PXE-E16 error when booting UEFI clients to see if what they discussed about this error can help you resolve your issue.

Optional: WDS moved to a different Subnet prompts PXE-E16 error

The PXE bootstrap broadcasts a DHCPDISCOVER packet with PXE-specific options on UDP port 67, which is not usually routed. Because of this, the PXE server must be located on the same subnet. But when in a different subnet, you must configure your network for forwarding UDP traffic via any of the following steps below;

  • Multihome the WDS server via additional NICs (or VLAN tagging via a single NIC if your NIC and switch support it) or,
  • Configure your network to forward UDP broadcasts. First set up the IP helper/DHCP relay on the router that communicates between the networks. For Cisco IOS this is done using the IP helper-address command.

If the DHCP server and WDS are in a different subnet now. You will also have to configure the DHCP options 66 and 67. I would recommend taking a look at WDS and DHCP Deployment Scenarios: Configure DHCP Options 60, 66, and 67

Please see how to fix Stuck at Start PXE over IPv4: PXE-E18, Server response timeout, resolve MDT Warning: Unable to set working directory, the application returned an unexpected code 2. Also, see What happens when WDS and DNS are installed on the same Windows Server? DNS issues with WDS.

I hope you found this blog post helpful. If you have any questions, please let me know in the comment session.

Rate this post

Thank you for reading this post. Kindly share it with others.

  • Share on X (Opens in new window) X
  • Share on Reddit (Opens in new window) Reddit
  • Share on LinkedIn (Opens in new window) LinkedIn
  • Share on Facebook (Opens in new window) Facebook
  • Share on Pinterest (Opens in new window) Pinterest
  • Share on Tumblr (Opens in new window) Tumblr
  • Share on Telegram (Opens in new window) Telegram
  • Share on WhatsApp (Opens in new window) WhatsApp
  • Share on Mastodon (Opens in new window) Mastodon
  • Share on Bluesky (Opens in new window) Bluesky
  • Share on Threads (Opens in new window) Threads
  • Share on Nextdoor (Opens in new window) Nextdoor
Windows Server Tags:WDS, WDSUTIL, Windows 10, Windows Server 2016

Post navigation

Previous Post: How to query a list of installed programs in Windows
Next Post: The service could not be started either because it is disabled or because it has no enabled devices associated with it

Related Posts

  • screenshot 2020 04 04 at 01.38.38
    Fix Failed to create scheduled task due to Windows Server Management service issue Windows Server
  • SysInternals
    How to use the Process Explorer from SysInternals Tools Windows Server
  • sdfgh 1
    How to fix “Unable to Sign In: Domain Not Available” Windows Server
  • banner
    How to Back Up and Restore the Windows Registry Windows
  • sign11
    Windows sign-in options and account protection on Windows 11 Windows
  • Banner
    Enabling and Configuring WinRM via GPO Windows

More Related Articles

screenshot 2020 04 04 at 01.38.38 Fix Failed to create scheduled task due to Windows Server Management service issue Windows Server
SysInternals How to use the Process Explorer from SysInternals Tools Windows Server
sdfgh 1 How to fix “Unable to Sign In: Domain Not Available” Windows Server
banner How to Back Up and Restore the Windows Registry Windows
sign11 Windows sign-in options and account protection on Windows 11 Windows
Banner Enabling and Configuring WinRM via GPO Windows

Comments (2) on “No valid offer received: WDS PXE-E16 error when booting clients”

  1. Avatar photo Rashid says:
    10/05/2023 at 8:28 AM

    I feel like DHCP is also installed on that server and both WDS and DHCP trying to use same port 67
    check on cmd
    Text

    netstat -ano | findStr "67"
    

    If yes,
     Method 1At the command prompt, type the following command, and then press ENTER:
    wdsutil /set-Server /UseDhcpPorts:No
    Method 2Click Start, click Run, type wdsmgmt.msc, and then press OK.In the Windows Deployment Services window, expand Servers, right-click the WDS server name, and then click Properties.
    In the Server Properties dialog box, click the DHCP tab.
    Click to select the Do not listen on port 67 check box, and then click Apply.

    Log in to Reply
    1. chris Christian says:
      10/05/2023 at 8:00 PM

      Hello Rashid,

      Thank you very much for sharing this information with the community. As I mentioned, here is another possible solution to this issue.

      Cheers!

      Log in to Reply

Leave a Reply Cancel reply

You must be logged in to post a comment.

Microsoft MVP

VEEAMLEGEND

vexpert-badge-stars-5

Virtual Background

GoogleNews

Categories

veeaam100

Veeam Vanguard

  • Shared Folder
    How to access shared resources from two different domains Windows
  • veeam vulnerability backups
    Fix critical Veeam Backup and Replication 9.5, 10, and 11 vulnerabilities Backup
  • Fix Boot Failed UEFI SCSI Device on HyperV
    How to Fix Boot Failed UEFI SCSI Device on HyperV Virtualization
  • Featured image 2
    How to delete Windows old folder in Windows 11 Windows
  • Protecting DS923 NAS
    DSM Security: How to Protect Synology DS923+ NAS Reviews
  • Screensaver
    How to Enable or Disable Screen Saver on Windows Windows
  • 1237968 3d79
    How to perform sysprep in Windows Windows
  • Slide1 3
    Azure Virtual Networks: Preparing Azure and On-Premises Virtual Networks with Azure CLI Commands AWS/Azure/OpenShift

Subscribe to Blog via Email

Enter your email address to subscribe to this blog and receive notifications of new posts by email.

Join 1,796 other subscribers
  • RSS - Posts
  • RSS - Comments
  • About
  • Authors
  • Write for us
  • Advertise with us
  • General Terms and Conditions
  • Privacy policy
  • Feedly
  • Telegram
  • Youtube
  • Facebook
  • Instagram
  • LinkedIn
  • Tumblr
  • Pinterest
  • Twitter
  • mastodon

Tags

Active Directory Azure Bitlocker Microsoft Windows PowerShell WDS Windows 10 Windows 11 Windows Deployment Services Windows Server 2016

Copyright © 2025 TechDirectArchive

Loading Comments...

You must be logged in to post a comment.