

You can create virtual machines (VMs) in Azure that use SSH keys for authentication using a secure shell (SSH) key pair. This article will demonstrate how to quickly generate and use an SSH public-private key file pair for Linux virtual machines. This guide shows the step on how to use PowerShell to generate and associate an SSH public key with an existing Azure Linux-based Virtual Machine. Please see how to perform SSH key-based authentication in Linux and how to disable RC4 Cipher Algorithms support in SSH Server.
You will gain hands-on experience configuring SSH authentication keys for a Linux system running on Microsoft Azure. The steps in this article are essential for a Linux system administrator, platform administrators who use the SSH service, cybersecurity professionals, and penetration testers. Please follow along as I show you how to generate and associate SSH Public key with Azure Linux VM.
As part of the things I will cover in this article, you will browse to the Azure portal, find your Linux virtual machine, and reset the SSH public key configuration to your new key, which is assumed you have lost or failed to download the SSH key during the virtual machine set up.
Accomplishing this step demonstrates the ease of administration of your Linux host via the Azure portal.
Read other related guides on Linux and SSH: How to perform SSH key-based authentication in Linux, how to Generate SSH Key in Windows 10, and how to SSH into a Virtual Machine created using Azure CLI or GUI.
What are SSH and SSH Keys?
SSH, also known as Secure Shell or Secure Socket Shell, is a network protocol that allows users, especially system administrators, to access a computer securely over an insecure network. Therefore, an SSH key allows us to connect to VMs without using passwords by passing a private key that you or your organization can manage.
If you use the portal regularly to deploy Linux VMs, you could perhaps make using SSH keys easier by generating them directly on the portal or uploading them from your computer.
When you first create a VM, you can generate SSH keys that you can reuse for other VMs. Alternatively, you can create SSH keys separately so that you have a set of keys in Azure that are specific to your organization’s needs. You can generate a new SSH key to be used with your existing Linux VM if:
- You forgot to download and save the copy of the SSH key while creating the VM on Azure
- Or you found out that your existing SSH Key has been compromised.
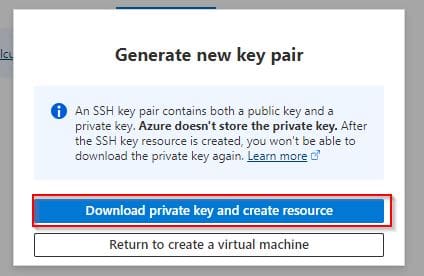
Note: If you already have keys and want to make it easier to use them in the portal, you can upload and store them in Azure for reuse.
Please see Fix broken Repository Path in Veeam Scale-Out Backup Repository, how to prevent macOS from going to sleep, and how to Backup MacOS to Synology NAS via Time Machine.
Generate SSH Keys
To generate an SSH key for an existing Azure Linux Ubuntu-based VM (generate SSH Public key with Azure Linux VM), follow the steps below:
Step 1-Search for and launch PowerShell on your PC as an Admin.
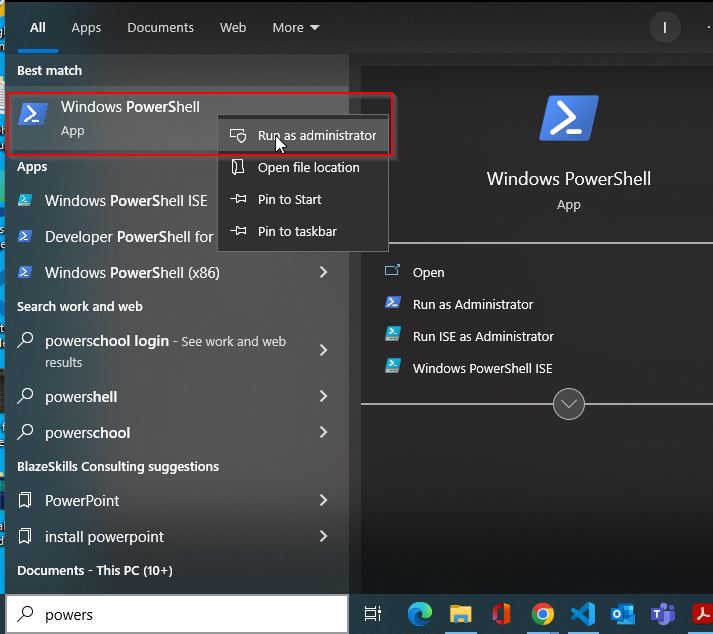
Step 2-Run the below command to generate the SSH keys in 2048 or 4096 bit size. Here we’re generating the SSH key in 4096 bits.
ssh-keygen -m PEM -t rsa -b 4096
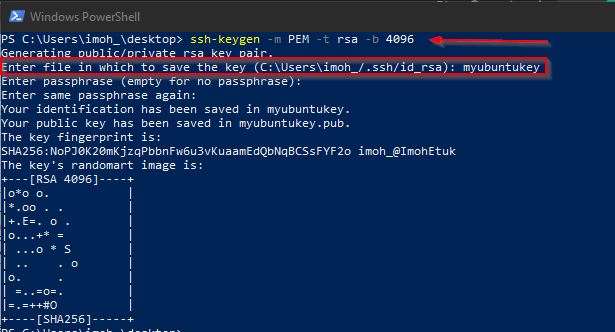
Before you generate the key, ensure you navigate to the directory that will be easily accessible to you. Here I am in the Desktop directory.
Before you can use the key for the Azure Linux VM, the key must be converted to a public key. To do so, kindly review this article to learn how to convert your SSH key from Privacy Enhanced Mail (PEM) to Public Private Key (PPK) format using Puttygen.
After converting the key to PPK format, use the cat command to view the content of your Public key file.

Now, highlight and copy the key to be used for the Azure Linux VM while resetting the key.
Note: Ensure you copy it to include —- BEGIN SSH2 PUBLIC KEY —- and —- END SSH2 PUBLIC KEY —-
Please see How to Upgrade Veeam ONE to 13.0.2.6723 to Address Security Fixes, how to Fix Vulnerable Veeam Backup and Replication 13.0.1.2067 and Earlier, and How to upgrade Veeam One from v12 to v13.
Resetting SSH Key for Azure Linux VM
Head to the Azure portal, and do the following:
Step 1-Reset the SSH Key on your Azure Linux-Based VM. To do so, go to the Linux VM you deployed earlier, and then click on “Connect” and select SSH as the connection type.

On the second screen, select Replace/reset your SSH private key.

Step 4-Type the username of your VM into the namespace while keeping the Reset SSH public key selected, paste the SSH public key you copied in the previous step, and click on Update.
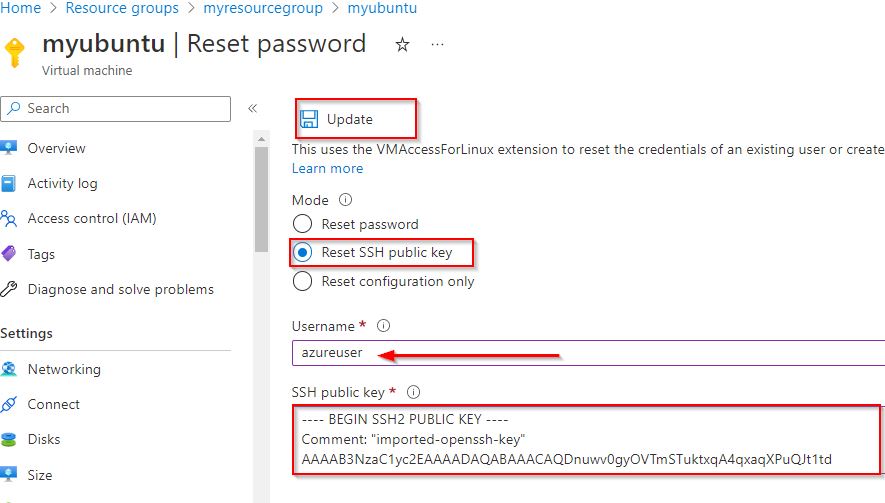
You will get a notification as shown below:

Please see Azure Application Gateway: Practical Configuration Guide, and Azure Arc for SQL Server PAYG: Installation, Connectivity Requirements and Operational Best Practices.
Connecting to your Linux VM with the New SSH Key Using Putty
To connect to the VM, do the following:
Step 1 – Search for and click on Putty to open it. When the Putty app is open, go to the Linux VM overview page on Azure Portal, and copy and paste the public IP Address of the VM into Pthe utty connection space.
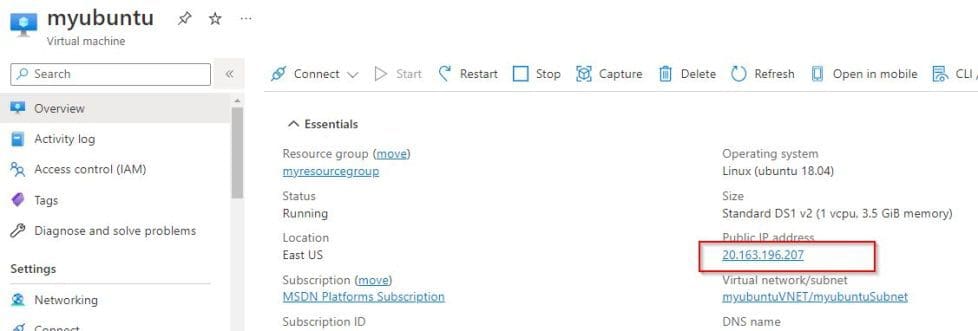
Paste it into Putty.

Step 2-From the Putty screen, click on the Auth blade on the left-hand side and select Browse to find the location where you stored the SSH public key you converted using the Puttygen app, and then click on Open.
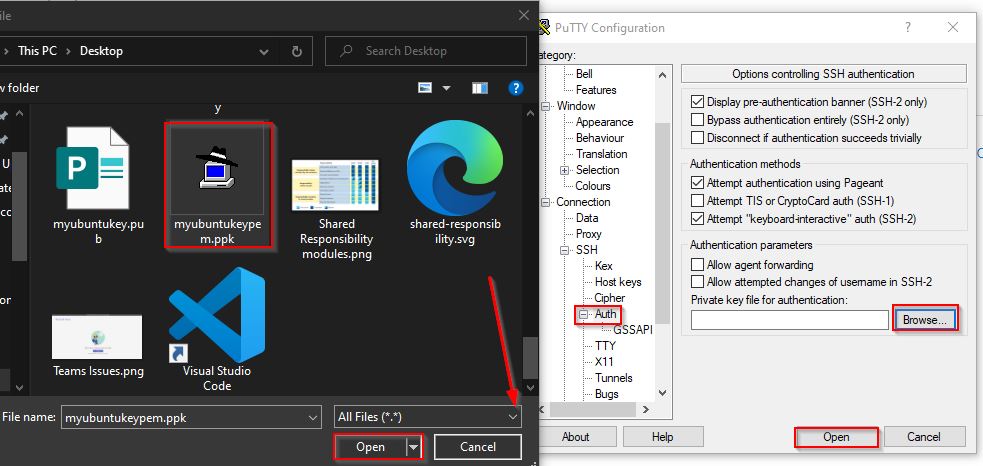
After clicking on Open, you will receive a prompt to accept the connection as shown on the screenshot below, go ahead and accept the connection.

Finally, you’re connected to your Linux VM on Azure. If you type the whoami command, you should see the username of your Linux VM displayed.

Now you have learned how to associate SSH Public key with Azure Linux VM. if you have followed the steps above up to this level, congratulations!
You’ve successfully generated a new SSH public key and associated it with your existing Azure Linux Virtual Machine on the Azure Portal and are also able to connect to it using an SSH client called Putty.


