Skip to content

TechDirectArchive

Hands-on IT, Cloud, Security & DevOps Insights

  • Home
  • About
  • Advertise With US
  • Reviews
  • Contact
  • Toggle search form
Home » Linux » Adding a subnetwork interface to an existing network interface

Adding a subnetwork interface to an existing network interface

Posted on 27/10/202006/09/2023 Christian By Christian No Comments on Adding a subnetwork interface to an existing network interface
subnetwork interface

A Network Interface Card (NIC) is used to connect a computer to an Ethernet network. This tutorial will teach you two ways you can add a network interface to an already existing network interface.

METHOD 1


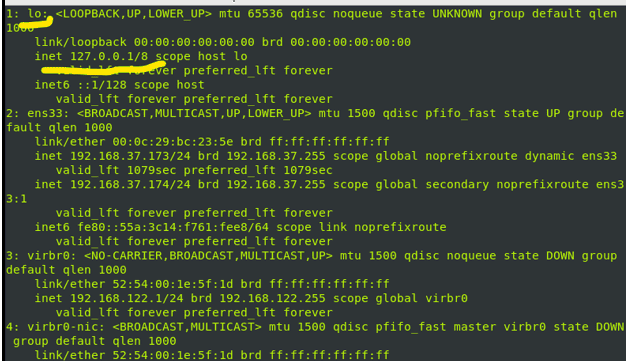
– Additionally, we look at my available interfaces by issuing the ip command.

existing network interface

For this tutorial, I am going to create and attach a sub network interface to the lo interface. All the configuration files for the various network interfaces are stored in the etc/sysconfig/network-scripts directory.

First, we will copy the content of the configuration scripts of the interface we want to attach the new subnetwork interface to; copy it to a file that will serve as the configuration script for the new subnetwork interface. The new script must end with a :interger extention. For example, the new interface I am creating will be named lo:1

  • Copy the configuration file with the command:

    cp /etc/sysconfig/network-scripts/ifcfg-lo /etc/sysconfig/network-scripts/ifcfg-lo:1

Remember to change the name of the network interfaces correspondingly when you are trying yours.

network configuration

When you are done copying, open the file you just created with the copy command with a text editor:

network management

Modifying Device Names in Copy Commands

Furthermore, Where you see DEVICE, change the device name to match the one you used in the copy command. In my case, I will change lo to lo:1.
– However, Also change the IPADDR value to the new address you want to add to the existing interface. In my case, I will put 127.0.0.10.

subnetwork interface

Save and quit the editor. Now, restart the interface using the command: ifup interfaceName. In my case, it will be ifup lo:1

network configuration

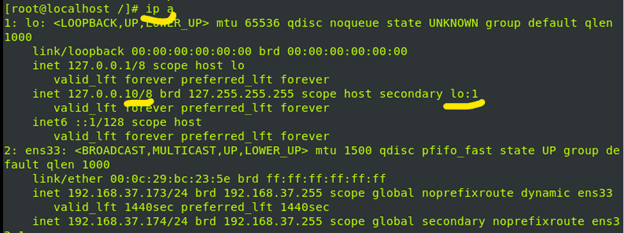
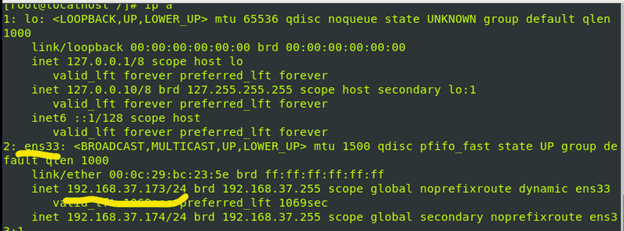
Moreover, If we run the ip a command again, you will see the new network sub-interface has been added.

network configuration

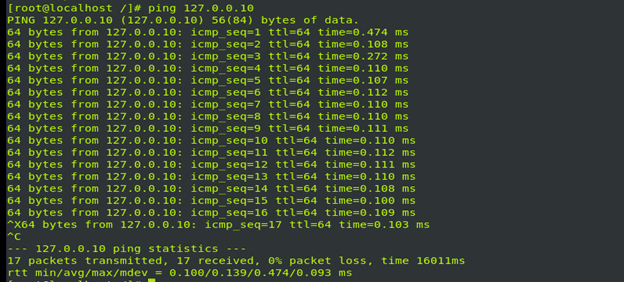
In addition, You can ping the ip address to verify if it is truly up.

METHOD 2
– Nonetheless, Let’s run the ip a command again to view our existing network interfaces.

Consequently, For this demonstration, I will attach a new sub network interface to the ens33 interface.

Similarly, Now use the command below to add a new interface to a network interface: nmcli con mod interfaceName +ipv4.addresses  “new-ip-address/nwMask”. In my case, the command will be nmcli con mod ens33 +ipv4.addresses “192.168.37.175/24”.

Nevertheless, Now reboot your system and run the ip a command again.

Nevertheless, The major difference between both methods is that you control naming the newly created interface in the first method.

I hope you found this tutorial helpful.

Rate this post

Thank you for reading this post. Kindly share it with others.

  • Share on X (Opens in new window) X
  • Share on Reddit (Opens in new window) Reddit
  • Share on LinkedIn (Opens in new window) LinkedIn
  • Share on Facebook (Opens in new window) Facebook
  • Share on Pinterest (Opens in new window) Pinterest
  • Share on Tumblr (Opens in new window) Tumblr
  • Share on Telegram (Opens in new window) Telegram
  • Share on WhatsApp (Opens in new window) WhatsApp
  • Share on Mastodon (Opens in new window) Mastodon
  • Share on Bluesky (Opens in new window) Bluesky
  • Share on Threads (Opens in new window) Threads
  • Share on Nextdoor (Opens in new window) Nextdoor
Linux Tags:Enhanced Networking Adapter, Networking

Post navigation

Previous Post: Log Off: How to sign out of Windows Server 2012
Next Post: How to check your current Runlevel in Linux

Related Posts

  • DNS FEATURE
    Domain Name System: All you need to know about DNS Linux
  • lampstack feature lamp stack ubuntu
    How to Install LAMP Stack on Ubuntu 18.04 Linux
  • featurekube
    How to Install and Use Minikube on a Linux System Containers
  • Package1
    Install Synaptic Package Manager: Handle packages in Ubuntu Linux
  • 1 pUEZd8z  1p 7ICIO1NZFA
    The package python-virtualenv has no installation candidate error Linux
  • images copy
    How to clean packages lying around in Linux Linux

More Related Articles

DNS FEATURE Domain Name System: All you need to know about DNS Linux
lampstack feature lamp stack ubuntu How to Install LAMP Stack on Ubuntu 18.04 Linux
featurekube How to Install and Use Minikube on a Linux System Containers
Package1 Install Synaptic Package Manager: Handle packages in Ubuntu Linux
1 pUEZd8z  1p 7ICIO1NZFA The package python-virtualenv has no installation candidate error Linux
images copy How to clean packages lying around in Linux Linux

Leave a Reply Cancel reply

You must be logged in to post a comment.

Microsoft MVP

VEEAMLEGEND

vexpert-badge-stars-5

Virtual Background

GoogleNews

Categories

veeaam100

Veeam Vanguard

  • bypass windows login main img
    How to disable auto login in Windows Windows
  • Password Migration to ICloud Keychain
    How to import your Chrome or Firefox passwords into your iCloud Keychain Mac
  • ztre23fsas
    Grant or Deny Microphone Access on Mac Mac
  • Disable BitLocker
    How to Disable BitLocker on Windows 10 Windows
  • Specifiy the right credential for adding a domain
    Specify user account name when adding a DC to an existing Forest Windows Server
  • tuning tomcat
    How to upgrade Apache Tomcat from One Version to another Web Server
  • nm
    How to add or remove email addresses from a mailbox Network | Monitoring
  • images
    Unable to connect to MSSQL Server after changing Server name Oracle/MSSQL/MySQL

Subscribe to Blog via Email

Enter your email address to subscribe to this blog and receive notifications of new posts by email.

Join 1,808 other subscribers
  • RSS - Posts
  • RSS - Comments
  • About
  • Authors
  • Write for us
  • Advertise with us
  • General Terms and Conditions
  • Privacy policy
  • Feedly
  • Telegram
  • Youtube
  • Facebook
  • Instagram
  • LinkedIn
  • Tumblr
  • Pinterest
  • Twitter
  • mastodon

Tags

AWS Azure Bitlocker Microsoft Windows PowerShell WDS Windows 10 Windows 11 Windows Deployment Services Windows Server 2016

Copyright © 2025 TechDirectArchive


Loading Comments...
 

You must be logged in to post a comment.