How to manage Microsoft Defender Antivirus using Group Policy and Command Line Utility

In this article, we shall discuss how to manage Microsoft Defender Antivirus using Group Policy and CMD (Commandline). Microsoft Defender Antivirus (previously Windows Defender Antivirus) is a component of the Windows Security experience, and it offers real-time protection against viruses, ransomware, spyware, rootkits, and a variety of other malware and hackers. Please see How to remove Microsoft Defender update on Windows 10 and Windows Server image.
It’s also one of the top antivirus software recommendations. Although the Windows Security app makes daily antivirus tasks simple, you can also operate the anti-malware solution via PowerShell commands, which can be useful in a variety of situations.
When you want to change a feature that isn’t available through the graphical user interface (GUI), such as scheduling a quick or full scan or a signature update, for example. To automate some Microsoft Defender Antivirus functions, you’ll need to write scripts.
Alternatively, utilizing commands rather than a GUI might speed up the configuration process, especially if you need to apply the same settings to many Windows PCs at the same time.
In this post, you will learn how to manage Microsoft Defender Antivirus in your business with Group Policy and Microsoft Malware Protection Command Line Utility (mpcmdrun.exe).
Here are some related guides: How to update Microsoft Defender Antivirus into the install image of Windows, and how to schedule Windows Defender Antivirus to scan on-demand in Windows.
What is Group Policy?
Group Policy is a Windows feature that allows network administrators to regulate the working environment of users and computer accounts in Active Directory through a number of complex settings.
It essentially gives administrators a consolidated location to manage and modify operating systems, programs, and user preferences. Group Policy is essentially a security tool that enables applying security settings to users and computers.
Also, see Windows Defender Antivirus Management with Intune, and Install.wim: How to view Microsoft Defender Antivirus update details on Windows 10 image.
What is the MpCmdRun.exe command?
mpcmdrun.exe is an important part of Microsoft’s Windows Security system that helps protect your PC from online threats and malware. You can also use this utility if you’d like to automate Microsoft Security Antivirus. You must run the .exe from the Windows command prompt.
Learn more about Microsoft Defender and Windows 11 encryption features in these related posts how to remove Microsoft Defender update on Windows 10 and Windows Server image, how to view Microsoft Defender Antivirus update details on Windows 10 image (install.wim), and new Windows 11 encryption features and security enhancements will help protect hybrid work.
Managing Microsoft Defender Antivirus using Group Policy
You can configure and manage Microsoft Defender Antivirus on your endpoints using Group Policy. In practice, you can configure or alter Microsoft Defender Antivirus group policy settings by following the steps below:
From the Start Menu, search for and click on "Edit Group Policy". Alternatively, press the Windows key + R to open the Run dialog box and type "gpedit.msc" to open the Group Policy Management Console.
On local Windows 10 /11 that’s not a Windows Server, you find it as the “Local Group Policy Editor”. It is named Local Group Policy Editor because your Windows 10 or 11 PC is a Server.

On the Group Policy Management Console or Local Group Policy, click on Computer Configuration->Administrative Templates.

Expand the tree to Windows components > Microsoft Defender Antivirus.

Select the area containing the setting you wish to alter, then double-click the setting to open it and make changes.

Enable an option under the “Client Interface”
Here, we are going to enable an option under the “Client Interface,” introducing the ability to display additional text to clients when they need to act. Additionally, the option allows you to suppress all notifications, suppress reboot notifications, and enable headless UI mode.”

The display of additional text to clients when they need to perform an action policy if enabled as stated in the flyout dialog box of the policy will allow you to configure whether or not to display additional text to clients when they need to act. The text displayed is a custom administrator-defined string.
For example, the phone number to call the company help desk. The client interface will only display a maximum of 1024 characters. Longer strings will be truncated before display.
To enable the display of additional text to clients when they need to perform an action policy, you can follow these steps:
Double-click on it to open, and click on "Enabled" type the text you will like to display to clients in the options column. Click Apply and Okay.

This policy supports at least Windows Server 2012, Windows 8 or Windows RT down to Windows 10 and 11.
After that, the status for display additional text to clients when they need to perform an action will become enabled.

Managing Microsoft Defender Antivirus using Microsoft Malware Protection Command Line Utility (MpCmdRun.exe)
The Microsoft Malware Protection Command Line Utility is “MpCmdRun.exe.” It allows command-line, parameter-controlled execution of the computer’s native Microsoft antimalware program with administrator credentials (Windows Defender, Microsoft Security Client, or Microsoft Security Essentials)
You can use the specific command-line utility mpcmdrun.exe to perform numerous functions in Microsoft Defender Antivirus. When you wish to automate Microsoft Defender Antivirus tasks, this utility comes in handy. The program can be found in the folder %ProgramFiles%\Windows Defender\MpCmdRun.exe. Use a command prompt to run it.
To run the command, launch the command prompt as an administrator and then enter MpCmdRun.exe command and press enter. You can run directly from the C:\Program Files\Windows Defender directory.

If you’re running an updated Microsoft Defender Antivirus platform version, run MpCmdRun from the following location: C:\ProgramData\Microsoft\Windows Defender\Platform\<antimalware platform version>.

The MpCmdRun utility uses the following syntax:
MpCmdRun.exe [command] [-options]For example, we use ScanType 1 to carry out a quick scan as shown below.
MpCmdRun.exe -Scan -ScanType 1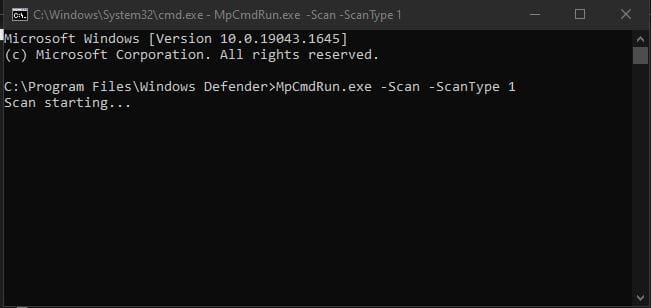
Scans for malicious software. Values for ScanType are:
 0 Default, according to your configuration. 1 Quick scan, 2 Full scan, 3 File and directory custom scan.
The scan is now completed

You will also be notified via the notification area of your PC window
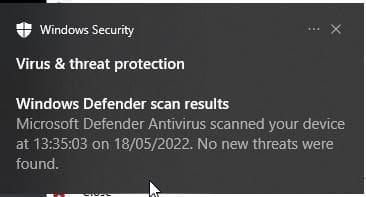
When clicked on the notifications, you will be directed to some recommended action to take to further strengthen the security of the PC.

As shown above, the SmartScreen for Microsoft Edge is turned off on my PC and I’m giving the action to take which is to turn it on.
I hope you found this blog post on how to manage Microsoft Defender Antivirus using Group Policy and CMD (Commandline) helpful. If you have any questions, please let me know in the comment section.