GitHub Pages Deployment Guide

Discover the streamlined process of seamlessly transitioning your workload from a local environment to GitHub, followed by effortlessly hosting it on GitHub Pages. This comprehensive guide demystifies the steps involved in the Github pages deployment guide. Thereby, empowering you to showcase your projects with ease and efficiency on the web. Other useful guides can be found here Move Azure Resources between Subscriptions and How to Deploy Azure Resources Using Azure Bicep also Setup a Continuous Deployment Pipeline with AWS CodePipeline and How to Install Azure Storage Explorer on Windows
GitHub Pages serves as an innovative platform within the GitHub ecosystem, empowering users to effortlessly host static websites directly from their repositories. This dynamic service caters to a diverse range of needs, from showcasing personal portfolios to sharing project documentation and beyond.
By leveraging GitHub’s seamless integration and user-friendly interface, individuals and organizations alike can amplify their online presence with ease and efficiency.
Step1: Download and Configure git bash
We can download Gitbash. To ensure thorough tracking of every action taken on our files, it’s imperative to associate an identity with each operation, given that Git serves as our version control system. Below are the commands to configure Git:
Git config --global user.name [username]The above command configures the username of the working environment

Git config --global user.email[email]The command above configures the email of the working environment

Please see How to sync S3 Bucket with an EC2 instance, How to install Git on macOS, and how to use Command-Line on Git Bash and GitHub Desktop to PUSH local code to GitHub.
Step 2: Prepare the working environment
For every project, the initial step is to create a directory that will contain all project files, and this project is no different. To create a directory, you can use the following command:
mkdir techdirectwebsite
Enter into the newly created directory with the command:
cd techdirectwebsite
To initialize the directory with Git, use the following command:
git init
At this point, we need to create a text file called index.html that would be sent to GitHub pages. We can use the command below
touch index.html
We can edit the index.html file using vim [name of the file] the command automatically opens the index.html file. We then need to be in insert mode by pressing I on the keyboard to be able to start editing the file
vim index.html
<!DOCTYPE html>
<html lang="en">
<head>
    <meta charset="UTF-8">
    <meta name="viewport" content="width=device-width, initial-scale=1.0">
    <title>Resume</title>
    <style>
        body {
            font-family: Arial, sans-serif;
            margin: 0;
            padding: 20px;
            line-height: 1.6;
        }
        h1, h2, h3 {
            margin-top: 0;
        }
        .container {
            max-width: 600px;
            margin: 0 auto;
        }
        .contact-info {
            margin-bottom: 20px;
        }
        .contact-info p {
            margin: 5px 0;
        }
    </style>
</head>
<body>
    <div class="container">
        <header>
            <h1>Your Name</h1>
            <p>Web Developer</p>
            <div class="contact-info">
                <p>Email: your.email@example.com</p>
                <p>Phone: 123-456-7890</p>
                <p>Website: <a href="https://www.example.com">www.example.com</a></p>
                <p>GitHub: <a href="https://github.com/yourusername">yourusername</a></p>
                <p>LinkedIn: <a href="https://www.linkedin.com/in/yourusername">yourusername</a></p>
            </div>
        </header>

        <section>
            <h2>Education</h2>
            <p>Bachelor of Science in Computer Science, University Name, Year</p>
        </section>

        <section>
            <h2>Experience</h2>
            <h3>Web Developer, Company Name, Date</h3>
            <ul>
                <li>Firstly, developed and maintained company websites using HTML, CSS, and JavaScript</li>
                <li>Secondly, collaborated with team members to implement new features and improve user experience</li>
            </ul>
        </section>

        <section>
            <h2>Skills</h2>
            <ul>
                <li>Firstly, HTML</li>
                <li>Secondly, CSS</li>
                <li>Thirdly, JavaScript</li>
                <li>Fourthly, Git</li>
                <li>Finally, Responsive Web Design</li>
            </ul>
        </section>
    </div>
</body>
</html>
Here is how to fix Git always asking for my Username and Password, and how to clone a repository and install software from GitHub on Windows.
Step 3: Clone the repo into git bash
To clone a repo, we must first create it on GitHub. Beforehand, navigate to the GitHub website, click on the + button, and then check the drop-down.

After creating the repo, click on the code, the green button, and copy the HTTPS option
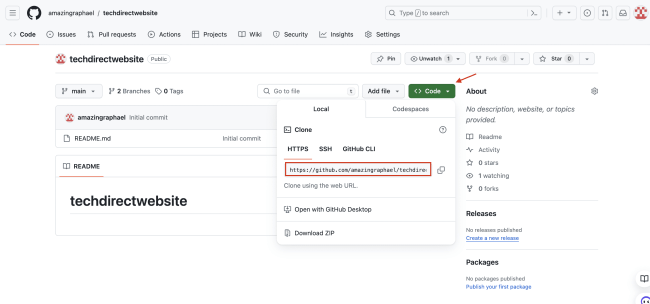
To clone the repo in our local environment, we need to use the code :
git remote add origin URL < this is the https link from the repo>git remote add origin https://github.com/raphgm/techdirectwebsite.git
Step 4: Push to GitHub
At this point, we can check the status of what is in our index.html file using the command
git status
At this stage, let’s actively add the files to the staging area to initiate tracking for them. Utilize the git add command, and subsequently, check the status again to confirm that tracking has commenced. We can employ the following command to add the files to the staging area:
git add index.html
Use the command to add a commit message:
git commit -m "this is a commit"
We can then push to GitHub using the command. Make sure you authenticate

git push origin master

You can view the content of the index.html document just in case there is a correct or any mistake.

Step 5: Prepare the pushed content for GitHub pages.
Navigate to the settings button of the repo and click on it and it will take you to the general settings page .

Next, click on Pages under the general settings

At this point, you are in the GitHub Pages home page. The first thing to take note of is, the source button select Deploy from a branch as the source .
The next thing to take note of is Branch. Select the branch that has the file that you want displayed on GitHub pages. In this part particular case, our source code was deployed to the master branch so we select master. Finally click on the save button.

After clicking on the save button, you will see something like whats on the page below:

At this point, you need to refresh the page to retrieve the URL of the rendered index.html document to GitHub pages

Finally, navigate to the URL https://github.com/amazingraphael/techdirectwebsite generated for you or hit the Visit site button to visit your new static webpage hosted on GitHub pages. The page is shown below:

Summary
GitHub Pages provides a versatile platform for hosting single-page documents like resumes or online stores, as well as sign-up pages. This article outlines the step-by-step process, from setting up your local environment to pushing your source code to facilitate seamless deployment.
I hope you found this article on Github pages deployment guide useful. Please feel free to leave a comment below.


