Protect your Windows Devices with MFA with SystoLOCK

SystoLOCK is a passwordless Multi Factor Authentication (MFA) platform developed by Systola GmbH here in Deutschland (Germany). Therefore, in this article, we shall discuss how to protect your Windows Devices with MFA with SystoLOCK. Please, see Creating IAM Users, Adding MFA and Policies on AWS, “MFA on Root Account: Create a User on AWS and Register MFA“, and steps in Integrating on-premise AD with Azure Active Directory and MFA.
MFA is a security access management solution that verifies a user’s identity at login with two or more verification factors. By providing a layer of protection to a user or company’s data, MFA helps to prevent malware, phishing, and ransomware attacks.
One of the greatest strength of SystoLOCK is that. It is relatively very easy to install and manage but you will need to adhere to some system requirements etc as we will decipher in this guide very shortly. The image below gives a shortly overview of the capabilities of this application.

Please, see “Rolling out Multi-factor Authentication – Recommendations“, steps in Migrating SAP HANA Plugin to Veeam, and how to Fix what is taking up my Mac Storage? Delete Snapshots.
Hardware Requirements
According to the SystoLOCK documentation, there are no strict hardware requirements for deployment. This indicates that the software components are lightweight and can operate efficiently on any supported operating system (OS). Provided the system has sufficient resources to ensure stable performance.
A separate Server is required to have Active Directory Certificate Services (AD DS) running in Enterprise Mode. For Active Directory Domain Services (AD DS), the AD Domain and Forest Functional Level must be higher than 2008R2. Please, see how to Raise or Downgrade AD Domain and Forest Functional Level.
For Windows client requirements, Windows 10 and 11 is supported. Kindly pay attention to Windows 10 EoL. All these requirements are applicable to ADFS, and RDS environments. If you have got multiple sites, please take a look at this link.
Please, see how to determine Active Directory Site Name, how to change Active Directory Domain name from dot local to dot com, and how to create New Users and Join Synology NAS to Active Directory.
System Components
SystoLOCK is a distributed system composed of multiple interdependent components. These components not only rely on each other but also on core Active Directory services.
It is important to note that SystoLOCK makes extensive use of Public Key Infrastructure (PKI), even though PKI is not a mandatory requirement for a Windows domain to operate properly. This means, a Certificate Authority (CA) must be deployed prior to installing SysLOCK.
Note: If you attempt to install SystoLOCK Server without AD CS properly configured, SystoLOCK setup will fail. Please, see , How to Install ROOT CA Enterprise and NPS Wifi Certificate, and how to Generate CSR and Request a Certificate from Herica CA.
Unlike standard Active Directory authentication where a client communicates directly with a domain controller. SystoLOCK introduces an additional layer in the process.
With SystoLOCK, authentication is brokered through its own service components before the final verification with Active Directory. The diagram below illustrates the SystoLOCK authentication flow:

- Credentials (user name, PIN and one-time-password) are sent to SystoLOCK server for validation.
- Upon successful validation, SystoLOCK server obtains a Certificate from a certification authority and
- Returns the certificate to the client.
- The client then presents the certificate to a domain controller.
- The domain controller authenticates the client.
Note: Domain controllers do not form part of the SystoLOCK infrastructure, but SystoLOCK depends on them and cannot operate without a domain environment. SystoLOCK does not support MFA in workgroup scenarios.
A domain can function without a Certification Authority (CA), but SystoLOCK requires an Enterprise CA to be installed and available at all times. The CA must issue user certificates for each authentication attempt, as SystoLOCK generates a new, short-lived user certificate every time a user authenticates.
SystoLOCK Client
The Windows Client is a driver that integrates with standard Windows authentication, captures SystoLOCK credentials, forwards them to the SystoLOCK Server, and modifies how authentication dialogs appear to users.

Please, see PetitPotam attack on Active Directory Certificate Services: How to mitigate NTLM Relay PetitPotam attack on AD C, and Steps in migrating SAP HANA Plugin to Veeam.
Install AD DS
Active Directory Domain Services (AD DS) is Microsoft’s directory service that stores and manages information about objects in a network, such as users, groups, computers, and other resources.
ADDS provides centralized authentication, authorization, and policy enforcement, allowing administrators to securely manage identities and access to resources within a Windows domain environment.
Also, see how to setup a Domain Controller as Recommended by Microsoft, how to add a new Domain Controller to an Existing Domain, and Microsoft Azure Multi-Factor Authentication (MFA). Here is How to install and configure Active Directory Domain Services on Windows Server 2022.
Install Microsoft AD CS
Microsoft Active Directory Certificate Services (AD CS) can be deployed in two modes: Standalone CA and Enterprise CA. SystoLOCK supports only the Enterprise CA deployment option.
Important: Once a Certification Authority (CA) is installed, the underlying server cannot be renamed. Ensure that the hostname and domain membership are finalized before installing the CA role. There are three primary deployment scenarios for providing an AD CS server to SystoLOCK:
- New dedicated instance(s): Deploying a fresh AD CS server solely for SystoLOCK.
- Existing instance: Integrating with an already deployed AD CS server. Please, see how to Install and configure Active Directory Certificate Services.
- New domain-wide instance: Implementing a new CA instance that serves the entire Active Directory domain
I will be installing a new Domain Wide Windows CA (Enterprise CA) to support SystoLOCK deployment in my Lab via the PowerShell command below.
Install-WindowsFeature -Name ADCS-Cert-Authority -IncludeManagementTools
To serve CRLs from the same server, install IIS
Add-WindowsFeature Web-Server -IncludeManagementTools
After AD CS role is installed, type the following command and press ENTER. After AD CS is installed, type the following command and press ENTER. You can change the below settings as you wish. I will recommend a restart of the Server after running the below command.
Install-AdcsCertificationAuthority -CAType EnterpriseRootCa `
    -CryptoProviderName "RSA#Microsoft Software Key Storage Provider" `
    -KeyLength 2048 -HashAlgorithmName SHA256 `
    -ValidityPeriod Years -ValidityPeriodUnits 3 -Force
In PowerShell, “ErrorId = 0” means no error occurred. While the “ErrorString is empty” means nothing failed. This means the operation completed successfully. sometimes modules or installers return 0 as a generic “success” even if they didn’t actually add/register what you expected. That’s why you should always verify by checking the results.
Configure CRL Distribution Points (CDPs)
To ensure SystoLOCK functions correctly, it’s crucial to configure CRL Distribution Points (CDPs) with HTTP paths, as Windows authentication subsystems may not reliably access LDAP-based CRLs during authentication.
While you can retain LDAP URLs if necessary, it’s recommended to prioritise HTTP URLs. In this post, we will be using PowerShell to configure CDPs. The below scripts, automates cleanup and re-adding CRL Distribution Points (CDPs) and AIA entries with the correct HTTP FQDN, restarts the CA service, and republishes CRLs.
Get-CACrlDistributionPoint `
    | ? { $_.uri -like "http*" -or $_.uri -like "ldap*" -or $_.uri -like "file*" } `
    | Remove-CACrlDistributionPoint -force

Add-CACrlDistributionPoint -Uri "http://<ServerDNSName>/CertEnroll/<CaName><CRLNameSuffix><DeltaCRLAllowed>.crl" `
    -AddToCrlIdp:$false -AddToFreshestCrl:$true `
    -AddToCertificateCdp:$true -Confirm -Force

# AIA configuration is optional, but advisable
$HttpUri = Get-CAAuthorityInformationAccess | ? { $_.uri -like 'http*' } | select -ExpandProperty uri
Get-CAAuthorityInformationAccess | Remove-CAAuthorityInformationAccess -Force
Add-CAAuthorityInformationAccess -Uri $HttpUri -AddToCertificateAia -Force

Restart-Service CertSvc

& certutil -CRL republish
Note: You can leave LDAP-based CRL pointers if you know that you need them, as long as you provide the http-based URLs as well.
Do not forget to configure “Automatic Database Cleanup”, and “Configure Domain Controller Certificate Templates”. For the rest of this section, please, see “ADCS: How to set up Microsoft PKI for SysLOCK“.
Please, see Guide to Remote Desktop Connection Properties for Secure Access, how to convert distribution group to security group, and how to upgrade Veeam Backup and Replication from version 11 to 11a.
Create a VM for SystoLOCK Authentication Server
At the core of SystoLOCK runs the SystoLOCK Server, a lightweight service that drives the entire business logic of the SystoLOCK infrastructure.
Organizations usually deploy multiple SystoLOCK Servers within a domain to ensure reliability and redundancy. In most cases, administrators install one SystoLOCK Server instance per domain controller.
Since I will be using my Proxmox environment for this deployment, I will have to upload an ISO image to the Proxmox storage as shown below.

To create a VM, right-click on the Proxmox node and select Create VM. You can also select the node and click on Create VM on the far right.

Enter the VM name and click next.

On the OS tab, select the ISO you have just uploaded. Choose the Guest OS type as well.

Specify the System types as shown below. Ensure the Qemu Agent is also selected.

The disk size was also altered and click next

The Socket and Coe and vCPU etc were specified also under the CPU menu.

I am okay with the momory below and I can increase it later as I wish

Since this is a Windows VM, Inter E1000 works best. Click next to proceed.

Confirm your settings and click finish.

Install Operating System
Shortly, you will be prompted to press any key to continue with the installation of Windows Server upon starting the VM.Choose the language you wish to install and time and currency format and click next.

Select the Keyboard or input method

I would like to install Windows Server and I will also like to agree to delete everything including the files, apps and settings.

When prompted, enter the product key if you have one. If you don’t, you can also do this later.

Because the license I entered is for Enterprise license. Please note the difference between a standard and enterprise license. A standard license would just be okay for you.
Standard allows for two OSEs (or containers with Hyper-V isolation) or an unlimited number of Windows Server containers without Hyper-V isolation, while Enterprise allows for four OSEs (or containers with Hyper-V isolation) or an unlimited number of Windows Server containers without Hyper-V isolation. Additionally, the Enterprise edition often includes features not found in Standard, such as support for larger databases and more advanced networking capabilities.

Accept the “Applicable notices and license terms”.

Select a disk (partition) to install Windows Server.

Ready to install, click on “Install” as shown below.

Windows Server is being installed.

When prompted, enter your Password and ensure to re-enter it again and click on Finish

Post OS Deployment
After deploying the OS, change the server hostname, configure static TCP/IP settings, install the latest updates, join the server to the domain, and set up time synchronization. To do this, select the Cntr+Alt+Dl button to access your Server.

Change theTPC/IP paraments to be static etc. Here are some guide for this “Post OS installation: Configure the properties of Windows Server, how to Install Windows Server 2025 via iDRAC Virtual Media or PXE, and how to Convert Windows Server Datacenter to Standard: Install Windows Server via iDRAC Virtual Media“.

Change server name and join device to the domain.

Please, see Block IP Addresses Using Group Policy (GPO) in Active Directory, DSM Security: How to Protect Synology DS923+ NAS, and MFA on Root Account: Create a User on AWS and Register MFA.
SystoLOCK Server Binaries Download
Here is the first prerequisite as spelt out by SystoLOCK. Ensure you are a member of the Enterprise Admins group, and then start the installation by running the package.

To install the binaries, obtain the latest server installer package on the target server. The below are th steps are employed in contacting SystoLOCK and was able to get the binaries. Kindly contact SystoLOCK or request a DEMO.

You can reveal the address or call them. Alternatively, you can use the contact form as shown below.

I recommend contacting SystoLOCK, as it provides a reliable solution for strengthening the security of your Windows infrastructure. Native Active Directory offers only limited authentication options. Windows Hello is generally not recommended in on-premises environments unless integrated with Entra ID for Windows Hello for Business.
As a result, most organizations still rely primarily on username-and-password authentication, which is increasingly vulnerable. Germany (Hamburg) based Systola GmbH addresses this gap by extending Active Directory with modern, passwordless, and multi-factor authentication methods, without requiring dependency on external cloud services.

After contacting or purchasing SystoLOCK, you can proceed and download

The credentials that were provided by SystoLOCK can now be used to download the binaries as shown below.

Also, see how to install Veeam Backup Console on a Jump Server, and Best Storage for Veeam: Comparing OOTBI by ObjectFirst to VHR.
SystoLOCK Server Installation
Ensure to login to your SystoLOCK Server with your Enterprise Admin privilege as shown below. Kindly pay attention to the text below if you are not using the Enterprise Admin Account.
In some rare cases you might want to install the Server with just Domain Admins privileges. While doing so, some tasks might fail and you would need to adjust failed components once you have or can delegate the necessary privileges. To start the installer without requiring the Enterprise Admins group membership, starting with version 2.8, fire up an elevated command prompt and start the installer from that console, providing the parameter
ALLOW_DOMAIN_ADMIN=1.

Upon downloading the binaries, we will proceed and install the SystoLOCK server as shown below. I will recommend running it as an Administrator.

Systola.SystoLOCK.ManagementAccept the UAC. Please, see how to Disable UAC with Group Policy and enable PIN in Windows Hello, Windows Local Account Authorization and Access Control, and how to Change User Account Type in Windows 10.

Click on Install as shown below.

Since I have already installed a CA. I will unselect the first option as that is selected by default. I will be selecting the CA and will click on Configure as shown below.

As you see, the SysteLOCK Authentication Server is being installed.

As you can see, the server installation is very fast because I am using the right account with the right privileges.

When prompted to reboot, please do.

There is absolutely no need for Post installation tasks as all configuration tasks completed successfully, especially, But, if you observed any errors during installation, I will recommend that you do this.
Please, see Backup Mac with Veeam Agent for Mac to Synology DS923+ NAS, and Fixing AIX Veeam agent job startup delay issue.
Access SystoLOCK Management Console
Search for the SystoLOCK Management Console as shown below and launch it.

Accept the UAC by clicking on Yes

The number of devices in my domain is being listed, the users etc. As you can see also, the license status (DEMO) is OK.

Note: During installation, SystoLOCK creates some new templates on the CA as shown below. The server forwards the certificate to the end device which is needed to authenticate itself against the Active Directory

Please, see How to Find the Pathname of a Mapped Network Drive, how to Import PST file into Exchange Server 2016, and The trust relationship between this workstation and the primary domain failed.
Install SystoLOCK Management Console
Installing the SystoLOCK Management Console on a separate server is recommended for security and availability reasons. It reduces the attack surface by isolating administrative access from the authentication engine, ensures the authentication service continues to run even if the console server fails, and allows for better scalability in larger environments.
The management console will have to be able to reach the server over the port 21573 (previously 21572). The server installer will make necessary changes to the windows firewall on the server, be sure to make the specified port available via any intermediate firewalls.
To install the management console, click on the installer as shown below and click on install.

The installation is pretty fast and straight forward. When prompted, click on Finish.

This way, you will not have to log onto the “SystoLOCK” server itself to administer it.

Henceforth, you have the console as shown below.
Install SystoLOCK Client
The Client can be installed with GPO or other software distribution mechanisms of your choice or manually. To use SystoLOCK with RDS, make sure to install it on both terminal servers and local computers.
I will be installing he binary manually on a Windows 11 PC. Obtain the latest MSI package for the Client or a universal EXE package as shown below. Since I have all the privileges, I will proceed with the installation as shown below by double clicking on it and selecting “Install”.

Accept the Yes.

Installation of the client is in progress

The installation has completed successfully.

Do not forget to reboot as recommended by SystoLOCK.
Now, you can pin the app to the “Start or/and Taskbar”. I will be launching the SystoLOCK tool as shown below.

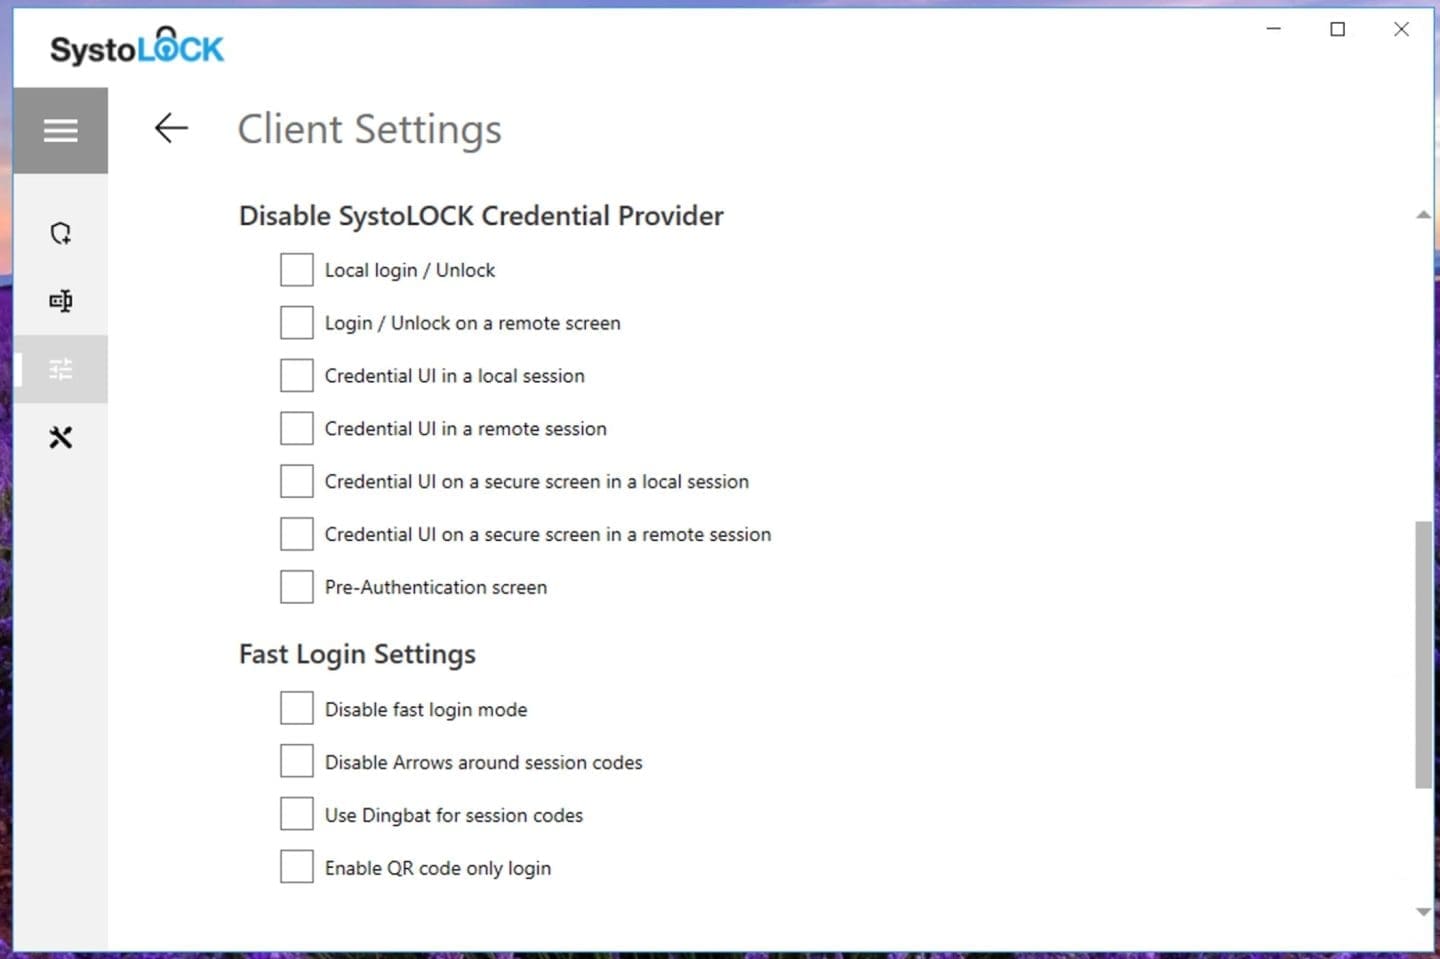
Here is the “SystoLOCK Tool” that can be used to administer your workstation by the user him/herself.

You can use this tool also for troubleshooting.


As shown in the SystoLOCK Tool, you can also perform some client settings according to your needs.


Kindly refer to some other guides I have written: How to enable or disable BitLocker Drive Encryption on Windows 10 and Virtual Machines, how to uninstall your current version of MBAM and run setup again, how to clear, enable or disable TPM in Windows via the BIOS or UEFI.
Device Enrolment
To begin with, ensure the SystoLOCK Client is installed on the device you want to protect as demonstrated above. Next, Log in to the SystoLOCK Management Console and navigate to the Computers. On the PC of interest, we can see that the enrolment state is disabled.

To fix this, we have to enable offline login as shown below.

As shown below, this has been enabled.

Shortly, you will see that the device is ready for enrolment.


Token Management
According to SystoLOCK, Tokens are referred to as the NEW PASSWORDS. SystoLOCK Tokens are cryptographic credentials assigned to users. They supplement the standard Windows username/password by adding a second factor (OTP, push notification, or hardware token).
Tokens are issued via SystoLOCK Management Console, and can also be revoked via the console if compromised or no longer needed. In order to demonstrate this, I will be creating a test user in AD as shown below.

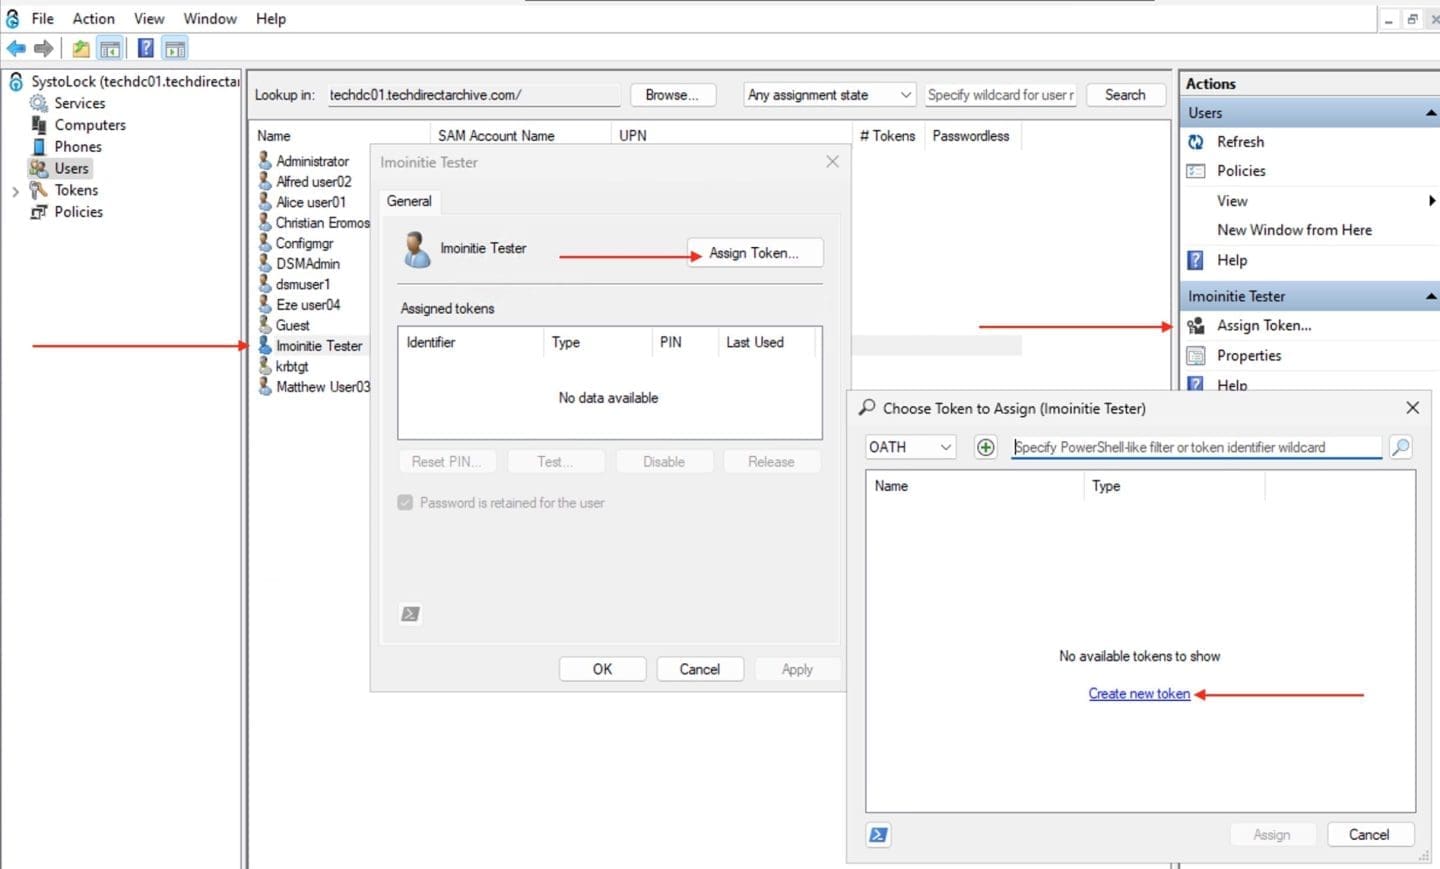
Next, I will create a Token and assign the token to a user in SystoLOCK Server. As you can see, there are different ways to create a token in SystoLOCK. Firstly, navigate to “Users” and select the user we have just created.
As you can see, we have not created a token previously. Because of this, the choose token to assign window will appear. Click on “Create new token” as shown below.
Alternatively, you could also create the Tokens before hand and then assign it to the user(s).
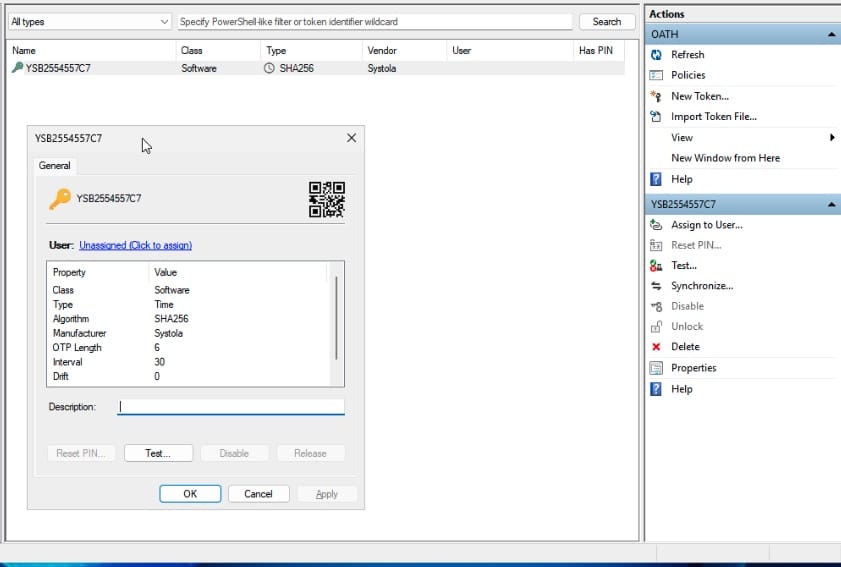
Ensure the right Token type is selected.

Select Time based (TOTP).
Note: If you try to test or use an ECH token (External Challenge Hardware token, e.g., YubiKey, smartcard-like device, or other FIDO/U2F hardware), the system requires an agreement key to establish trust between the token and the SystoLOCK server. Without this agreement key, the token is not considered provisioned

Assign token to user now. You can double click on the Token and use the link to assign the token to a user or use the “Assign to User” under the Actions pane.
Select the user to assign the token to

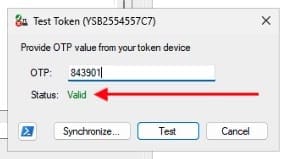
Before proceeding to provision our device, we can test our token to determine if the OTP is valid. To do this, click on test as shown below and enter the OTP values.

Bravo, the status is valid and we can now go ahead to provision our device for enhanced authentication (passwordless authentication).
Test SystoLOCK Passwordless Authentication
Upon restart, Log out or user switch, you can start the provisioning by entering the username, PIN and OTP as shown below.

Below are other sign in options. Remember, I had taken away the smart card login option from the “Client Settings” above. Else, the smart card option will be available. You can also use the “Local or domain account password”.

From experience, I had issues scanning the QR Code on the login screen. At the moment, I do not have a valid reason for this, if you have answers, please let me know in the comment. The work around was for me to enlarge the QR Code associated with the token.

Now, download the SystoLOCK companion. Since I use iPhone, I could download this from the Appstore. You can use any other OTP app (Microsoft Authenticator, Google Authenticator, FreeOTP, or SystoLOCK Authenticator).


When this is done. You should be able to access your device with your PIN and OTP.

As you can see, we have successfully login.

Below are some apps you can now use to administer.

Lets try the SystoLOCK Change PIN

Please, see Upgrade Windows Admin Center 2306 – 2311: Run WACmg v2401, fix Microsoft SQL Evaluation period has expired: How to upgrade SQL Server instance, and How to delete a VM and Storage in Proxmox
FAQs
How can I correctly delete a Token?
When the token is assigned to a user. You must release a token before deleting it. But, if it is not assigned, you can delete the token on the fly.
How to fix cannot perform test operation on ECDH token without agreement key?

Note that, if you try to test or use an ECH token (External Challenge Hardware token, e.g., YubiKey, smartcard-like device, or other FIDO/U2F hardware), the system requires an agreement key to establish trust between the token and the SystoLOCK server. Without this agreement key, the token is not considered provisioned as shown in the image below

To fix this, you need to provision the ECH token with an agreement key before testing. Assign a new token and insert/activate the hardware token if required. Next, the console will prompt for an agreement key exchange. When complete, the key is automatically stored in SystoLOCK’s database during provisioning.
How to fix “The requested session access is denied”?
When authenticated by SystoLOCK and login passed to AD. You might get the following error “The requested session access is denied”. 
To fix this, in the Local Security Policy. Add the user to the policy “Allow log on through Remote Desktop Services”. Here is a related article “Error 1385: The user has not been granted the requested logon type at this time“.
SystoLOCK’s MFA credential provider treats some logons (even via Hyper-V console) as a RemoteInteractive session internally. Therefore, you will have to enable RDP on the VM.
I hope you found this article on how to Protect your Windows Devices with MFA with SystoLOCK very useful. Please, feel free to leave a comment below.


