On Windows 10, there are two major account categories for users: Administrator and Standard User, each with its own set of rights for using a device and apps. The Administrator role grant users full system control, allowing them to alter settings globally, install software, run elevated processes, and do pretty much anything else. The Standard User account type, on the other hand, is more limited. Users using the standard account can interact with apps but cannot install new ones. They can alter settings, but only those that will not impact other accounts, therefore global system settings are not permitted. If a program or command requires elevated permission, they will need administrator privileges to perform the operation. In this article, you will learn how to Change User Account Type in Windows 10.
It is usually advisable to use an account with standard permissions since it provides a more secure environment. However, depending on the circumstances, it may be required to change the account type from Standard User to Administrator (or vice versa), and Windows 10 provides several options for doing so via Settings, Control Panel, User Accounts, PowerShell, and Command Prompt.
In this Windows 10 article, we’ll walk you through almost every technique for changing the account type on your device.
For more on Windows read these: How to change your Windows Computer login Password, How to remove a Device from your Microsoft Account, how to Add a device to your Microsoft account, how to add Hardware and Peripherals: How to add a device to a Windows 10 Computer, how to remove a Bluetooth device and connect a new Bluetooth device to Macbook, and how to Link and Unlink an Android Phone to Windows 11.
Note: If you want to change your primary account's type from administrator to standard, you need to first create a new administrator account, and then use the new account to change your previous account's type to standard and make administrative adjustments.Method 1: Change User Account Type in Windows 10 using Settings
Press the Windows key + I keyboard shortcut to open the Settings app, and then click Accounts. Here are some related guides: Configure Telegram to receive Blog Notifications, how to fix unable to Turn Bluetooth On or Off on Mac, and how to Check the Size of Video Random Access Memory (VRAM) in Windows.

Select Family and other people from the list on the left. Click on the account you want to change the type of and click Change account type.

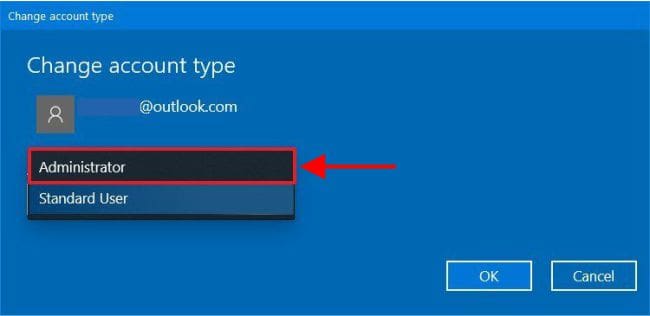
Select either Administrator or Standard User from the drop-down menu and click OK.

Method 2: Change user account type using User Accounts
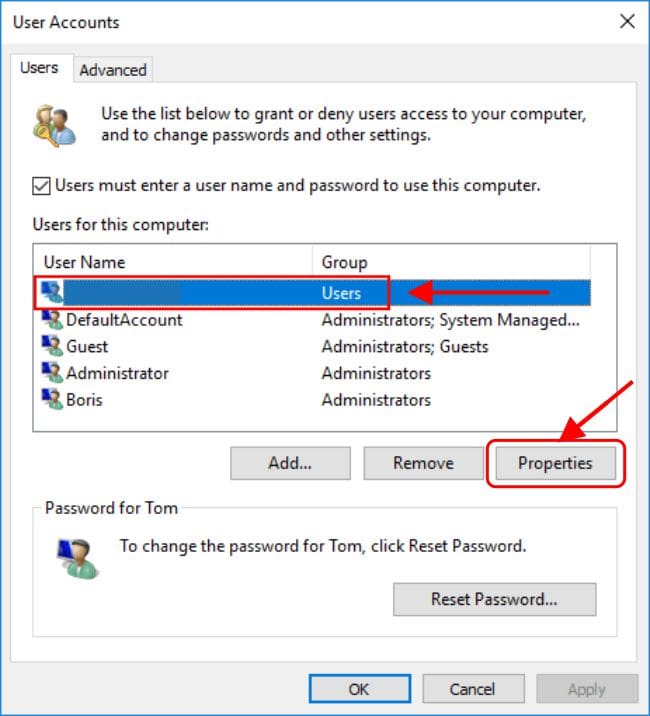
Press Windows Key + R combination and then type netplwiz in the Run dialog box.

The User Accounts dialog box will open. Select the account you would like to change and click the Properties button.

Click the Group Membership tab. From there you can select the account type for that particular user.

Method 3: Change user account type using Control Panel
- Open the Control Panel in Large or Small icons view. Click User Accounts.

- In the User Accounts screen, click the Manage another account link.

- The Manage Accounts window appears, listing all the accounts on your computer. Click the account you want to change.

- Click the Change the account type link in the list options.

- Select Standard or Administrator option as applicable in your case, and click the Change Account Type button.

Method 4: Change user account type using Command Prompt
- Open an elevated Command Prompt by pressing the Windows key + X keyboard shortcut and selecting “Command Prompt (Admin).”
- To change a standard user to administrator, you just need to add it to the Administrators group. Run the following command at the Command Prompt. Replace Matthew with your account’s name.
net localgroup Administrators Matthew /add- To change an administrator account to standard user, just remove it from the Administrators group. Type this command and press Enter.
net localgroup Administrators Matthew /delConclusion
I hope you find this guide helpful on how to Change User Account Type in Windows 10. If you have any questions, please leave them in the comments section below.
