Skip to content

TechDirectArchive

Hands-on IT, Cloud, Security & DevOps Insights

  • Home
  • About
  • Advertise With US
  • Contact
  • Reviews
  • Toggle search form
Home » AWS/Azure/OpenShift » Access EC2 Linux Instance via the Password
  • WindowsServer2022
    Windows Server 2022 Capabilities: Register Windows Admin Center with Azure Windows Server
  • image 75
    Useful Tutorial on CBackup Software Network | Monitoring
  • HP driver
    Printer Driver Information: How to determine the version and type of a Printer Driver Windows
  • How to create blue screen using the Not my Fault tool from Sysinternals
    How to create blue screen using the Not my Fault tool from Sysinternals Windows
  • Screenshot 2022 04 27 at 17.51.48
    Remote Desktop Services Setup on Windows Server Windows Server
  • Building VPC
    Build a Scalable VPC for Your AWS Environment [Part 1] AWS/Azure/OpenShift
  • Featured image GettingWinReady
    Fix “Getting Windows Ready” Don’t turn off your computer stuck on Windows Windows
  • Screenshot 1
    Fix SMB Freezes That Break Backups on Critical Linux Servers Network | Monitoring

Access EC2 Linux Instance via the Password

Posted on 09/03/201822/02/2025 Christian By Christian No Comments on Access EC2 Linux Instance via the Password

An Amazon EC2 instance is a virtual server in Amazon’s Elastic Compute Cloud (EC2) for running applications on the Amazon Web Services (AWS) infrastructure. In this article, we will describe how to access EC2 Linux Instance via the Password. Please see Create Folders and Enable File sharing on Windows, How to deploy Ansible AWX on centos 8, how to determine Tombstone Lifetime in Active Directory, and how to setup and configure a Lamp stack on CentOS.

Access EC2 Linux Instance

The default username for CentOS instance (on AWS) is: centos. In CentOS use the below,

  • sudo su in changing to a root user or
  • Sudo su <username>

This article assumes that you have a running EC2 Linux Instance. Please see How to create an EC2 Instance.

Step 1: PuttyKeyGen

After creating an instance start the PuttyKeyGen. Click on Load

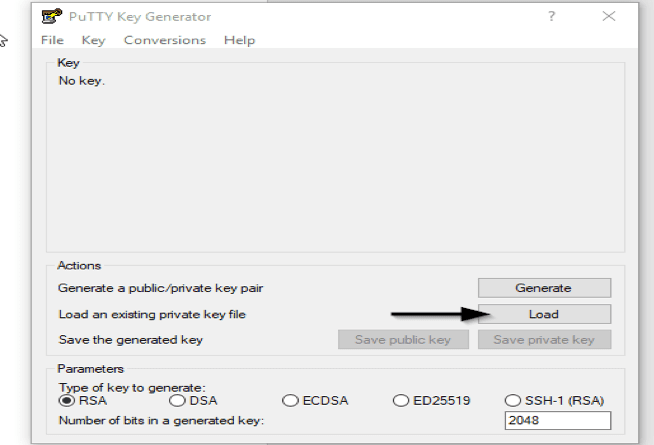
By default, PuTTYgen displays only files with the extension .ppk. To locate your .pem file, select the option to display files of all types.

Now you should be able to view the keyfile download from the instance containing the public.

Choose Save private key to save the key in the format that PuTTY can use. PuTTYgen displays a warning about saving the key without a passphrase. Choose Yes.

Here is how to Install and configure Ansible on Azure Virtual Machine, and How to change the system time zone under RedHat and CentOS.

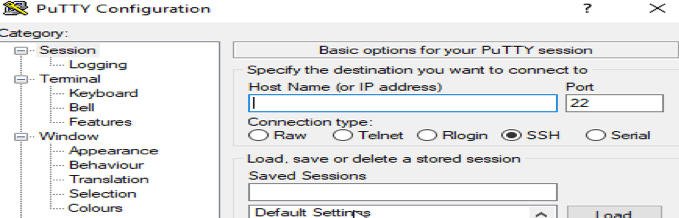
Step 2: Launch Putty

Enter the connection name or IP and select port 22

To have the private key entered. Expand Connection, expand SSH, and then choose Auth and choose Browse.

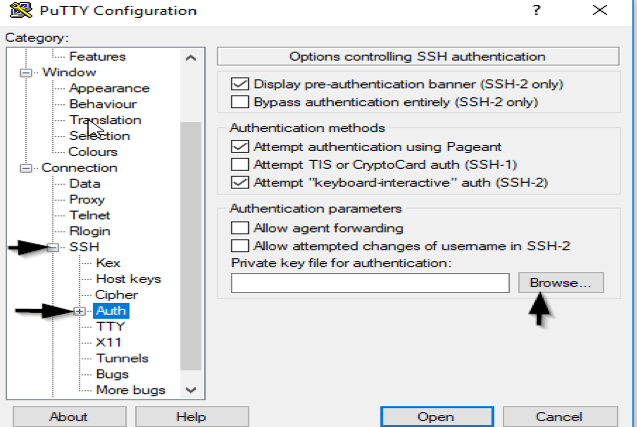
Now click on Open, you should be able to access the server. The default username for CentOS is centos

Steps 3: Create user password

To create a password for this user, edit the sshd_config setting and save it

vi /etc/ssh/sshd_config
change the PasswordAuthentication value as yes
PasswordAuthentication yes
:wq (means save and exit)

Step 4: Restart SSH service

To restart the SSH service, use the command(s) below.

service sshd restart

 or

/etc/init.d/sshd restart

Step 5: Add a user Account

To add a user account in order to connect to the EC2 instance via a username and password on CentOS

Step A: To add a user to the system, issue the useradd command to create a locked user account:

#useradd <username>

Step B: Unlock the account by issuing the passwd command to assign a password and set password aging guidelines:

passwd <username>

This must be the same user name in step A above. After this criteria has been met, then you should be able to set the password

Now: Connect a new session and test with the user account created.

Add a user as a Sudoer on CentOS

Note: Because certain action can only be performed by Linux Administrators on Linux.

This makes the root by default have access to whatsoever on the Linux Machine. Since we have the root user account disabled, we will create a new user account and add the user to the Sudoer file thereby granting him all privileges he needs.

Procedure for Adding a Sudoer

  • Steps 1: First Create a user account and the steps can be found in this document above
  • Step 2: The file in Linux that determines if you are eligible to execute the Sudo is called “Sudoers” and this can be found in this location /etc/sudoers

But it is not recommended to modify this file as it is detrimental! Why is it so? This is because any syntax error found in this file could affect the entire system. So there is a unique used called visudo

[[email protected]]# visudo
 After running this comment, use “i” to insert and search for the file (this will prompt the sudoer file for editing (modification)
 ## Allow root to run any commands anywhere

Below this you will see lines like (Add the username and permission as the root user) as shown in the screenshot below, e.g,
                               [username]     ALL=(ALL)        ALL

I hope you found this article on how to access EC2 Linux instance via the password very useful. Please feel free to leave a command below.

5/5 - (1 vote)

Thank you for reading this post. Kindly share it with others.

  • Click to share on X (Opens in new window) X
  • Click to share on Reddit (Opens in new window) Reddit
  • Click to share on LinkedIn (Opens in new window) LinkedIn
  • Click to share on Facebook (Opens in new window) Facebook
  • Click to share on Pinterest (Opens in new window) Pinterest
  • Click to share on Tumblr (Opens in new window) Tumblr
  • Click to share on Telegram (Opens in new window) Telegram
  • Click to share on WhatsApp (Opens in new window) WhatsApp
  • Click to share on Pocket (Opens in new window) Pocket
  • Click to share on Mastodon (Opens in new window) Mastodon
  • Click to share on Bluesky (Opens in new window) Bluesky
  • Click to share on Threads (Opens in new window) Threads
  • Click to share on Nextdoor (Opens in new window) Nextdoor
AWS/Azure/OpenShift Tags:AWS, EC2, EC2 instance, EC2 Instances

Post navigation

Previous Post: AWS Flow Logs IAM Role Setup
Next Post: How to setup and configure Jitsi as SoftPhone

Related Posts

  • Screenshot 2020 05 13 at 19.23.25
    AWS Command-Line Interface: How to configure AWS CLI [Part 1] AWS/Azure/OpenShift
  • Deploy to ACI
    Create Azure Container instance to deploy your image to Azure using Azure CLI AWS/Azure/OpenShift
  • Docker Guide
    Pull and Deploy Nginx Container Images from Docker Hub AWS/Azure/OpenShift
  • ADO Self hosted agent
    How to Create Self-Hosted Agent for Azure DevOps Pipelines Automation
  • oauth2final
    How to implement Interactive Authentication using MSAL dotNET AWS/Azure/OpenShift
  • Azure SASE
    [AZURE] Security Service Edge (SSE) and Microsoft Entra ID AWS/Azure/OpenShift

More Related Articles

Screenshot 2020 05 13 at 19.23.25 AWS Command-Line Interface: How to configure AWS CLI [Part 1] AWS/Azure/OpenShift
Deploy to ACI Create Azure Container instance to deploy your image to Azure using Azure CLI AWS/Azure/OpenShift
Docker Guide Pull and Deploy Nginx Container Images from Docker Hub AWS/Azure/OpenShift
ADO Self hosted agent How to Create Self-Hosted Agent for Azure DevOps Pipelines Automation
oauth2final How to implement Interactive Authentication using MSAL dotNET AWS/Azure/OpenShift
Azure SASE [AZURE] Security Service Edge (SSE) and Microsoft Entra ID AWS/Azure/OpenShift

Leave a Reply Cancel reply

You must be logged in to post a comment.

Microsoft MVP

VEEAMLEGEND

vexpert-badge-stars-5

Virtual Background

GoogleNews

Categories

veeaam100

sysadmin top30a

  • WindowsServer2022
    Windows Server 2022 Capabilities: Register Windows Admin Center with Azure Windows Server
  • image 75
    Useful Tutorial on CBackup Software Network | Monitoring
  • HP driver
    Printer Driver Information: How to determine the version and type of a Printer Driver Windows
  • How to create blue screen using the Not my Fault tool from Sysinternals
    How to create blue screen using the Not my Fault tool from Sysinternals Windows
  • Screenshot 2022 04 27 at 17.51.48
    Remote Desktop Services Setup on Windows Server Windows Server
  • Building VPC
    Build a Scalable VPC for Your AWS Environment [Part 1] AWS/Azure/OpenShift
  • Featured image GettingWinReady
    Fix “Getting Windows Ready” Don’t turn off your computer stuck on Windows Windows
  • Screenshot 1
    Fix SMB Freezes That Break Backups on Critical Linux Servers Network | Monitoring

Subscribe to Blog via Email

Enter your email address to subscribe to this blog and receive notifications of new posts by email.

Join 1,839 other subscribers
  • RSS - Posts
  • RSS - Comments
  • About
  • Authors
  • Write for us
  • Advertise with us
  • General Terms and Conditions
  • Privacy policy
  • Feedly
  • Telegram
  • Youtube
  • Facebook
  • Instagram
  • LinkedIn
  • Tumblr
  • Pinterest
  • Twitter
  • mastodon

Tags

AWS Azure Bitlocker Microsoft Windows PowerShell WDS Windows 10 Windows 11 Windows Deployment Services Windows Server 2016

Copyright © 2025 TechDirectArchive


Loading Comments...
 

You must be logged in to post a comment.