
Skip to content

TechDirectArchive

Hands-on IT, Cloud, Security, Veeam & DevOps

  • Home
  • About
  • Advertise With US
  • Reviews
  • Contact
  • Toggle search form

The connection was denied because the user account is not authorized for remote login: How to add and remove Remote Desktop Users

Posted on 11/08/202120/08/2026 Christian By Christian No Comments on The connection was denied because the user account is not authorized for remote login: How to add and remove Remote Desktop Users
  1. Home
  2. Windows
  3. The connection was denied because the user account is not authorized for remote login: How to add and remove Remote Desktop Users
connection denied

The Remote Desktop Protocol (RDP) is a protocol developed by Microsoft for remote access to a device running the Windows operating system. With this protocol, screen displays and control commands can be encrypted and transmitted over IP networks. Kindly refer to the related guide on how to reset your built-in (Local) Administrator’s password in Windows 10, how to reset your built-in (Local) Administrator password in Windows 10.

The Remote Desktop Protocol was created from an extension of a protocol from the T.120 protocol family of the International Telecommunication Union (ITU). The Remote Desktop Protocol works as a terminal server protocol in client-server mode. 

Here are some RDP related guides: How to allow saved credentials for RDP connection, how to remove saved RDP entries in Windows 10, how to remove server connection entries from RDP, how to prevent the saving of Remote Desktop Credentials in Windows, and the logon attempt failed for the remote desktop connection.

Ensure the following are adhered to in order to successfully establish a remote desktop connection to another device:

  • The computer to which you will connect has to allow remote connections (Enable RDP on the device).
  • You need to know the servername or the IP address of the device you are connecting to.
  • You need to be added as a member of the Remote User Group or have the necessary permission to connect to the device remotely.

Remote Desktop User Authorization Error

However, The error “The connection was denied because the user account is not authorized for remote login” occurs when the account you use to connect to the target system remotely does not have the appropriate rights to connect to the server.

Furthermore, This means the user account you are trying to establish a remote connection does not belong to a Remote Desktop Users group.
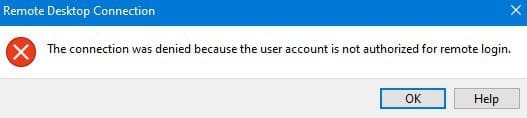
user account
Remote Desktop Connection works only if the host computer allows remote connections

To resolve this issue, there are different ways to go about this. The quickest and easiest way is to use the first step discussed below (add the user to the .

Step 1: Add the user as a member of the remote user group on the local computer. In addition, On the device you wish to access remotely, you need to be added as a member of the remote user group.

Moreover, Type and search lusrmgr.msc in the Taskbar search box or, search for Computer Management (Can be accessed via the server Manager or Windows Administrative Tool),

authorized

This will open the Computer Management snap-in. Expand the Local Users and Groups as shown and click on Groups.
– Groups
– Double click on Remote Desktop Users

remote login

This will open the Remote Desktop Users’ Properties

connection denied

This will open the Select Users, Computers, Service Account, or Group wizard. Click on OK.

remote login

On the Remote Desktop User Properties windows, click on Ok. If you wish to perform other tasks, then you can click on Apply. In this way, the window will not be closed.

user account

Nonetheless, To remove a desktop user, please follow the steps mentioned above.
– Click on the user you wish to remove and
– Click on Remove.

authorized

Consequently, the user has been removed and can no longer connect to the device remotely.
– Click on OK to close the window.

Screenshot-2021-08-11-at-20.14.40

Step 2: Creating a New Security Group:

To fix the issue, you might want to create a new security group whose members will have the power to establish a Remote Desktop connection. Similarly, Type the command secpol.msc in the Start search box and hit Enter or,
– Press Windows Key + R to open Run.
– Type in “secpol.msc” or “Local Security Policy” and press Enter.

Screenshot-2021-08-11-at-20.15.20

– Navigate to the Local Policies
– User Rights Assignment and
– Double click on “Allow log on through Remote Desktop Services”.

Screenshot-2021-08-11-at-20.20.16

Remote Desktop Services Properties

This will open the “Allow log on through Remote Desktop Services” properties window. As you can see, the Administrators and Remote Desktop users are already part of this group.
– To add your users or group of users, click “Add USers or Group” as shown below.

Screenshot-2021-08-11-at-20.23.34

This will open the Select Users, Computers, Service Account, or Group wizard. The steps are exactly the same as discussed in step 1 right now.
– Enter the user name and click on check names.

Screenshot-2021-08-11-at-20.25.05
Screenshot 2021 08 11 at 20.25.05
Screenshot-2021-08-11-at-20.25.25
Screenshot 2021 08 11 at 20.25.25

As you can see below, the user has been added.

Screenshot-2021-08-11-at-20.26.32

T remove the use, follow the same steps and click on the remove button as shown below.

Screenshot-2021-08-11-at-20.27.35

The user has been removed and can no longer connect via RDP to the host except he is part of the Remote Desktop USer Groups or Administrators group.

Screenshot-2021-08-11-at-20.29.50

Step 3 – Add the user to the Local Administrator Group: I do not recommend doing his except the user is an Administrator and has been proven worthy over time.
– Launch the Computer Management snap-in
– Expand the Local Users and Group
– Double click on the Administrators group and add the user as shown below.

Screenshot-2021-08-11-at-20.32.35

I hope you found this blog post helpful. If you have any questions, please let me know in the comment session.

Thank you for reading this post. Kindly share it with others.

  • Share on X (Opens in new window) X
  • Share on Reddit (Opens in new window) Reddit
  • Share on LinkedIn (Opens in new window) LinkedIn
  • Share on Facebook (Opens in new window) Facebook
  • Share on Pinterest (Opens in new window) Pinterest
  • Share on Tumblr (Opens in new window) Tumblr
  • Share on Telegram (Opens in new window) Telegram
  • Share on WhatsApp (Opens in new window) WhatsApp
  • Share on Mastodon (Opens in new window) Mastodon
  • Share on Bluesky (Opens in new window) Bluesky
Windows Tags:RDP, Remote Access, Remote Desktop, RemoteConnection, Windows 10, Windows Server 2016

Post navigation

Previous Post: Synology NAS brute-force attack: Employ Synology Best Practice to remediate StealthWorker Botnet attack
Next Post: Mitigate Windows Print Spooler Remote Code Execution Vulnerability

Related Posts

  • What Happens if You Turn Off Your Computer During windows update
    What Happens if You Turn Off Your Computer During an Update Windows
  • image 77
    How to use the DigiCert certificate utility for Windows to create a CSR Windows
  • Featured Image Windows Security
    How to protect your Windows PC from potentially unwanted applications Security | Vulnerability Scans and Assessment
  • Featured Image
    Restore Point Creation in Windows 10 and Windows 11 Windows
  • Show or Hide File Extensions
    How to Show or Hide File Extensions on Windows 11 Windows
  • banner 4
    How to Install Windows on VMware Workstation Windows

More Related Articles

What Happens if You Turn Off Your Computer During windows update What Happens if You Turn Off Your Computer During an Update Windows
image 77 How to use the DigiCert certificate utility for Windows to create a CSR Windows
Featured Image Windows Security How to protect your Windows PC from potentially unwanted applications Security | Vulnerability Scans and Assessment
Featured Image Restore Point Creation in Windows 10 and Windows 11 Windows
Show or Hide File Extensions How to Show or Hide File Extensions on Windows 11 Windows
banner 4 How to Install Windows on VMware Workstation Windows

Leave a Reply Cancel reply

You must be logged in to post a comment.

Microsoft MVP

vexpert-badge-stars-5

Virtual Background

VEEAMLEGEND

Categories

veeaam100

Veeam Vanguard

  • azure sql featured image
    How to delete ADFS Windows Internal Database without access credentials Oracle/MSSQL/MySQL
  • images 1
    How to Monitor Windows Hosts via Nagios Network | Monitoring
  • git default branch min
    Git config –global init.defaultBranch: Error cannot lock ref ‘refs/remotes/origin/windows’, not a directory Version Control System
  • banner
    How to hide Folders and Files from Search Results in Windows Windows
  • rdp4
    How to change the default RDP port in Windows Network | Monitoring
  • mbamclient
    How to deploy MBAM Client as part of a Windows Deployment Windows Server
  • WDS
    An error occurred while trying to start the Windows deployment services error 0x906 Windows Server
  • Telegram Bot for wordpress
    Configure Telegram to receive Blog Notifications JIRA|Confluence|Apps

Subscribe to Blog via Email

Enter your email address to subscribe to this blog and receive notifications of new posts by email.

Join 1,759 other subscribers
  • RSS - Posts
  • RSS - Comments
  • About
  • Authors
  • Write for us
  • Contact
  • Advertise with us
  • General Terms and Conditions
  • Privacy policy
  • Feedly
  • Telegram
  • Youtube
  • Facebook
  • Instagram
  • LinkedIn
  • Tumblr
  • Pinterest
  • Twitter
  • mastodon
  • Bsky

Tags

Active Directory Azure Bitlocker Microsoft Windows PowerShell WDS Windows 10 Windows 11 Windows Deployment Services Windows Server 2016

Copyright © 2026 TechDirectArchive

Loading Comments...

You must be logged in to post a comment.