
This article introduces the planning considerations and initial deployment process supporting the successful deployment of an Azure VMware Solution (AVS) private cloud. This guide assists customers in learning AVS concepts, identifying AVS prerequisites, planning for the initial deployment, deploying the first AVS private cloud, and establishing connectivity between an on-premises datacenter and the AVS private cloud. Azure VMware Solution (AVS) is a cloud-based hosted VMware solution that enables customers the flexibility to both run workloads within the Azure ecosystem completely, or replicate on-premises VMware workloads to AVS. Use cases include dev/test, disaster recovery, and even for short-term bursts where additional resources are required beyond what might be available in the local datacenter. After it is deployed, users are greeted with familiar vSphere and NSX-T interfaces from which they can provision and manage their VMware-based workloads and connect them to external storage solutions such as Pure Storage Cloud Block Store (CBS).
As of this article, it is important to note that in-guest iSCSI is the only supported method of connecting Cloud Block Store to AVS. Also refer to some of the related guides: How to configuring azure monitor for vms on azure stack hub. how to install Ansible on Windows with Cygwin, how to install and configure Ansible on Ubuntu, how to automate infrastructure deployments in the cloud with ansible and azure pipelines, how to deploy azure vmware solution private cloud, how to configure a remote server (windows) to Support Ansible, and how to install Kerberos packages in Windows via Cygwin.
To get started
This user guide will detail how to set up and manage AVS and use it in combination with CBS on Azure with Windows in-guest iSCSI.
Planning
This section addresses the considerations and actions to be taken prior to starting the deployment of the AVS private cloud. This includes planning for resource placement, resource naming, cluster sizing, requesting host quota, registering the AVS provider, and network allocation.
Create Azure Subscription, Resource Group, Virtual Network, Region, and Resource Name
An AVS private cloud must be created in a resource group. A resource group is associated with a subscription and a region. First, determine the subscription that will be used for AVS. This subscription must be associated with a Microsoft Enterprise Agreement (EA) or a Cloud Solution Provider (CSP) Azure plan. A resource group can contain resources deployed in multiple regions, but for the sake of simplicity and consistency, it is recommended that the resource group be hosted in the same region as the AVS private cloud.
A resource group within Azure is exactly what it sounds like: A container for managing different resources deployed within Azure. Customers might have a Resource Group and other pieces already created that they can leverage on, but for the purposes of this guide we will be creating everything from scratch to show the end-to-end deployment.
You may choose an existing resource group or create a new resource group specifically for AVS and related services. To create a new resource group, follow these steps:
- Log into the Azure portal
- Click Create a resource
- Type “resource group” into the search bar and select the “Resource group” item.
- Click Create
- Select the appropriate subscription, provide a name for the Resource Group, and select the desired region.
- Click Review + create, then Create

Setting Up Your Resource Group for Azure VMware Solution Deployment
You will need to associate your new Resource Group with the appropriate Azure Subscription (1) you wish to use and then give it a Name (2). Next, select a Region (3) that you want the resource group to run within. Make sure that the Region that you select supports AVS and then click Create on the bottom of the screen.
Subscription - Select your Azure subscription in which AVS resources will be deployed

Resource group - Select new or existing resource group that will contain AVS resources

Region - Select Your Region that can associates with AVS

Review + create
With the Resource Group created, we can now add a Virtual Network to it that will enable communication amongst all of the subsequent items that we deploy. You can simply search for Virtual Network in the search bar and when the item below comes up, select it and then click on the Create button to launch the associated wizard.
With a virtual network you can create a logically isolated section in Microsoft Azure with this networking services, also you can securely connect it to your on-premises datacenter or a single client machine using an IPsec connection. Virtual Networks make it easy for you to take advantage of the scalable, on-demand infrastructure of Azure while providing connectivity to data and applications on-premises, including systems running on Windows Server, mainframes, and UNIX.
Use Virtual Network to:
- Extend your datacenter
- Build distributed applications
- Remotely debug your applications
As with the Resource Group creation, select a Subscription you want to use, then select the Resource Group that was created in the previous step. Next, give the virtual network (vnet) a name and select the same Region used in the Resource Group. Click on the Next button to specify IP addresses.

Configuring IPv4 Address Space for VNet in AVS Deployment
Define an IPv4 address space that you wish to associate with the vnet. This range can be very large or very small depending upon the size of the AVS deployment required and what other services might be running in parallel within the resource group. For example purposes, a /20 or a few /24 address spaces are more than sufficient.
Subnets are contained within the IPv4 address space and help delineate network traffic based upon function. To create a subnet, click on the + Add subnet button.
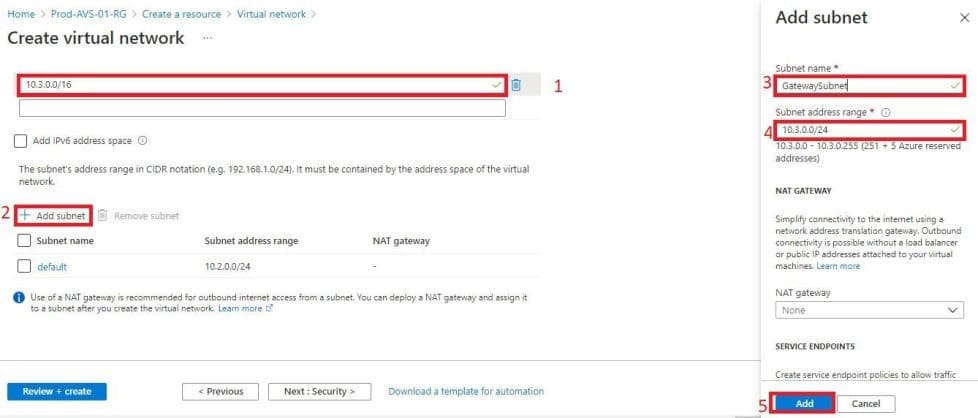
Here I am repeating the +Add subnet procedure and create an additional /24 range called default (though any name can be used) which will be used later within this section for jumphost creation.
Select default and click Next:Security
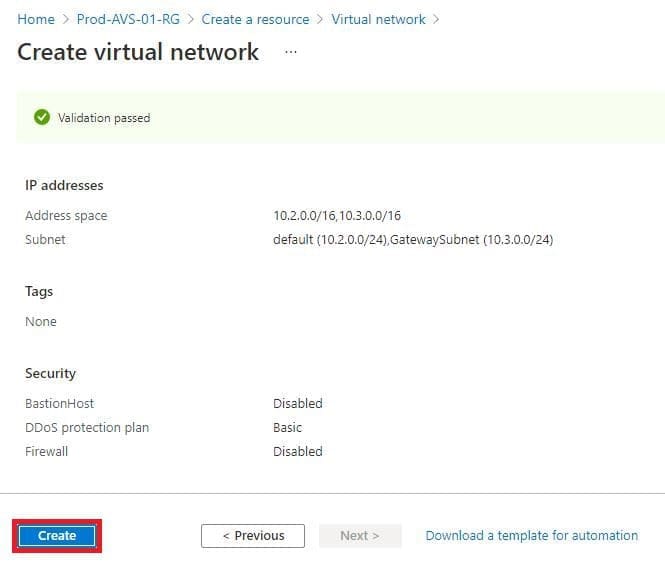
Leave the Security options as default unless your environment requires a change then click on Review + createOnce the vnet is validated click on Create to build it.
Create a Azure VMware Solution (AVS) Private Cloud
The vnet we created in the previous section is the only prerequisite component that needs to be in place before you can deploy an AVS private cloud. To get started creating AVS, search for Azure VMware Solution in the Azure marketplace and click on the below search result, then click on Create AVS Private Cloud

The AVS creation wizard will spawn. Please note that a support request must be opened with Microsoft in order to have AVS resources allocated to the appropriate subscription ID before it can be deployed, with those prerequisites out of the way, the AVS creation wizard screenshot is shown below with individual field descriptions broken out below.

Configuring Subscription and Resource Group for AVS Deployment
Subscription: Enter the Azure subscription that you requested to be used with AVS.
Resource group: Select the Resource Group created earlier within this article.
Location: Pick the region you used for the Resource Group, taking care that it also is supported by AVS.
Resource Name: Provide a name for your AVS private cloud.
SKU: Pick a SKU to be used.
ESXi hosts: Select the number of ESXi hosts you want to associate with your AVS deployment. The minimum number of hosts that must be used is three.
vCenter admin password: Specify a complex password for the cloudadmin@vsphere.local username you will use to connect in to vCenter post-deployment.
NSX-T Manager password: Specify a complex password that will be used for logging into NSX-T with the admin account post-deployment.
Address block: Enter a private, non-overlapping CIDR block that AVS will use for functions like management, vMotion and HCX. This range cannot overlap with the range you specified in your vnet created earlier within this guide.
Virtual Network: Select the vnet that was created earlier within this guide. The AVS deployment will create an expressroute circuit between this network and the private address block specified in the previous step.
Final Check: Validating Inputs Before Deployment
With all of the above fields completed, click on Review + create to validate the inputs prior to deployment.
Once the deployment inputs have been validated, you can click the Create button to kick off the AVS cloud deployment. Note that a typical 3 ESXi host deployment can take anywhere from 2-3 hours.

Upon completion of the deployment, you will be able to navigate into the AVS resource and find IP addresses for vCenter and NSX-T as well as IP addresses for those and other components on the private network.
Create a Windows Virtual Machine JumpHost in Azure
While waiting for the AVS deployment to build, another item to build is an Azure jumphost that we can use to access AVS (specifically vCenter, NSX-T and VMs running on top of AVS) once it has been built.
To get started, logon to the Azure portal and select Virtual machines followed by Add.

Below is an attached image which shows a description for each of the highlighted fields.

- Subscription: Enter the Azure subscription that you requested to be used with AVS.
- Resource group: Select the Resource Group created earlier within this article.
- Virtual machine name: Provide a descriptive name for the virtual machine (e.g. Jumphost as been used above)
- Region: Pick the same region you used for the Resource Group and AVS.
- Availability options: Depending on the SLA needed for this VM, you can add availability options for it here.
- Image: Select the operating system you wish to use to access AVS. From the above example we are using Windows Server 2019 but other operating systems will certainly work.
- Azure Spot instance: We select No for in our example.
- Size: This selection allocates vCPUs and RAM to the virtual machine via predetermined sizes.
- Username: Select a username that will be used to login to the VM once created.
- Password: Enter a complex password for the user account.
- Public inbound ports: Since we are using this as a jumphost to access AVS, we clicked on Allow selected ports.
- Select inbound ports: We choose RDP to enable RDP access to the jumphost.
- Licensing: Leave this as No unless you have a Windows key available to use.
After the above fields have been filled out, click on Next : Disks > to proceed to the next step in the wizard.
Choosing the Right Drive for Your Jumphost: Standard SSD Recommendation
Unless your jumphost is going to be running other applications that require a higher performance OS drive, Standard SSD should be sufficient for the jumphost function. Click on the Next : Networking > button on the bottom of the screen to proceed.

Earlier in this article we created a default subnet as part of our AVS vnet. Select the virtual network created earlier in this section and the Subnet (default) and create a new public IP address.
Click on Review + create to validate and create the VM.

- Virtual Network: Provide a descriptive name for the virtual network.
- Subnet: Select the default subnet created earlier within this article.
- Public IP: Create a new Public IP as shown on the image above.
- NIC Network Security Group: Select Basic as shown on the image above.
- Public Inbound Ports: Select Allow selected ports as shown on the image above.
- Select Inbound Ports: Select RDP (3389) as shown on the image above.
- Accelerated Networking: We select Of in our example.
- Load Balancing: We select No in our example.
- The click Review + Create.
Once the virtual machine has been created, now you can navigate to it within the Azure Resource Group. Click on Overview, then Connect and finally RDP as shown on the image below.

In the Connect window, you can Download RDP file to your local machine and then double-click on the downloaded file to launch RDP and connect to your new jumphost VM with the credentials used when the VM was created.

Summary
This article provided an overview of the planning and deployment steps in deploying Azure VMware solution private cloud


