
When it comes to enhancing your authentication processes, Installing and configuring SimpleSAMLphp is a crucial step. Installing and configuring SimpleSAMLphp empowers your system with a versatile authentication framework, making it a pivotal aspect of your setup. In this guide, we will delve into the ins and outs of Installing and configuring SimpleSAMLphp, providing you with a step-by-step walkthrough. Please see SimpleSAMLphp Setup on Windows Server – Part 1, and how to upgrade VMware Tools in vSphere.
With a well-executed process of Installing and configuring SimpleSAMLphp, you can streamline authentication procedures and bolster security.
Enhancing Authentication Expertise with SimpleSAMLphp Mastery
By mastering the art, you can ensure seamless user authentication experiences. Moreover, Whether you’re a novice or an experienced developer, understanding the nuances of Installing and configuring SimpleSAMLphp will undoubtedly elevate your proficiency in managing authentication mechanisms.
So, let’s embark on this journey of Installing and configuring SimpleSAMLphp and unlock the potential of robust and efficient authentication.
However, SimpleSAMLphp is an award-winning application written in native PHP that deals with authentication. UNINETT leads the project and has a large user base, a helpful user community, and many external contributors. The main focus of SimpleSAMLphp is providing support for SAML 2.0 as a Service Provider (SP).
Configure SimpleSAMLphp
SAML SSO transfers the user’s identity from one place (the identity provider) to another (the service provider). This is done through an exchange of digitally signed XML documents.
SimpleSAMLPHP package can be downloaded from any of the links below and extract into C:inetpubwwwroot
- https://simplesamlphp.org/download
- https://community.esri.com/groups/arcgis-online-templates/blog/2014/12/31/setting-up-enterprise-logins-using-simplesamlphp
Add a new virtual directory in IIS by using IIS Manager. Right-click on “Default Web Site” and select “Add Virtual Directory”.
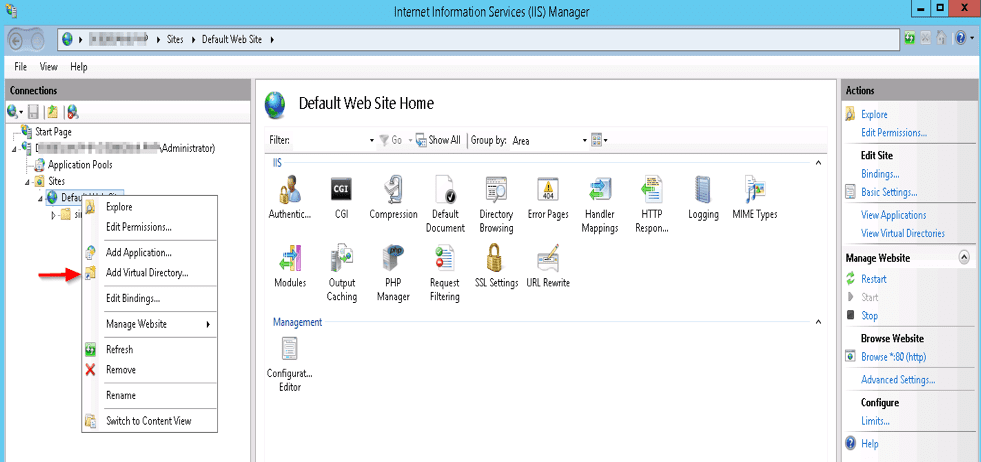
Provide “simplesaml” as the Alias and “C:inetpubwwwrootsimplesamlphp-1.13.2www” as the physical path. Click OK to close the dialog.

Now it should look this way!

Ensure you have your firewall rules to allow HTTP. If everything is okay, the image below will be prompted. Open a web browser and navigate to http://localhost/simplesaml

I hope you found this blog post helpful. If you have any questions, please let me know in the comment session.


Hi, I have followed the above article to configure the simplesaml in IIS. But final output is not working properly. It shows error “No input File is Specified”. Could anyone drop an solution.