Portainer is a compact container management application that offers a GUI for streamlining container operations. Moreover, it supports numerous Docker environments, Kubernetes, Nomad and all of the major orchestration platforms (Docker hosts and Swarm clusters). The Portainer Server and the Portainer Agent are the two components of Portainer. This tutorial will take you through the steps of installing docker portainer on a Linux machine especially Ubuntu and also show you how to add multiple environments to portainer. Please check through these links for Other useful articles: Diagnostic Data in Windows 10 and Windows 11 and How to upgrade from Ubuntu 20.04 LTS to 22.04 LTS and Authentication: How to use a Fido Certified U2F Key and How to Add a Device to your Microsoft account and How to Add a Device to your Microsoft account.
The benefit of using Docker Portainer
Installing Docker Portainer eliminates the difficulty of maintaining and deploying containers
A genuinely platform-independent container-native application deployment and management solution is what Portainer aims to achieve. To do this, we’ve made the underlying container management technology (such as Kubernetes) opaque to the developers who just want to manage their apps. However, without being an expert, you can CONSUME the container platform if you utilize Portainer.
The management of containers is made more efficient by Portainer
Without using the command line, engineers can deploy individual containers, monitor their status, restart them as needed, and perform debugging with Portainer. To help engineers improve app performance, Portainer also offers deep visibility into what is running, where it is running, and how it is running. Additionally, because Portainer connects to all your hosts and platforms, you can view all your containers’ information on a single webpage, negating the need to connect to each one individually to check on their status. This allows engineers to concentrate on what’s crucial while saving a ton of time.
Follow best practices for IT governance
Technology executives need to possess skills for managing software in a repeatable, scalable, and secure manner. Installing Docker Portainer supports organized framework, which also makes it possible for teams to cooperate. By doing this, you lower the risk to your company and make it easier for you to install and operate your apps in a compliant manner. Additionally, Native container platform management has difficulty with identity and access management, which Portainer fixes. It enables you to grant particular roles with pre-determined capability restrictions to individuals and teams. What’s more, you can even layer roles to create fine-grained access privileges.
Requirements to Install Docker Portainer
Kindly ensure the following prerequisite are met before you install Docker Portainer
- Docker installed on your Linux machine
- Sudo Privileges
- Ubuntu 20.04 and higher
Step1: Confirm you have docker installed
Once you met all the requirements, you can proceed to install the docker portainer on Linux.
docker --version
Step 2: Create Docker Volume
Information is kept in Portainer on a Docker volume. To create a Docker volume for the Portainer Server, enter the command shown below:
docker volume create portainer_data
The system outputs the volume name if the procedure is successful as seen from the screenshot above,
Step 3: Install Portainer Server
Docker Hub has the most recent Portainer Community Edition image. Pull the image and launch a Portainer Server container using the docker run command:
docker run -d -p 8000:8000 -p 9443:9443 --name portainer \
--restart=always \
-v /var/run/docker.sock:/var/run/docker.sock \
-v portainer_data:/data \
portainer/portainer-ce:2.9.3
Portainer uses secure port 9443 to offer the user interface. Unless you want to employ edge agents, port 8000, mostly used for edge computing, is unnecessary.

The container is started, and the required images are retrieved via docker run. Type the following to see if Portainer is active:
docker psThe command below lists all the active containers. Verify that the portainer container is there and that its state is Up.

Step 4: Access Portainer Dashboard
You can use an internet browser to access the web UI for Portainer. Here’s how to go to the primary Portainer dashboard after you’ve installed Docker Portainer.
1: Visit the following URL in a browser:
https://localhost:94432. The first time you access Portainer, the system asks to create a password for the admin user. Thus, type the password twice and select the Create user button.

The Environment Wizard runs immediately when you hit the create user button as shown above and it reveals the interface shown below
3. Choose the Get Started option to see the dashboard and begin using Portainer exclusively locally. During the initial setup, select Add Environments to add more environments.

Get started gives you the environment shown below

Step 4 (Optional): Increase the number of environments when you install the docker portainer
The Portainer UI allows you to manage several Docker setups. Additionally, a Portainer Agent instance has to be installed in each environment. The agent then communicates with the server on port 9001.
To add an environment to Portainer, follow these instructions:
1: On the machine you wish to add, use the following command below to launch a Portainer Agent container:
docker run -d -p 9001:9001 --name portainer_agent --restart=always -v /var/run/docker.sock:/var/run/docker.sock -v /var/lib/docker/volumes:/var/lib/docker/volumes portainer/agent:2.9.3be patient for Docker to pull to the necessary images and initiate the container.

2. The IP address of the machine hosting the environment is required to register the new environment in Portainer. To find the IP if you don’t already know it, use the ip command:
ip aThe command lists the network interfaces on your system. Make a note of the main interface’s IP address.

Return to the Portainer Server UI.
3. From the menu on the left, choose Environments, then click Add environment.

If you select the Add Environments button in Step 3, Portainer takes you directly to the Create Environment page.
4.Enter the information about the environment you wish to add on the Create Environment page.
5. Type the URL of the system running Portainer Agent in the Environment URL field. (I used the IP from step2) : port number as shown below
[ip-address]:90016. When you finish the setup, select the Add environment button in the Actions section.

On the Environments page, the brand-new environment is shown.

Step 5: Deploy Container Using Portainer
Deploying a test Docker container will allow you to test your Portainer configuration. Installing an instance of Apache HTTP Server requires the procedures listed below.
1: The Containers page will open when you choose Containers from the menu on the left.

2.In the action bar, click the Add container button.

3. Specify the container you wish to use, including its name, the name of the image, and the connection ports.
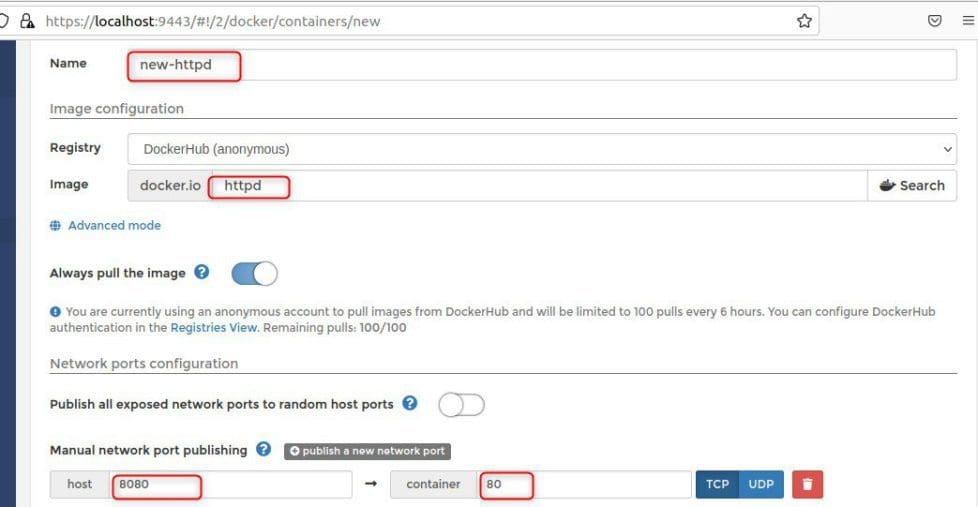
4. After configuring the container, click the Deploy the container button at the bottom of the page.
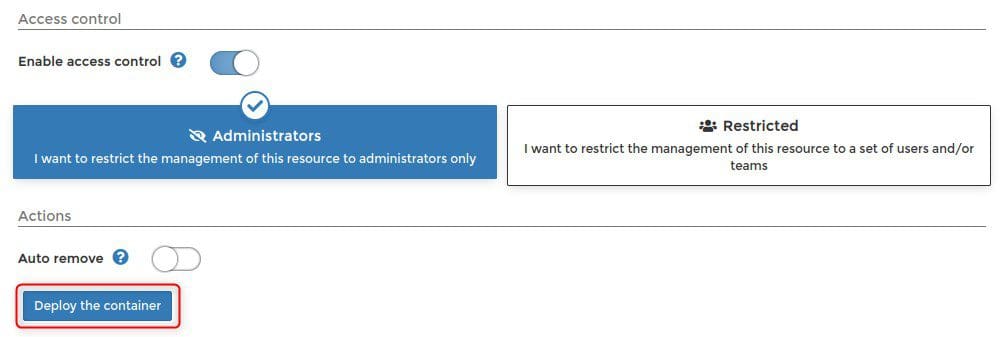
It might take a while for it to start running but wait for it.

5. Open a new tab in your browser and enter your environment’s IP address, followed by the port designated for the container. The Apache server displays the confirmation message.

Summary
In conclusion, you’ve learned how to install Portainer to manage Docker containers on Linux, following the instructions in this article. Furthermore, the steps for establishing a Portainer Server instance and adding environments to your installation were covered in the tutorial.