Skip to content

TechDirectArchive

Hands-on IT, Cloud, Security, Veeam & DevOps

  • Home
  • About
  • Advertise With US
  • Contact
  • Reviews
  • Toggle search form

How to create a capture image on Windows Deployment Services

Posted on 27/05/202008/09/2024 IT Expert By IT Expert No Comments on How to create a capture image on Windows Deployment Services
  1. Home
  2. Windows Server
  3. How to create a capture image on Windows Deployment Services
capture image

A capture Image is required for an environment where you are deploying similar Operating Systems that contain the same basic applications. The image is used to create a capture image. For the differences between Capture image, Discover image, Install and Boot images (Windows PE). In this article, you will learn about How to create a capture image on Windows Deployment Services. Please see how to add images to WDS and configure Multicast transmission via the GUI.

Create a capture image

Follow the steps to have this done. Click on the boot image. Right-click on the boot image on the right pane of the window and select Create Capture Image as shown below. This is the first step to create a capture image on Windows Deployment Services.

Note: In this Window, you can do a lot of stuff, as shown below. Furthermore, Here, we want to create a Captured Image

Windows Deployment Services

Enter the Image Name

However, Enter the image’s name and description as well to proceed with creating a capture image.

image creation

For more information on this, see ” how to configure Windows Deployment Services on Windows Server 2019“

Browse to the RemoteInstall Directory

For location and file name, click on browse and browse to the path where the RemoteInstall” folder is when we installed WDS role.

create image
Screenshot 2020 05 27 at 22.36.14

Moreover, This will ensure we have the Capture Image folder created under the RemoteInstall Directory, crucial for creating a capture image on Windows Deployment Services.

Windows Deployment Services
capture image
Screenshot 2020 05 27 at 22.43.25

In addition, The Metadata and location will be like this as shown below. Click on Next

image creation

This will continue the installation process and when done

capture image

Click on Finish (Now the Capture Image has been created)

create image

Now we have successfully created a captured image. Now we can see the captured file in the RemoteInstall location as shown below

image creation

Next, you will have to upload this image to WDS. This can be done by following the steps below. See how to add the Lite-Touch Images to WDS for a similar example.

Launch the WDS console

Launch the WDS console and right-click on the Boot image to effectively create a capture image on Windows Deployment Services.

capture image

In the Add Image Wizard, browse to the image file as shown below

Screenshot 2020 06 06 at 23.52.45
Screenshot 2020 06 06 at 23.53.09

Click on Next to proceed when the image file has been selected.

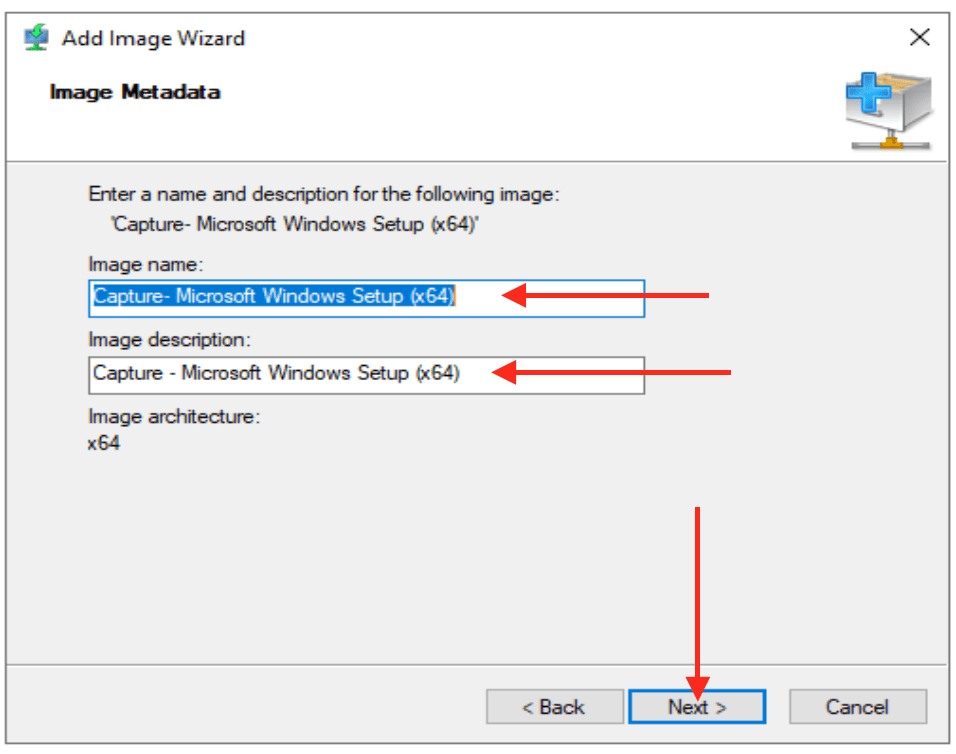
In the Image Metadata window, click on Next. You can add a descriptive name in your environment when you create a capture image.

Review the summary as shown below and click on Next

When the image upload is completed, click on Finish as shown below.

Screenshot 2020 06 06 at 23.57.35
Screenshot 2020 06 06 at 23.59.08

As we can see on the WDS console, under the boot images, the Capture image we created has been uploaded successfully.

Nonetheless, I hope you found this blog post on how to create a capture image on Windows Deployment Services helpful. Consequently, Please let me know in the comment session if you have any questions.

5/5 - (1 vote)

Thank you for reading this post. Kindly share it with others.

  • Share on X (Opens in new window) X
  • Share on Reddit (Opens in new window) Reddit
  • Share on LinkedIn (Opens in new window) LinkedIn
  • Share on Facebook (Opens in new window) Facebook
  • Share on Pinterest (Opens in new window) Pinterest
  • Share on Tumblr (Opens in new window) Tumblr
  • Share on Telegram (Opens in new window) Telegram
  • Share on WhatsApp (Opens in new window) WhatsApp
  • Share on Mastodon (Opens in new window) Mastodon
  • Share on Bluesky (Opens in new window) Bluesky
  • Share on Threads (Opens in new window) Threads
  • Share on Nextdoor (Opens in new window) Nextdoor
Windows Server Tags:WDS, WDSUTIL, Windows Deployment Services, Windows Server 2016

Post navigation

Previous Post: How to remove WDS role via the GUI and PowerShell
Next Post: Windows Deployment Services: WDSUTIL CommandLine Options on Windows Server 2019

Related Posts

  • 1 kAUgwdVYmcVgUSXiwUkObw
    Error 0x801c001d – Automatic registration failed: Failed to look up the registration service from AD Windows Server
  • Screenshot 2020 08 28 at 12.51.10
    The service could not be started either because it is disabled or because it has no enabled devices associated with it Windows Server
  • maxresdefault
    Install and manage IP Address Management on Windows Server Windows
  • Windows 11 taskbar features remove 1
    How to modify Windows 11 Taskbar via Intune and GPO Windows
  • shrink and create partition
    How to shrink and create new partition on Windows Server Windows Server
  • newsroom hero image password security
    Unable to update the password value provided for the new password and Password Policy Windows Server

More Related Articles

1 kAUgwdVYmcVgUSXiwUkObw Error 0x801c001d – Automatic registration failed: Failed to look up the registration service from AD Windows Server
Screenshot 2020 08 28 at 12.51.10 The service could not be started either because it is disabled or because it has no enabled devices associated with it Windows Server
maxresdefault Install and manage IP Address Management on Windows Server Windows
Windows 11 taskbar features remove 1 How to modify Windows 11 Taskbar via Intune and GPO Windows
shrink and create partition How to shrink and create new partition on Windows Server Windows Server
newsroom hero image password security Unable to update the password value provided for the new password and Password Policy Windows Server

Leave a Reply Cancel reply

You must be logged in to post a comment.

Microsoft MVP

VEEAMLEGEND

vexpert-badge-stars-5

Virtual Background

GoogleNews

Categories

veeaam100

Veeam Vanguard

  • win 10 login screen
    Import a user profile in Windows to another PC Windows
  • Banner AzLogin 1
    Azure Managing Subscriptions with PowerShell: From Login-AzAccount to Resource Control and Private Endpoint Verification for Azure File Share” AWS/Azure/OpenShift
  • HOW TO AUTOMATE A PROCESS IN LINUX@
    Shell Scripting: How to Automate a Process in Linux Linux
  • Banner
    Azure Arc for SQL Server PAYG: Installation, Connectivity Requirements and Operational Best Practices AWS/Azure/OpenShift
  • Capture 2
    MDT Invalid credentials: The network was not found Windows
  • Banner 1
    How to Assign a Public IP to Azure Virtual Machine (VM) AWS/Azure/OpenShift
  • SCVMM Setup Fails Because It Cannot Find The Specific Windows ADK Deployment Tools Files
    SCVMM setup Fails: Fix Missing Windows ADK Deployment Files Windows Server
  • BitLocker
    BitLocker Drive Encryption architecture and implementation types on Windows Windows Server

Subscribe to Blog via Email

Enter your email address to subscribe to this blog and receive notifications of new posts by email.

Join 1,792 other subscribers
  • RSS - Posts
  • RSS - Comments
  • About
  • Authors
  • Write for us
  • Advertise with us
  • General Terms and Conditions
  • Privacy policy
  • Feedly
  • Telegram
  • Youtube
  • Facebook
  • Instagram
  • LinkedIn
  • Tumblr
  • Pinterest
  • Twitter
  • mastodon

Tags

Active Directory Azure Bitlocker Microsoft Windows PowerShell WDS Windows 10 Windows 11 Windows Deployment Services Windows Server 2016

Copyright © 2025 TechDirectArchive

Loading Comments...

You must be logged in to post a comment.