
An error can occur in VirtualBox Manager while trying to start up a Virtual Machine. A VirtualBox Manager is software that can help you run Virtual Machines with Windows 8,10,11, and whichever operating system you may want. In this article, we shall discuss how to fix “Failed to open session in VirtualBox to install Windows 11 Image”. Please see how to configure email notifications for Azure CI/CD build Pipeline on Azure DevOps Project, and how to create an App Service Plan with Continuous Deployment to deploy a .NET Application from GitHub.
In this program, you could get a very annoying error and you can end up spending a lot of your productive time trying to fix it.
Check out some of my previous posts on Provisioning Azure Resources using Azure Az PowerShell Cmdlet from Cloud Shell, How to build your first CI/CD Pipeline in Azure DevOps using ASP.Net Core Application, and how to secure access to your Virtual Machine with Just-in-Time (JIT) VM Access.
Why the error “Failed to open session in VirtualBox” may have occurred
This can happen to you while trying to install the most desired Windows 11 Operating System that was officially released by Microsoft on October 5, 2021, using Oracle VirtualBox Manager.
You may have been aware of some specific requirements that your system must meet to be able to install and run Windows 11. You can review the requirements from Microsoft’s official documents.
So, if your system specification falls below the requirements stated by Microsoft, you could still install it. One of the ways you can install Windows 11 on your system is to use VirtualBox Manager or VMWare.
When this happens, you will get an error similar to the one shown below:
Failed to open a session for the virtual machine Imohweb-Win11.

Call to NEMR0InitVMPart2 failed: VERR_NEM_INIT_FAILED (VERR_NEM_VM_CREATE_FAILED).

Result Code: E_FAIL (0x80004005)
Component: ConsoleWrap
Interface: IConsole {872da645-4a9b-1727-bee2-5585105b9eed}
This “Failed to open session in VirtualBox” error could happen if you recently upgraded your VirtualBox. For example, let’s say you upgrade from v6.1.28 from v6.1.26 in your 64-bit Windows 10 Pro PC. Experiencing or having encountered such errors in the past, you’d understand the frustration they can cause.
Fixing the Error “Failed to open session in VirtualBox”
These simple steps below will guide you through quickly with ways to get it fixed. You need to disable some things in your Windows OS to fix it. Follow through the steps below:
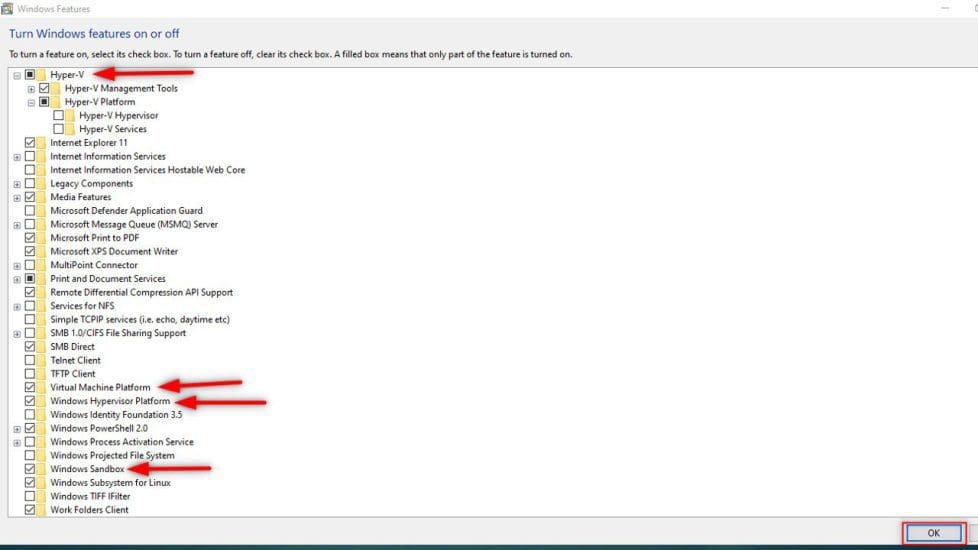
- From Start Menu -> Windows Feature
- Locate
Hyper-Vand uncheck theboxbeside it to disable it - Scroll down to locate
Virtual Machine Platformand check the box beside it to enable it - Next enable
Windows Hypervisor Platformby checking the box beside it - Locate and disable
Windows Sandbox - Click
Ok– Windows will apply the changes and prompt you to restart the system, do not restart it yet because there is still one more thing to do.
Launch PowerShell as an Administrator. In the PowerShell window, run the command below and hit enter.
bcdedit /set hypervisorlaunchtype off 
Lastly, you can now close the PowerShell window and restart your PC. Go ahead to run the operating system image of your choice in the VirtualBox Manager.
FAQs
No, Oracle VirtualBox is not fully compatible with Windows Device Guard or Credential Guard. These Windows security features rely on virtualization-based security (VBS), which uses Hyper-V under the hood. Since VirtualBox and Hyper-V cannot run simultaneously without conflict (especially in older versions), enabling Device Guard or Credential Guard can prevent VirtualBox VMs from starting or cause performance and compatibility issues.
To use VirtualBox effectively, you typically need to disable Device Guard and Credential Guard. This involves modifying Group Policy settings, clearing UEFI keys, and potentially adjusting registry entries. Alternatively, consider using VirtualBox 6.1 or later, which introduced some experimental support for Hyper-V (via “Hyper-V Paravirtualization”), but note that performance and compatibility may still be limited compared to native execution.
Because, the hypervisor loads before the OS and assigns hardware virtualization to the hypervisor, not the host OS. VirtualBox cannot use hardware virtualization if the Hyper-V hypervisor is active.
On the host operating system, click Start > Run, type gpedit.msc, and click Ok. The Local group Policy Editor opens. Navigate to Local Computer Policy > Computer Configuration > Administrative Templates > System > Device Guard > Turn on Virtualization Based Security.
I hope you found this blog post on “how to Fix Failed to open session in VirtualBox to install Windows 11 Image” helpful. If you have any questions, please let me know in the comment session. Cheers!


Hello,
Unfortunately doesn’t work in my case, I just upgraded to version 6.1.30 and it keeps giving the error. But many thanks for the help
Regards
Hello Guilherme,
thank you for the kind words.
Unfortunately, it is often so that no one solution can solve a specific program. Once again, thank you!
Kindly let us know the solution that worked for you so others can learn from you.
Best,