With Azure App Service, organizations or individuals looking to get their Web Apps, Mobile Apps or API Apps running without having to bother about managing the underlying infrastructure such as patching of Operating System, managing security, updating new software and patching the underlying virtualization can easily get it up and running within seconds. Just as you will have Azure to manage virtualization, servers, storage, and networking for you when you choose the Infrastructure as a Service (IaaS) cloud model, Platform as a Service (PaaS) allows Azure to manage almost everything for you. If you’ve ever wondered how to create an app service plan while deploying from GitHub, then you’re in the right place.
In the PaaS option, you only have to manage your application and its data without having to worry about things like the running of the application, patching of software or the operating system, and the underlying infrastructure such as virtualization, server, and so on. See the image below to better understand how cloud models work and what you can do by yourself.

Empowering Simplicity with Azure App Service Plan: PaaS at Its Best
Azure App Service plan is a perfect example of PaaS. As shown in the image above, you only have the option to manage the application and data while Azure takes care of the rest for you.
In Azure, an app be it web, mobile or API app always runs in an App Service plan. In addition, Azure Functions also has the option of running in an App Service plan. An App Service plan defines a set of compute resources for a web app to run. These compute resources are similar to the server cluster in conventional web hosting. One or more apps can be configured to share the same computing resources or in the same App Service plan.
When you create an App Service plan in a certain region (for example, Central Europe), a set of compute resources is created for that plan in that region. Whatever apps you put into this App Service plan run on these compute resources as defined by your App Service plan. Each App Service plan defines:
- Operating System (Windows, Linux)
- Region (Central US, East US, etc.)
- Number of Virtual Machine (VM) instances
- Size of Virtual Machine (VM) instances (Small, Medium, Large)
- Pricing tier (Free, Shared, Basic, Standard, Premium, PremiumV2, PremiumV3, Isolated)
What does Azure Service plan do? Azure App Service is a fully managed web hosting service for building web applications, services, and RESTful APIs. The service offers a range of plans to meet the needs of any application, from small websites to globally scaled web applications.
App Service Pricing Tier:
The pricing tier of an App Service plan determines what App Service features you get and how much you pay for the plan. The pricing tiers available to your App Service plan depend on the operating system selected at creation time. There are a few categories of pricing tiers:
- Shared compute: Free and Shared, the two base tiers, runs an app on the same Azure VM as other App Service apps, including apps of other customers. These tiers allocate CPU quotas to each app that runs on the shared resources, and the resources cannot scale out.
- Dedicated compute: The Basic, Standard, Premium, PremiumV2, and PremiumV3 tiers run apps on dedicated Azure VMs. Only apps in the same App Service plan share the same compute resources. The higher the tier, the more VM instances are available to you for scale-out.
- Isolated: This tier runs dedicated Azure VMs on dedicated Azure Virtual Networks. It provides network isolation on top of compute isolation to your apps. It provides the maximum scale-out capabilities.
Let’s head over to the business of the day. Before you can create and deploy your app to an App service Plan on Azure, the following are required;
- Active Azure Subscription if you don’t have one, follow this link to sign up and receive $200 free credit
- Sign into Azure portal, and create an App Service Plan on Azure
- Have your code hosted externally on GitHub
Create Web App with continuous deployment from GitHub using Azure Portal
Note: You can also use Azure CLI or PowerShell to create App Service Plan. To create App Service Plan using Azure CLI, see this article. On the other hand to create using PowerShell, read this
Steps to create your app service plan. I assume you have an active Azure Subscription if not follow the link above to sign up for a free account. Thereafter:
- Sign into Azure Portal
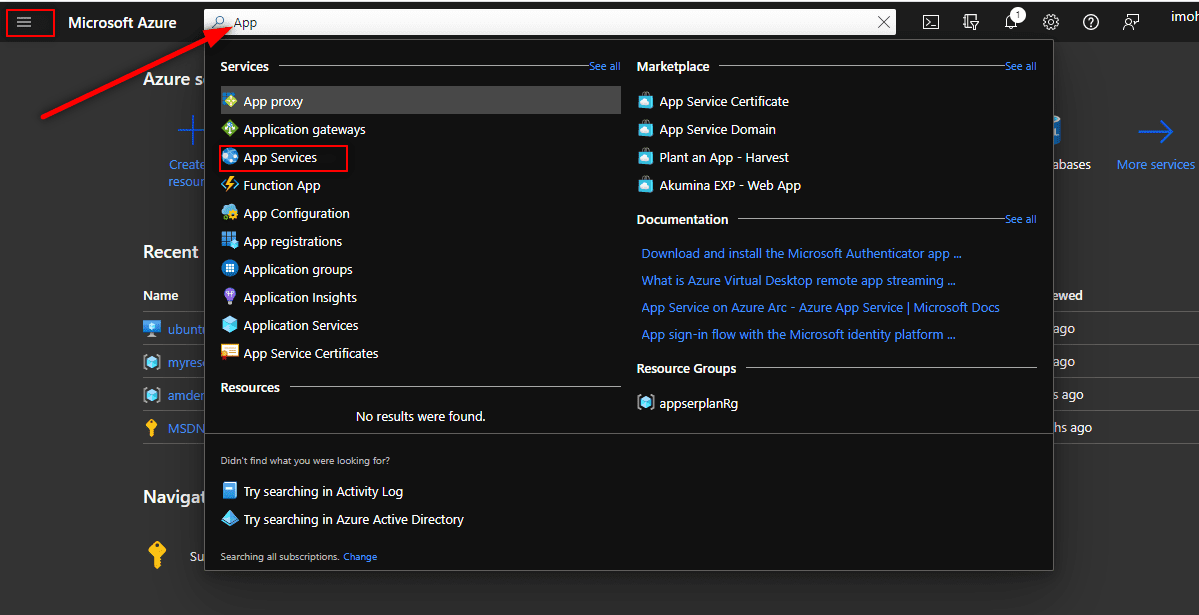
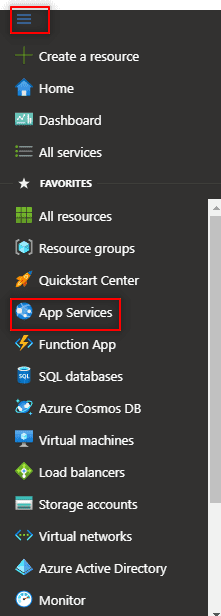
- Search for and select
App Servicein the horizontal search bar across the portal interface or click theshow portal menuas highlighted in the screenshot below;
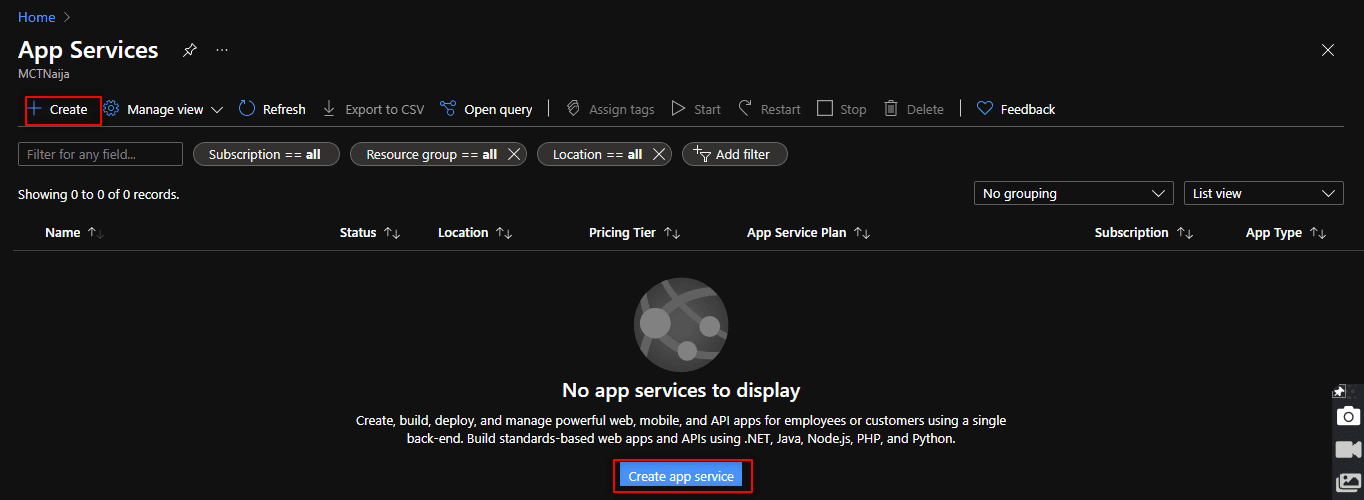
3. Click + Create or Create app service. The screenshot below clearly shows this
4. Next, select your preferred Resource Group or create a new one if you don’t already have one to use. Name your app service plan. The name of my app service plan is imohappplan
Note that this first configuration screen is grouped under the basic tab. You will use the deployment tab in the next screen where you will need to authorize your GitHub repository for App service plan


Customize Your App Environment Settings
The second screenshot above allows you to make decisions based on your preferences. Note that the choice you make here will determine the publishing format Code or Docker Container, the Runtime Stack, the Operating System, the region you would like your app to run, and the app service plan for your app.
The SKU and size section, which shows Standard S1 as my app service plan, can be changed to an app service most desirable to you based on the type of performance you want for your app. Click on the Change size text to change it. Clicking it will take you to the screenshot below.

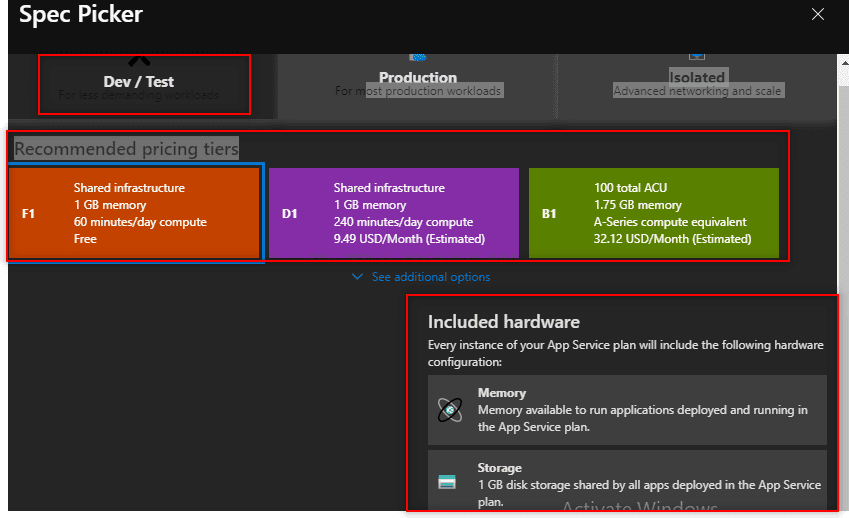
In addition, The screenshot above will take you to where to explore more app service pricing tiers. Nonetheless, Feel free to compare and choose the one suitable for your app and click apply to retain the chosen plan. Consequently, I left mine at S1 the app service plan and the Production Pricing Tier. Similarly, The Dev/Test app service pricing tier can be used for non-production workloads alone.
If you wish to choose other app service pricing tiers. See the below screenshots which gives the breakdown of app service plans under the Dev/Test and Isolated Pricing Tiers and this link to learn more about app service pricing tiers.

Streamline Deployment with Continuous GitHub Integration
5. Furthermore, click on the deployment tab and set the continuous deployment to enable to authorize the GitHub Repository where your code is hosted. However, Enabling continuous deployment will trigger an automatic update to your application whenever a new commit is made to your code on GitHub. Moreover, Ensure you supply your details correctly to authorize access to your GitHub. See the screenshot below;


Additionally, The above screenshot shows authorization between GitHub and Azure App Service.
6. Therefore, Select the details of your GitHub actions, so Azure Web Apps can access your repository.
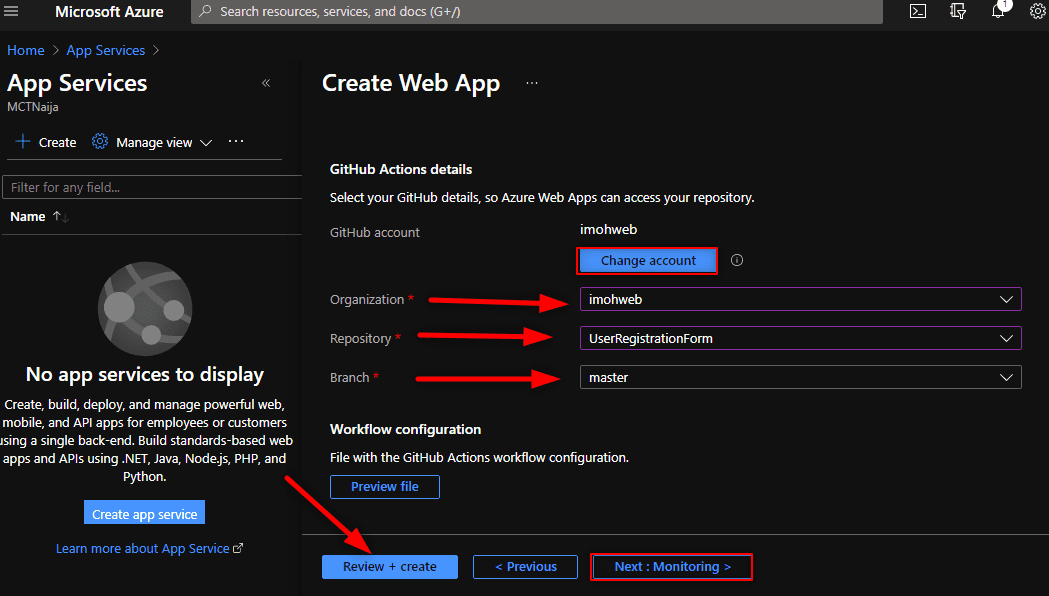
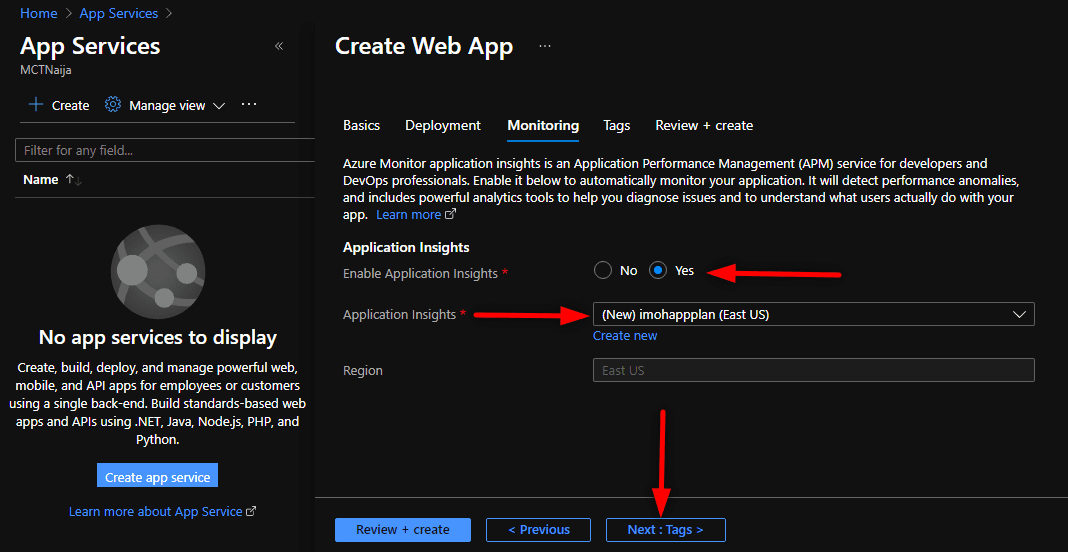
Consequently, The above screenshot shows the GitHub actions details page. As clearly shown, the name of my GitHub organization is imohweb, the GitHub repository where my code is located UserRegistrationForm , while the branch is master. Similarly, You can go ahead and configure the monitoring solution to enable Azure Monitor application insights which is an Application Performance Management (APM) service for developers and DevOps professionals. Nevertheless, See the related article to learn more about Azure Monitor Application Insights. See the below screenshot for more info!
Configuring Application Insights Settings and Tag Management in Azure
Moreover, The above screenshot shows the Application Insights is set to enable and the Region set to East US, which is the selected Region for the app service plan. In addition, You can go ahead and add Tags , which is optional, but adding tags will enable you to organize your Azure resources and management hierarchy. Nonetheless, Learn more about tags. I am going to skip adding tags and head to the Review + create button.
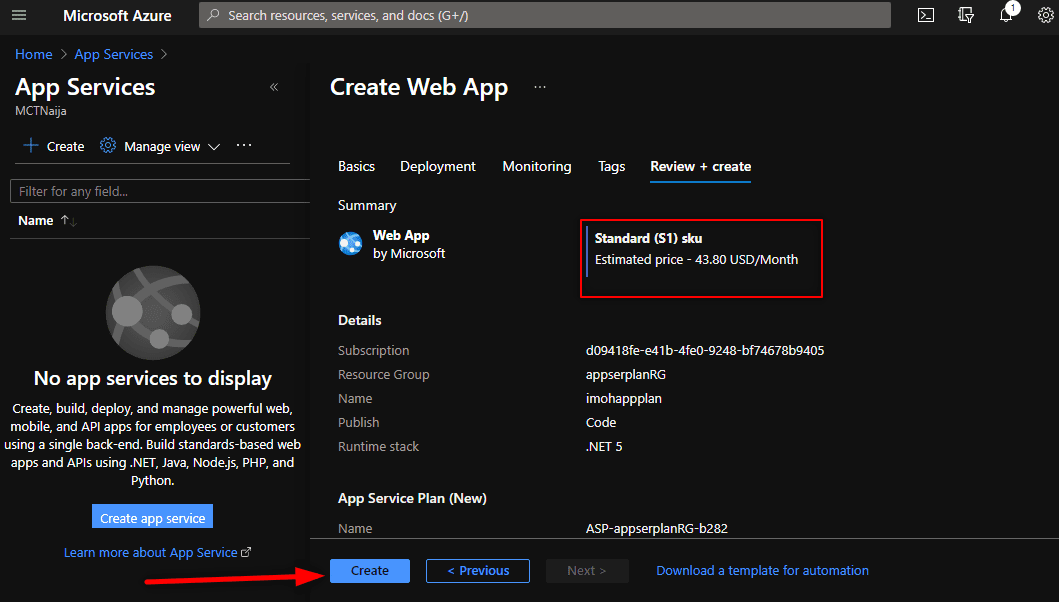
Lastly, click Create to create your app service plan as shown on the screenshot above. Deployment is in progress. However, See the below screenshot

Furthermore, When the deployment is successful, click on Go to resource as shown below.

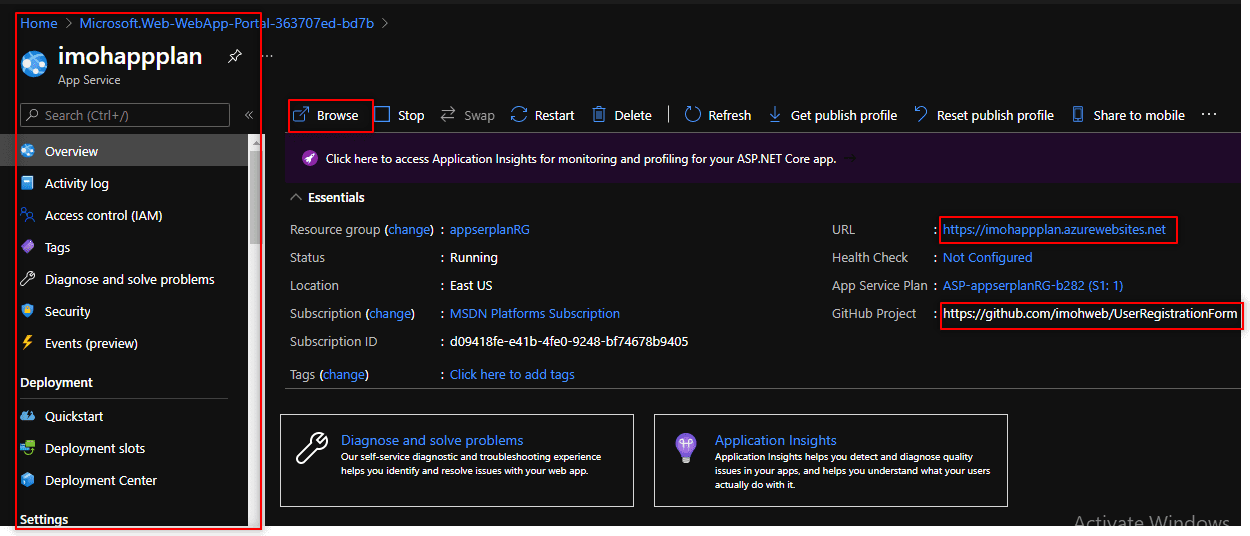
Additionally, The below screenshot gives you a perfect scenario of how yours will look like. You can access your web app directly by clicking on the button as shown below, or you can use the URL that’s given. Therefore, As you can see, the URL carries azurewebsites.net. You can use the settings option in app service blade to customize it how you want.
Similarly, The settings tab of your app service plan blade is where you can do most of the key configurations for your app service. Nevertheless, See the screenshot to see what and what you can do.

Enhance Your App: Custom Domains, Scaling, and More
Consequently, From the screenshot above you can add a custom domain. See how to map an existing domain to your app service plan in a related article. Also, you can scale up (changing the pricing tier of the App Service plan that your app belongs to and scale out (increasing the number of VM instances that run your app. You can scale out to as many as 30 instances, depending on your pricing tier).
Nonetheless, let’s finally launch our web app to see the application interface on a browser by clicking on the URL or browser button as I mentioned above.
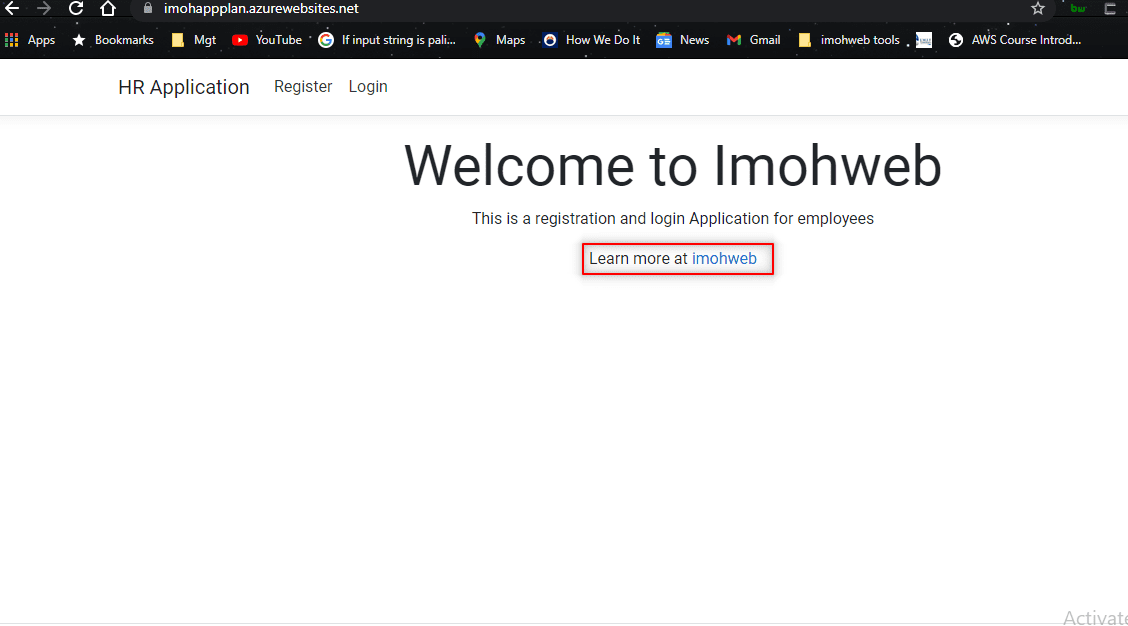
In addition, The screenshot above shows the interface of my application.
Lastly, let’s go ahead and make some changes to our code in Visual Studio and push the same to GitHub to see the continuous deployment in action.
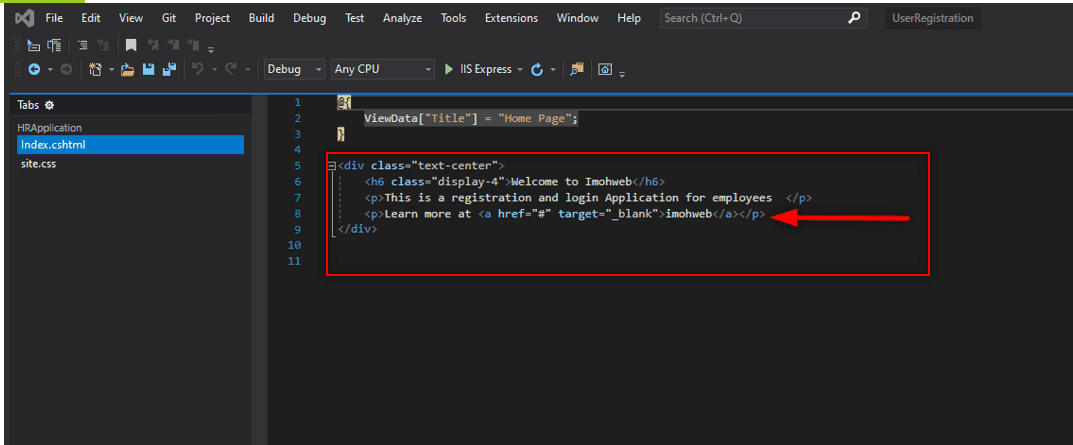
The above screenshot shows my code in Visual Studio before making changes.
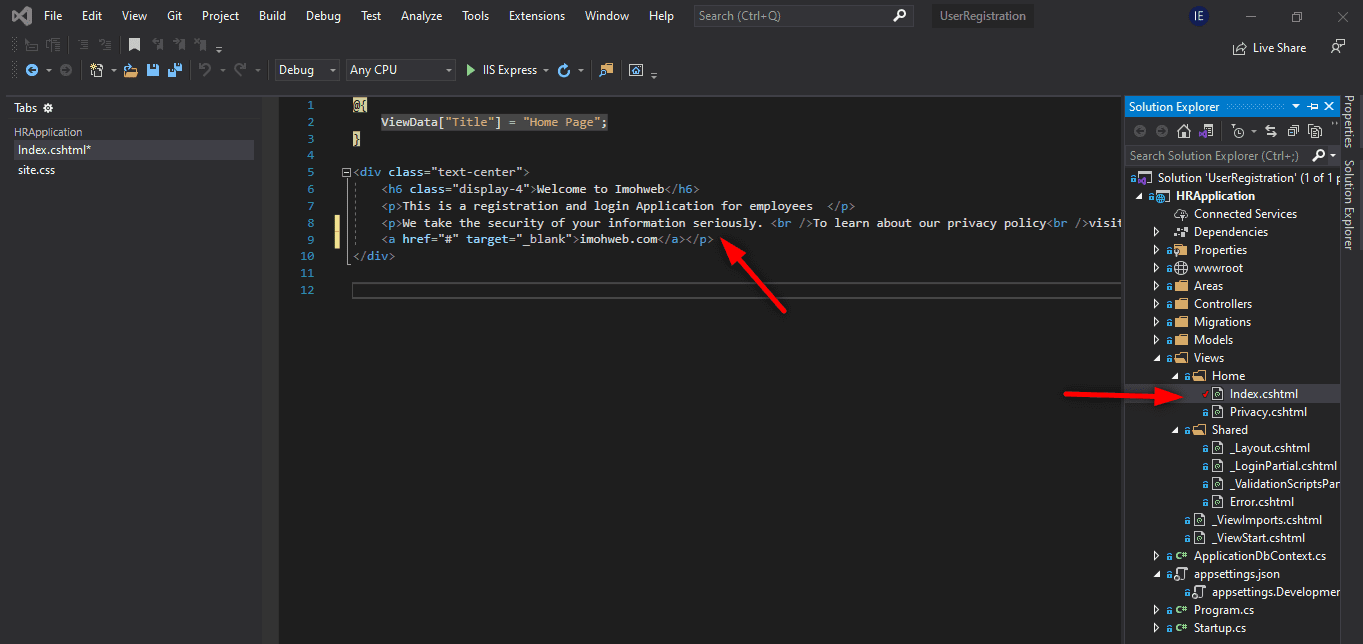
Furthermore, The screenshot above shows the modified code to my web app. From the screenshot, I modified the index.cshtml file under the home folder.
However, See the last screenshot after modifying and committing the changes to my GitHub Repository.

The screenshot above shows the web interface after making changes to my code. You can compare this screenshot to the previous one above to confirm that the continuous deployment feature works perfectly.
Summarily, we have learned how to create an App Service Plan and set up continuous deployment for our code hosted on GitHub. Moreover, This enables the quick flow of code projects between the dev and ops team in an organization, as things will be done faster than expected.