How to Configure Advanced PAM in Linux

The Pluggable Authentication Module (PAM) adds a layer of security to administrative tools and commands. It includes dynamically loadable libraries that dictate how different applications verify and authenticate users. Explore this article to learn how to configure advanced PAM in Linux. In this article, we shall learn how to Configure Advanced PAM in Linux. Please see Unable to bind to LDAP or AD in Pleasant Password Server, and What’s New? Install Windows Server 2025 and enable RDP.
You can find other related guides here: Delivering System Utilization Report on a Linux based OS, and how to enable LDAP over SSL with a third-party Certificate such as DigiCert.
Understanding Advanced PAM
You have used advanced PAM if you are logged on to a Linux system without realizing, SSH also uses PAM. It is also used to make user authentication standard. The config files can be located in /etc/pam.d/login
auth [ user Unkown=ignore success=ok ignore=ignore default=bad] pam_securetty.soThe highlight text is a syntax of a pam rule, the rule type is auth. What the rule does is to make sure pam_securetty.so ensures that the root user is logging in.
And if it is, it makes sure that the user is logged in from a secured terminal, which is /etc/securetty.
So, everyone that is trying to login as root and not from a secured terminal will have their access denied . A user can only login from a secured terminal defined in /etc/securetty. Configuration files are named according to the programs using them in /etc/pam.d/
TYPES OF PAM RULES:
Authentication Management (Auth) this validates a user's identity
Account Management and this will allow or deny based on access policy
Password management, manages password change policies
Session management, applies settings for user sessions

TYPES OF PAM  CONTROL FLAGS:

Required if the first rule passes PAM proceeds to the next rule of the same type, if it fails PAM still proceeds but the result returns a failure
Requisite If this passes, PAM does not check any more rules
Sufficient If this rule passes, no other rule of the same type gets processed
Optional Whether it passes or fails, PAM continues to the next
Include Includes all rule of the same type from designated configuration files
Demo
#cd /etc/pam.d
#ls
Configuring Advanced PAM in Linux
When we get into this config directory, we will realize that there are lots of files there, normal and some symbolic links, the symbolic links all reference parent, for example passwd-auth is a symbolic link to passwd as shown in the screenshot below.
If we cat for samba in the screenshot below. We will see that all the rule types mentioned above are accounted for.

cat samba

We should notice the rule types are in red and the control flags are in blue. If we further cat into any of the files in the required flag. We can see that the files are further separated into the required rule types; auth, account, password, and session.

Understand Control Flags
As we can see, each of the flag is strictly adhered to, The rules are processed in order as the control flags imply.
Looking at the screenshot carefully, we can see that it is required that the environment is set up first and next it is required to set a delay on failure.
The next two steps showed that the process was successful, next it is sufficient to not require any other form of restriction.
Again, it is sufficient that if the first password passes, we can login without any issues. The last one determines what happens to the error generated in the log file when a failure finally happens.
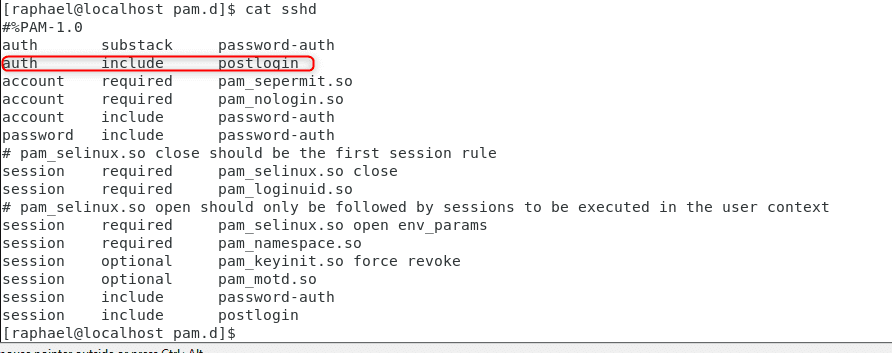
If we cat sshd we will see that it is also separated into sections s and there quite a few number of include lines, to see what those do, we have to cat to see what’s in, lets cat into postlogin for example

Modify PAM Configuration
The postlogin server example does not do anything because we do not have an auth rule type to include, if we look at the screenshot above carefully, account and password do include password-auth. So, let’s cat into password-auth

So, if we cat into account or password rule type as shown above. We get these results shown

As we can see, we do have things in account and password rule type that need to be pulled in and processed.
Ideally, the tool to use to update these files is called authconfig-tui so if you are going to amend these files, the best practice for manipulating things with an n-cursor interface is to use the tool.
#authconfig-tui
We can scroll through and configure any of the parameters using this tool instead of manually changing anything.
To select an item, you need to hit the space bar on your keyboard. So, assuming we have ldap installed on the system and we select ldap, we just hit space to select ldap and click on next.

We tried to set up ldap and it returned the message in the screenshot. So let’s set up ldap to configure advanced PAM.
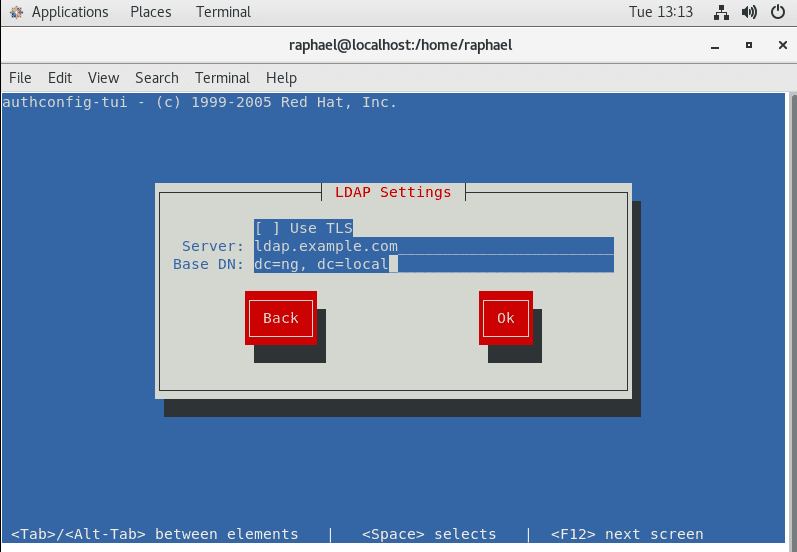
It had blank values, so we use ldap.example.com as the server and base DN as dc=ng, dc=local, to see if what we did succeeded in adding ldap to the files. Lets run the command
#grep ldap *
From the image above, we see that pam_ldap has been added to the files. We need to make a change to the default login definitions and change UID to 500
#vim /etc/login.defs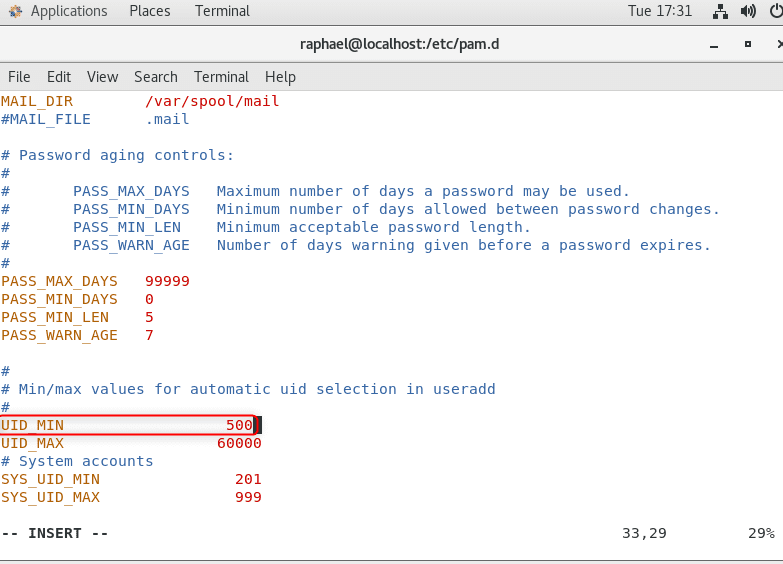
Update
Next thing to do to configure advanced PAM in Linux is to make the change reflect in all the files. So use the code below
#authconfig --updateall
By default, PAM authentication is set to succeed if UID is greater than 1000 but we have set it to 500, so if we do a grep 500 * , we will see that everything has been changed to 500.

Install PAM Modules
There are lots of modules preconfigured in the system that we can add to PAM and we can find these in
# ll /usr/lib64/security/pam*
One of such module that is usually used very often is PAM_tally. And we can check this from the man pages as well. we can get more information about tally2 module
#man pam_tally2
Man pam tally2 gives an interesting example. with the code line highlighted in the screenshot
#vim /etc/pam.d/login
# pam_tally2.s0 deny=4  even deny root unlock time = 2000
The line of the second code we copied from the tally2 man page will lock the account after 4 failed login attempt and it will even lock root, after 20 minutes it will unlock the account.
If we paste the code in the auth stack of vim/etc/pam.d/login, pam_tally2 will be called anytime we fail to login
Summary
By now, you should have a clear understanding of how to configure advanced PAM in Linux.
Bear in mind that Pam uses control flags and rules to implement security of how users are authenticated. It is not advisable to configure it manually.
We use authconfig-tui to configure LDAP and other necessary settings. We can add a popular module called pam_tally2 to our auth stack to checkmate how our system should act when a user fails to login.


