Skip to content

TechDirectArchive

Hands-on IT, Cloud, Security & DevOps Insights

  • Home
  • About
  • Advertise With US
  • Reviews
  • Contact
  • Toggle search form
Home » Windows » How to fix The Group Policy settings for BitLocker startup options are in conflict and cannot be applied
  • image 79
    How to import SSL Certificate to Windows Server using DigiCert Utility Windows
  • images 3
    Install Minimal Container Templates on Proxmox Server Virtualization
  • hero activedirectory 2
    Concept of Active Directory Computer Account Windows Server
  • image 6
    Set Browers and Windows to reopen Apps on Startup Windows
  • Add Nutanix AHV to Veeam
    Full Integration Guide on how to Add Nutanix AHV to Veeam Network | Monitoring
  • Credential Sync acrosss devices
    How to sync your passwords across iOS and Mac devices Mac
  • Steps to upgrade VBR to v12.1
    How to upgrade Veeam Backup and Replication v11 to 12.1 Backup
  • Docker ENOENT error
    ENOENT: No such file or directory Error in Docker build Containers

How to fix The Group Policy settings for BitLocker startup options are in conflict and cannot be applied

Posted on 18/05/202208/12/2023 Matthew By Matthew No Comments on How to fix The Group Policy settings for BitLocker startup options are in conflict and cannot be applied
Featured-post.-1

I recently encountered the error message “The Group Policy settings for BitLocker startup options are in conflict and cannot be applied. Contact your system administrator for more information” during a BitLocker Encryption setup. The issue occurred while attempting to turn on BitLocker encryption through the Control Panel. The group policy setting for BitLocker may cause this error when enabling BitLocker Encryption. To fix it, open the policy and set “Require additional authentication at startup” to “Not Configure.” Please see this guide on how to deploy Microsoft BitLocker Administration and Monitoring Tool

Some Context on BitLocker Encryption with TPM (Trusted Platform Module)

BitLocker Drive Encryption is a data security tool that integrates with the operating system and solves the risks of data theft or disclosure from lost, stolen or improperly discontinued machines.

The TPM is a hardware component that computer makers include in many newer computers. It integrates with BitLocker to help safeguard user data and confirm that a computer has not been tampered with when the system was turned off.

In addition to the TPM, BitLocker provides the option of locking the normal startup process until the user enters a personal identification number (PIN) or inserts an external device, such as a USB flash drive, that carries a startup key.

These extra security features enable multifactor authentication and assurance that the machine will not start or restart from hibernation unless the right PIN or startup key is supplied. If you are having an issue integrating BitLocker with TPM, see how to fix your device cannot use a Trusted Platform Module: Allow BitLocker without a compatible TPM

Learn more about BitLocker encryption: Microsoft Bitlocker Administration and Management: Effect of renaming an MBAM or BitLocker protected Computer, BitLocker System Partition: Detailed steps to troubleshoot and fix System Partition not available or large enough [Part 2],

So, lets see how to solve this problem by changing the BitLocker configuration settings from the Group policy editor.

How to Set Require Additional Authentication at Startup to “Not Configured“

Open the group policy editor by clicking Start or press the Windows key then enter ‘group policy’. Click the ‘Edit group policy’ or press open:

BitLocker encryption

Under “Computer Configuration” follow on the path below.

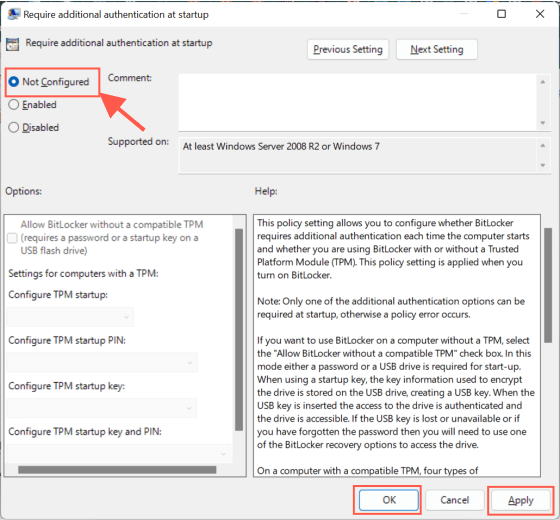
Administrative Templates > Windows Components > BitLocker Drive Encryption > Operating System Drives” 
  • Double click: “Require additional authentication at startup”
Group Policy conflict

Change the following:

  • Under Require additional authentication at startup window select “Not Configured”
  • Click “Apply” and “OK”
BitLocker security

For your changes to take effect, open the command prompt as administrator and execute the following: gpupdate and wait till the computer and group policy update is successfully applied. Or simply restart your system.

Group Policy management

Click Start or press the Windows key and search for ‘BitLocker’. Click the ‘Manage BitLocker’ or press open.

BitLocker encryption

Now continue with the BitLocker Encryption by following this detailed guide on how to enable BitLocker on Windows 10 and virtual machine.

How to Enable Authentication PIN at Windows Startup

If you have successfully enabled BitLocker on your Drive. If you are required to set up an authentication PIN at Windows startup follow the steps below.

  • Open the group policy editor.
  • Navigate to “Require additional authentication at startup” as shown below.
Group Policy conflict

Change the following:

  • Under Require additional authentication at startup select “Enabled”
  • Click on the drop-down under “Configure TPM startup PIN” and select “Require startup PIN with TPM”
  • Click “Apply” and “OK”
Image7

Next, open the Command prompt as administrator then enter

gpupdate

Enter the following command to turn on the authentication PIN:

manage-bde -protectors -add C: -TPMAndPIN Replace the C: with your Drive Letter. 

You will be required to input your preferred PIN twice, then close the terminal.

Image8-1

After this, whenever you power on your system. You will be required to input the set pin to unlock your system drive before booting to Windows.

Image9-1

Please see MBAM Report Errors: Understanding Microsoft BitLocker Administration and Monitoring compliance state and error status and Encryption Algorithm: Why does MBAM not automatically re-encrypt MBAM or Bitlocker protected devices​.

I hope you found this blog post on how to fix “The Group Policy settings for BitLocker startup options are in conflict and cannot be applied” helpful. If you have any questions, please let me know in the comment session.

Rate this post

Thank you for reading this post. Kindly share it with others.

  • Click to share on X (Opens in new window) X
  • Click to share on Reddit (Opens in new window) Reddit
  • Click to share on LinkedIn (Opens in new window) LinkedIn
  • Click to share on Facebook (Opens in new window) Facebook
  • Click to share on Pinterest (Opens in new window) Pinterest
  • Click to share on Tumblr (Opens in new window) Tumblr
  • Click to share on Telegram (Opens in new window) Telegram
  • Click to share on WhatsApp (Opens in new window) WhatsApp
  • Click to share on Pocket (Opens in new window) Pocket
  • Click to share on Mastodon (Opens in new window) Mastodon
  • Click to share on Bluesky (Opens in new window) Bluesky
  • Click to share on Threads (Opens in new window) Threads
  • Click to share on Nextdoor (Opens in new window) Nextdoor
Security | Vulnerability Scans and Assessment, Windows Tags:Bitlocker, BitLocker Drive Encryption Administration Utilities, BitLocker Status, Enable BitLocker, Microsoft BitLocker Administration and Monitoring, Microsoft Windows, Windows 10, Windows 11

Post navigation

Previous Post: How to manage Microsoft Defender Antivirus using Group Policy and Command Line Utility
Next Post: Installing Windows Subsystem for Android (WSA)

Related Posts

  • winSEARCH
    Hide or Remove Search Button from Windows 10 Taskbar Windows
  • screenshot 2020 03 14 at 16.23.23
    Change Windows Desktop icon shortcut for fast user switching Windows
  • Fix OneDrive Error
    How to Fix OneDrive Error 0x80071129: The tag present in the reparse point buffer is invalid Windows
  • Banner
    How to Scan Your Code by Integrating SonarCloud into Your GitHub Repository Security | Vulnerability Scans and Assessment
  • azure just in time
    How to secure access to your Virtual Machine with Just-in-Time (JIT) VM Access AWS/Azure/OpenShift
  • maxresdefault
    How to remove a Printer from Windows 10 via PowerShell, Windows registry and Print Management Windows

More Related Articles

winSEARCH Hide or Remove Search Button from Windows 10 Taskbar Windows
screenshot 2020 03 14 at 16.23.23 Change Windows Desktop icon shortcut for fast user switching Windows
Fix OneDrive Error How to Fix OneDrive Error 0x80071129: The tag present in the reparse point buffer is invalid Windows
Banner How to Scan Your Code by Integrating SonarCloud into Your GitHub Repository Security | Vulnerability Scans and Assessment
azure just in time How to secure access to your Virtual Machine with Just-in-Time (JIT) VM Access AWS/Azure/OpenShift
maxresdefault How to remove a Printer from Windows 10 via PowerShell, Windows registry and Print Management Windows

Leave a Reply Cancel reply

You must be logged in to post a comment.

Microsoft MVP

VEEAMLEGEND

vexpert-badge-stars-5

Virtual Background

GoogleNews

Categories

veeaam100

sysadmin top30a

  • image 79
    How to import SSL Certificate to Windows Server using DigiCert Utility Windows
  • images 3
    Install Minimal Container Templates on Proxmox Server Virtualization
  • hero activedirectory 2
    Concept of Active Directory Computer Account Windows Server
  • image 6
    Set Browers and Windows to reopen Apps on Startup Windows
  • Add Nutanix AHV to Veeam
    Full Integration Guide on how to Add Nutanix AHV to Veeam Network | Monitoring
  • Credential Sync acrosss devices
    How to sync your passwords across iOS and Mac devices Mac
  • Steps to upgrade VBR to v12.1
    How to upgrade Veeam Backup and Replication v11 to 12.1 Backup
  • Docker ENOENT error
    ENOENT: No such file or directory Error in Docker build Containers

Subscribe to Blog via Email

Enter your email address to subscribe to this blog and receive notifications of new posts by email.

Join 1,839 other subscribers
  • RSS - Posts
  • RSS - Comments
  • About
  • Authors
  • Write for us
  • Advertise with us
  • General Terms and Conditions
  • Privacy policy
  • Feedly
  • Telegram
  • Youtube
  • Facebook
  • Instagram
  • LinkedIn
  • Tumblr
  • Pinterest
  • Twitter
  • mastodon

Tags

Active Directory AWS Azure Bitlocker Microsoft Windows PowerShell WDS Windows 10 Windows 11 Windows Server 2016

Copyright © 2025 TechDirectArchive


Loading Comments...
 

You must be logged in to post a comment.