
Microsoft Desktop Optimization Pack (MDOP) is a suite (portfolio) of technologies available to Software Assurance customers through an additional subscription. In this guide, I will show you the steps on how to deploy MBAM for BitLocker Administration. Please see the following comprehensive guide on how to enable Bitlocker Pre-Boot Authentication via the Group Policy, and BitLocker PIN bypass: How to configure Network Unlock.
The following components are included in the MDOP suite: Microsoft Application Virtualization (App-V), Microsoft User Experience Virtualization (UE-V), Microsoft Advanced Group Policy Management (AGPM), Microsoft Diagnostics & Recovery Toolset (DaRT), and Microsoft BitLocker Administration and Monitoring (MBAM). Please see how to Force BitLocker Recovery: Perform BitLocker Recovery via the Self-Service Portal and Helpdesk.
MBAM is an administrator interface used to manage BitLocker drive encryption.
It allows you to configure your enterprise with the correct BitLocker encryption policy options, as well as monitor compliance with these policies.
Kindly refer to the following similar guides on BitLocker. how to fix missing BitLocker Recovery Tab in Active Directory Users and Computers, and how to enable or disable BitLocker Drive Encryption on Windows 10 and Virtual Machines.
MBAM Components
Here are the MBAM components: Recovery Database (stores recovery keys), Compliance and Audit Database (stores compliance data mostly used by reporting), Reporting (based on SQL Server Reporting Services), Administration and Monitoring Portal (Help Desk portal), Self-Service Portal (end-user portal), MBAM Client, and MBAM GPO.
The procedures in this topic describe how to install Microsoft BitLocker Administration and Monitoring (MBAM) in the Stand-alone topology on a single server. The following diagram shows an example of a single-server architecture.

MDOP helps to improve compatibility and management, reduce support costs, improve asset management, and improve policy control.
MBAM takes BitLocker to the next level by simplifying deployment and key recovery, centralizing compliance monitoring and reporting, enforces drives encryption, prevents simple PIN usage, supports enhanced PINs, and also provides a grace period for encryption postponement, etc.
Please please is a table showing the operating systems that are supported for the MBAM Server installation. I will be using Windows Server 2019 for this deployment.
| Operating system | Edition | Service pack | System architecture |
|---|---|---|---|
| Windows Server 2019 | Standard or Datacenter | 64-bit | |
| Windows Server 2016 | Standard or Datacenter | 64-bit | |
| Windows Server 2012 R2 | Standard or Datacenter | 64-bit | |
| Windows Server 2012 | Standard or Datacenter | 64-bit | |
| Windows Server 2008 R2 | Standard, Enterprise, or Datacenter | SP1 | 64-bit |
Part 1 – Create users and groups in Active Directory Domain Services (ADDS) to support MBAM For BitLocker Administration
As part of the prerequisites, the following service accounts and security groups must be created to support MBAM.
Thereby providing security and access rights to specific servers and features, such as the databases that are running on the instance of SQL Server and the web applications that are running on the Administration and Monitoring Server.
Below are the created service accounts and security groups. Service Accounts (users) do not need to have greater user rights. A domain user account is sufficient.

| Name | SA/ SG | Description |
| MBAM-RO-SVC | User Account | Read-only service account: Domain user group whose members have read-only access to the reports in the Reports area of the Administration and Monitoring Website |
| MBAM-RW-SVC | User Account | Read/write service account |
| MBAM-IISAP-SVC | User Account | IIS application pool service account: Domain user account to be used by the application pool for the web applications. The same account also used to Configure Databases page. |
| MBAM Helpdesk Users | Security Group | Members of this group are granted read-only access to the helpdesk portal |
| MBAM Advanced Helpdesk Users | Security Group | Members of this group are provided with helpdesk access without the need to specify user and computer details for recovery |
| MBAM Report Users | Security Group | Members of this group have access to the MBAM SSRS reports |
| MBAM Database Read-Only | Security Group | Security Group for adding Read-Only DB members |
| MBAM Database Read-Write | Security Group | Security Group for adding Read-Write DB members |
Please refer to this article on how to create a Service Account and Security Groups needed to support MBAM.
Step 2 (Optional) – Configure and install SSL certificate
Step 2 (Optional) – Configure and install SSL certificate
I will be skipping this step because this implementation is in a test environment. For a production Server, please ensure you configure an SSL certificate on the server to help secure the communication between the MBAM Client and the Administration and Monitoring Website and the Self-Service Portal websites.
It is not recommended to use self-signed certificates because of security reasons. Here are some articles that can guide you on this. Learn how to export a certificate in PFX format in Windows.
Part 3 – Install Internet Information Services (IIS) for MBAM
Here are some Internet Information Services-related articles: How to add and remove IIS Web Server on Windows Server 2019 via the Server Manager and PowerShell. See “Event ID 5059: Application pool has been disabled or Changing identity user for IIS Application Pool“. Please install the following roles and role services below.


Next, select the needed Features. These are the requirements needed for the administration and monitoring server.


Kindly refer to these related guides: How to view BitLocker disk encryption status in Windows, how to backup existing and new BitLocker recovery keys to Active Directory, and BitLocker Drive Encryption architecture and implementation types on Windows.
Here are the needed Roles Services
Ensure that the following role services are installed to support the MBAM Administration and Monitoring server. If you wish to know more about these features


Optional: You can run the following PowerShell Command to have all the Web Server, role services and features installed.
Add-WindowsFeature -Name "Web-Server", "Web-WebServer", "Web-Common-Http", "Web-Default-Doc", "Web-Dir-Browsing", "Web-Http-Errors", "Web-Static-Content", "Web-Health", "Web-Http-Logging", "Web-Performance", "Web-Stat-Compression", "Web-Security", "Web-Filtering", "Web-Windows-Auth", "Web-App-Dev", "Web-Net-Ext", "Web-Net-Ext45", "Web-Asp-Net", "Web-Asp-Net45", "Web-ISAPI-Ext", "Web-ISAPI-Filter", "Web-Mgmt-Tools", "Web-Mgmt-Console", "NET-Framework-Features", "NET-Framework-Core", "NET-Non-HTTP-Activ", "NET-Framework-45-Features", "NET-Framework-45-Core", "NET-Framework-45-ASPNET", "NET-WCF-Services45", "NET-WCF-HTTP-Activation45", "NET-WCF-TCP-Activation45", "NET-WCF-TCP-PortSharing45", "RDC", "WAS-Process-Model", "WAS-NET-Environment", "WAS-Config-APIs"Part 4 (A) – Install MSSQL Server to support MBAM Deployment
Because MBAM uses SQL Server to store its data, you should select one of the versions below to support your deployment.
The following table lists the Microsoft SQL Server versions that are supported for the MBAM Server features, which include the Recovery Database, Compliance, and Audit Database, and the Reports feature.
The required versions apply to the Stand-alone. Please see some related MSSQL guides I have written. What are the differences between various Editions of Microsoft SQL Server, and how to install MSSQL Server 2019 Developer Edition and SSMS on Windows, and how to download and install Microsoft SQL Server 2019 Express edition and SSMS.
| SQL Server version | Edition | Service pack | System architecture |
|---|---|---|---|
| Microsoft SQL Server 2019 | Standard, Enterprise, or Datacenter | 64-bit | |
| Microsoft SQL Server 2017 | Standard, Enterprise, or Datacenter | 64-bit | |
| Microsoft SQL Server 2016 | Standard, Enterprise, or Datacenter | SP1 | 64-bit |
| Microsoft SQL Server 2014 | Standard, Enterprise, or Datacenter | SP1, SP2 | 64-bit |
| Microsoft SQL Server 2012 | Standard, Enterprise, or Datacenter | SP3 | 64-bit |
| Microsoft SQL Server 2008 R2 | Standard or Enterprise | SP3 | 64-bit |
SQL collation
You must install the “SQL_Latin1_General_CP1_CI_AS collation” regardless of the SQL Server version, you are installing. The “SQL_Latin1_General_CP1_CI_AS collation” is a SQL collation and the rules around sorting data for unicode and non-unicode data are different.
Collation is a set of rules that tell database engines how to compare and sort the character data in SQL Server. Collation can be set at different levels in SQL Server. Below are the three levels: SQL Server level, Database level, and Column level.
SQL_Latin1_General_CP1_CI_AS collationYou will be able to download SQL Server 2019, 2017, 2016, and 2014. Note: If you are using MS SQL 2019, you will have to adjust the compatibility level by using the ALTER DATABASE command. MBAM has a maximum supported compatibility level of 140.
The default compatibility level for new databases created on SQL Server 2019 is 150 which will need to be altered to 140 or lower. On how to change the compatibility level of a database, please see the following guide “how to alter a DATABASE compatibility level“. If you decide to install MSSQL2016, you must install the March 2017 Servicing Release for MDOP.
Below are the needed SQL Server features you will need to install on any of the SQL server versions we decide to install.
- Database Engine Services
- ReportingServices - Native
- Client Tools Connectivity
- Management Tools - Basic and
    ====> Management Tools - Complete
I will be using Windows Server MSSQL 2017 to perform this test because I will be installing MSSQL 2017 in my production environment, therefore, it makes sense to test with this version of SQL Server.
If you are installing MSSQL 2017 like me, the SQL Server Reporting Services (SSRS) requires a separate installation. I will show you the steps.
To install SQL2017 to support MBAM
If you do not have an MSSQL server installed in your environment already, kindly follow the steps below to perform this. Double-click on the SQL server installer to begin the installation.
Please see How to Disable BitLocker on Windows 10, how to Query MBAM to display the BitLocker Recovery report. How to check if Microsoft BitLocker Administration and Monitoring is installed on Windows.
Select Custom installation
This will enable you to select and install only what you wish to install. You will be required to confirm your UI language. Just click on Yes to continue.


Click on Install to begin the SQL Server 2017 installation.

Click on installation, click on New SQL Server stand-alone installation or add features to an existing installation. Proceed by clicking on Next to continue


Accept the License term and continue. Also check to allow Microsoft Updates. On the rule window, if there are no errors , please click on Next to proceed.
Select SQL Server feature installation option
Next, Select SQL Server feature installation option you would like to install. This is one of the Windows we are really interested in ensuring it is configured correctly.
Since I am using an evaluation version, I do not have all the features coupled together. Ensure the Database engine Engine Services is selected and the client Tools Connectivity. 
Two more features are missing. What do we do? We will have to click on “Download it from the web” as shown in the figure above.This will ensure we have the needed “SQL Server Reporting Services (SSRS)” installed to our server to support MBAM.


Now, we have our Reporting services installed. We will have to proceed with the SQL Server installation.
Next, you can choose to create a Named instance (You can use the default as well). If you use a named instance too, be sure to also open the SQL Browser Server port (UDP 1434). You only need database services and SQL Server Reporting Services.

Collation setting at SQL Server level can be specified while installing SQL Server as shown below.
The collation of the SQL Server is set to SQL_Latin1_General_CP1_CI_AS. The breakdown of the collation settings are as below.
- SQL: All SQL Server collations will have the prefix SQL
- Latin1_General: Represents the sort rule,
- CI: Means case insensitive and
- AS: Means accent sensitive


In the next window, you will have to configure the Database Engine Configuration. Usually, the Windows Authentication Mode is enough for test purposes.
Select Mixed-mode option
I prefer to go with the Mixed-mode option. Here I will be able to set up an SA account. See more on SA “how to reset MSSQL Server SA Password on Ubuntu via the command line and SQL Server Management Studio“.

On the Ready to Install window, go through the summary features to install and if okay, click on Install.

As you can see, the installation is successful as shown below.

Part 4 – (B): Install Microsoft SQL Server Management Studio
SQL Server Management Studio is a software application used for configuring, managing, and administering all components within Microsoft SQL Server.
You can as well have the tool downloaded from this SSMS Tool, or launch the SQL Server 2017 installer and click on this link.
You will be redirected to download it as well.
By clicking on install, you agree to the license terms as shown below. Just hit on the button below to begin the installation.

You may be required to start your server upon installation of the SSMS tool. Now the installation of SSMS is complete. Click on start and on Microsoft SQL Server Studio and connect to your DB.


As you can see below, I do not have the reporting services installed because this is how on SQL 2017. Therefore, I will have to create a reporting database from the SQL Server Reporting Services (SSRS).
Below are the prerequisites for the reports. SSRS must be installed and running. We also need to configure SSRS in ” native ” mode and not in unconfigured or SharePoint ” mode.

Select create a new report serve database and ensure the server name is correct. Else you will get an error. See this article on how to fix “Named Pipes Provider, error: 40 – Could not open a connection to SQL Server“


Enter your desired report server name and as you can see the “Report Server Mode” is Native as recommended. Now, click on Next to continue.

Enter your credential to connect to the DB. If you enter a wrong credential at this step, the connection will fail. Click on Next to continue


As you can see Report Server Database creation is complete.

As recommended by Microsoft, we now have our Report Server created in Native Mode.

Step 4 (C) – Configure Server Reporting Services (SSRS) to use Secure Socket Layer (SSL)
If you plan to use SSL for the Administration and Monitoring website, make sure that you configure SQL Server Reporting Services (SSRS) to use the Secure Sockets Layer (SSL) protocol before you configure the Administration and Monitoring Website.
Otherwise, the Reports feature will use unencrypted (HTTP) data transport instead of encrypted (HTTPS). You can follow Configure SSL Connections on a Native Mode Report Server to configure SSL on Report Server. I do not have a certificate, so I am okay with the following settings below.

Note: If SSRS is not configured to use Secure Socket Layer (SSL), the URL for the reports will be set to HTTP instead of HTTPS when you install the MBAM Server.
If you then go to the Administration and Monitoring website and select a report, the following message appears: “Only Secure Content is Displayed.” To show the report, click **Show All Content. Since this is a test environment, then you can ignore this step just like I am doing 🙂
Part 4 (D) – Other required SQL permission (Prerequisites) for the recovery database
In the post-installation of SQL Server, make sure that you provide the user accounts in SQL Server, and assign the permissions to the user or (groups) that will be configuring the MBAM database and reporting roles on the database server. These same prerequisites also apply to the compliance and audit database.
To proceed with these steps, we will have to configure the needed permissions for the user accounts for the installation of the MBAM Database and reporting roles on this database instead of using full administrative privileges.
- Launch the SSMS and connect to the MBAM database
- Expand Security and right-click on Logins,
- Select New login as shown below.
Note: The SSRS Instance Permissions. This is required to configure reports only if you are installing databases on a separate server on the server on which reports are configured. The SQL Server Reporting Services Rights are: "Creating Folder" and "Publish Reports". 
You will have to search on AD for this service account. Click on search and select the account. You may have to select the right location for you to be able to find the service account.

Next, we will have to assign the permissions. To do this, click on Server Roles as shown below.

We will be assigning the following permissions below to the account. The Logon Server Roles for SQL Server Instances: “dbcreator“, and “processadmin” and click on OK when complete. That is all that is needed to create the IIS Pool account “MBAM-IISAP-SVC“.

Next, we will have to repeat the process of creating an “MBAM Report Users" group by creating a new login. Please repeat the same process as above.” To be able to select the user group this time, ensure you have the Groups selected under the Object type and click on ok.

In this way, you have have the available groups and be able to select your desired group. In my case, it was “MBAM Report Users"

As you can see, both accounts have been created.
Ensure you assign the right permissions and mapping to the DB. Or else you will have a tough time 😉

Part 4 (D): Enable Named Pipes and TCP IP in the SQL server configuration
Please ensure that you have enabled named pipes and TCP IP in the SQL server configuration manager as shown below.

After this ,Open services.msc (you can type this from RUN command ) and change the SQL server service log on to Local System account from its properties instead of NT service account.
Domain account would be recommended but in lab,I go with Local system account.
Part 5 – Install ASP.NET MVC 4.0
We will need to install ASP.NET MVC 4.0 to support the “self-service portal”.

Double-click on the downloaded ASP.NET MVC 4.0 and click on install as shown below. If the installation completes correctly, the message “set up is successful” will be displayed.

Step 7 – Install Service Principal Name (SPN)
A service principal name (SPN) is a unique identifier of a service instance. SPNs are used by Kerberos authentication to associate a service instance with a service logon account. To enable the MBAM server to authenticate communication from the Administration and Monitoring Website and the Self-Service Portal.
You must register a Service Principal Name (SPN) for the hostname or FQDN under the domain account that you are using for the web application pool “in my case MBAM-IISAP-SVC”. This will ensure Kerberos issues are avoided. See if you run into issues creating service accounts.
If you do not have administrative rights to create SPNs, you must ask the Active Directory administrators in their Organisation Administrators in your organisation to create the SPN for you by using the following command. To set this for your NetBIOS hostname, use the command below.
setspn.exe -S http/mbamserv1 techdirectarchi\MBAM-IISAP-SVC

- Where The NetBIOS host name is mbamserv1, and nd the domain account used for the web application pool is techdirectarchi\MBAM-IISAP-SVC Note: You will only have to configure constrained delegation if you are using MBAM 2.5. If you are using MBAM 2.5 Service Pack 1 and later, you do not need to configure delegation for the IIS Pool account “MBAM-IISAP-SVC”. To configure your SPN using your FQDN, please refer to the below syntax.
setspn.exe -S http/MBAM.yourdomain.suffix YourDomain\MBAM-IISAP-SVC

- Where The fully qualified domain name is mbamserv1.techdirectarchi.net, and the domain account used for the web application pool is techdirectarchi\MBAM-IISAP-SVC.
Optional: If you wish to configure constrained delegation when you are using “MBAM 2.5 only“, please see how to configure a service account for Kerberos delegation, or this Register SPN.
- Navigate to Active Directory, and find the app pool credentials that you configured for MBAM websites in the earlier steps.
- Right-click, and go to properties.
- Click the delegation Tab
- Click the option for Kerberos authentication.
Step 8 – Additional Security Group and User Requirements
The MBAM-RO-SVC account needs “Logon as a batch job” permissions on the SQL Server machine. Add this account to the IIS_IUSRS group.
The MBAM-IISAP-SVC needs Logon as a batch job and Impersonate a client after authentication permissions on the server running the web service components. See how to add an account to the local IIS_IUSRS group.
First, to add this account to the IIS_IUSRS group, locate the MBAM server
- Launch the Computer Management Console and
- Navigate to the Local Users and Groups
- Click on Groups and search for IIS_IUSRS and add the service account you created for the IIS Pool. 

Both MBAM-IISAP-SVC and MBAM-RO-SVC accounts need “Logon as a batch job” permissions on the SQL Server machine. Please refer to this guide “how to configure log on as a batch job permissions on any server“.

The MBAM-IISAP-SVC needs Impersonate a client after authentication permissions on the server running the web service components. Double click on the “Impersonate a client after authentication” and then add the service account to it.


Part 9 (A) – Install MBAM for Bitlocker Administration
MBAM is part of MDOP and can be purchased through MVLS (Microsoft Volume Licensing) or Windows Enterprise Licensing. Once you have downloaded the MDOP DVD image, this needs to be burnt to a DVD or mounted via tools such as Virtual CloneDrive from slysoft.com.
As you can see below, this is the software I am using. If you are having issues installing MBAM due to it being previously installed.

Now that we have mounted the image, I will navigate through this folder path “E:\MBAM\MBAM 2.5 SP1\Installers\x64” and have MBAm installed unto my Server. Double Click on the installer as shown below.

This will open the MBAM welcome page, click on Next to proceed.

Accept the License Agreement and click on Next to continue

On the Customer Experience Improvement program, select the option of your choice and click on Next

On the begin your installation, please click on Install as shown below. The installation process is very fast.

I will uncheck the “Run MBAm Server Configuration after the wizard closes. This is because I would love to apply the July 2018 Servicing Release for MDOP. Click on Finish.

Step 9 (B) – Install July 2018 Servicing Release for MDOP
To install SQL2017 to support MBAM, you must also install July 2018 Servicing Release for MDOP. This will enable MBAM to support the newer AES XTS ciphers in Windows 10 and SQL 2017. More information can be found at this Microsoft desktop Optimization Pack.
You can download the MBAM server installation file to install on the MBAM server and MBAM client to install on clients.
Note: The July 2018 Servicing Release for MDOP (additional components) must only nstalled after you install the original MBAM installation files as discussed in step 9 A above. If you install the serving update first, it will fail and you will be asked to uninstall it.
Now, you will have to choose the download you want from the following page and on the next page, click on Install.


Now, you can check the box to launch the “MBAM Server Configuration after the wizard closes”.

Run MBAM Server Configuration
If you do not wish to open it this way, you can find the MBAM Server Configuration from the Start menu as shown below. This will also open up the MBAM Server Configuration wizard and click to add Features.


After installation, launch the MBAM Server Configuration wizard and click “Add New Features”. We’re going to install the databases. Some documentation advice is to check all the boxes (features) at once.
If you do, the report and the Administration and Monitoring features will fail and will never succeed.
Therefore, I will advise that you install the following below. First, install the Compliance and Audit database and Recovery database.

After the prerequisite check is completed successfully. If this fails for you, please go back and complete the outstanding items through my exhaustive list and ensure you have not missed any steps.

To obtain the setup log files, you have use the Msiexec package and the /L <location> option to install MBAM. Log files are created in the location that you specify. Additional setup log files are created in the %temp% folder on the server of the user who is installing MBAM. Also see the MBAM Event Log.Enter Database Information
Fill in the options on the next screen. I installed the SQL instance into a named instance, therefore, I will be using this. If you used the default instance, leave that box blank. Enter the required server names and security groups as shown below.

When Compliance and Audit database and Recovery database. complete, click on Finish.

Launch the MBAM Server Configuration wizard and select Reports as shown below

On the Configure Report wizard, enter the SQL Server Reporting Services Instance, select the “Reporting role domain group” and select the Read Only Service account and click on Next

On the Summary page, please click on Add to have the features added.

As you can se the installation has succeeded.

Configure Administration and Monitoring
In the following window below, we would like to install the IIS application components. I do not have a certificate, so I will select do not to use a certificate. If you have one, please browse it and select it.
Also, enter the IIS Pool service account. Rerun the MBAM configuration wizard.

Prerequisites will be checked

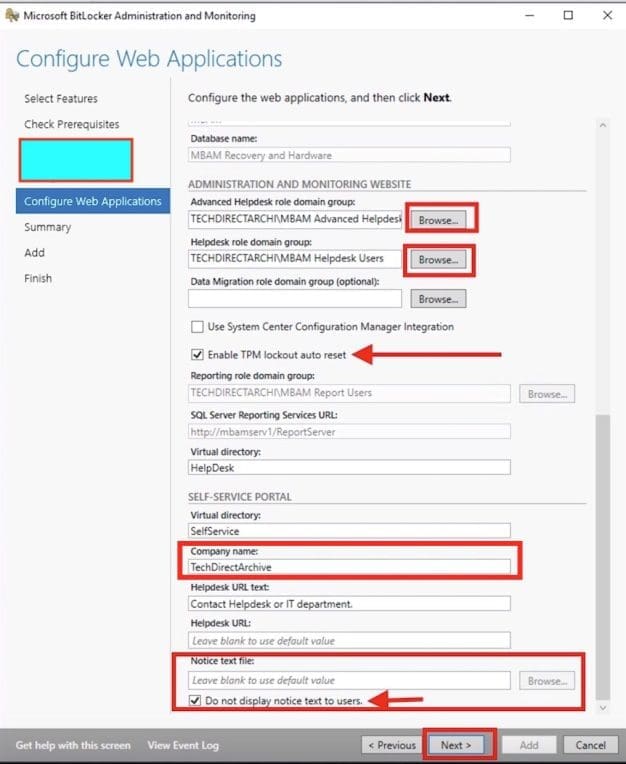
Configure the Web Application
Enter the “Advanced Helpdesk”, and “Helpdesk role domain group”. Enable TPM lockout auto reset, and enter the Company Name which will be displayed on the self-service portal.
Enter the required IIS details (If you do not have one, please select “Do not use a certificate”. If you are using SSL you will need to select the security certificate to be used.


Note: In the “Configure Web application Window” you will also have to enter your Company name in the window as well. This was omitted in the screen above because I rerun the setup and was previously added.
In MBAM 2.5 SP1, there is setting added called ‘resetting TPM Lockouts auto reset’: This setting enables MBAM to automatically reset TPM lockouts. During normal policy enactment cycles, MBAM checks the TPM to determine whether it is in lockout mode.
MBAM contacts the MBAM services to retrieve the TPM password hash that is associated with the client machine.
Note: MBAM attempts to reset the TPM lockout counter only if the BitLocker Recovery Key for the OS volume has been disclosed by the MBAM services. MBAM checks if any TPM protectors are enabled such as TPM or TPM and PIN before resetting the TPM lockout counter.
Review the summary page and click on Finish to complete this MBAM setup.


In the next guide “Microsoft BitLocker Administration and Monitoring customization Portal customization [Part 2]”, I will be showing you how to customize the self-service portal and perform BitLocker recovering by using the portals.

You can integrate MBAM with System Center Configuration Manager (SCCM) which is now referred to as Microsoft Endpoint Configuration Manager and Intune suite.
The Microsoft BitLocker Administration and Monitoring – Client Deployment Scripts can be downloaded. Just to show you also, we have all our databases in place as well.

MBAM Agent in the initial delay period
The MBAM client doesn’t start the operation immediately after installation. There is an initial random delay of 1–18 minutes before the MBAM Agent starts its operation. In addition to the initial delay, there is a delay of at least 90 minutes.
The delay depends on the Group Policy settings that are configured for the frequency of checking the client status. Therefore, the total delay before a client starts operation is random startup delay + client checking frequency delay.
FAQs relating to how to deploy MBAM for BitLocker Administration
Microsoft BitLocker Administration and Monitoring (MBAM) is a Microsoft solution that provides centralized management and reporting for BitLocker disk encryption in an enterprise environment. Deploying MBAM offers several benefits, including:
– Centralized Management: MBAM allows you to manage BitLocker policies and recovery keys from a single console, simplifying administration.
– Compliance Reporting: It provides detailed reports to help organizations demonstrate compliance with encryption requirements, such as those mandated by regulatory standards.
– Self-service recovery: End-users can initiate key recovery or password reset without IT assistance, reducing support overhead.
MBAM is designed to integrate with existing Microsoft Enterprise management tools such as Active Directory, and Intune etc. This integration streamlines BitLocker management within the existing infrastructure, making it easier for administrators to implement and maintain BitLocker policies.
BitLocker and MBAM serve complementary roles in managing disk encryption for Windows devices:
– BitLocker is a built-in Windows feature that provides full-disk encryption to protect data on your computer or removable drives.
– MBAM is a management tool by Microsoft that complements BitLocker. It offers centralized management, reporting, and key recovery features for BitLocker. If you need centralized management, compliance reporting, and enhanced key recovery capabilities for a larger number of devices in an enterprise setting, implementing MBAM alongside BitLocker is advisable.
I hope you found this blog post helpful on how to deploy MBAM for Bitlocker Administration. You have learned how to deploy MBAM for Bitlocker Administration. If you have any questions, please let me know in the comment session.


Hi CHRISTIAN,
Thanks for excellent article on MBAM, it does save my time and was able to efficiently execute it.
I am stuck after Part 1, Kindly share part2 of the Article.
Regards,
Muzaffer
Hello Azam, thank you for the kind words! Certainly, I will 😉
Hello Azam,
I have to be honest, I will not be creating or developing this article further. If you have any questions or encounter any issues in your setup, please let me know.