
This post shows you how to manage MS365 accounts with PowerShell. First, let’s look at what Microsoft 365 is all about. Microsoft 365 is designed to help you do more with innovative apps, intelligent cloud services, and world-class security. It is a cloud-based platform that offers high-end productivity tools for businesses and individuals. Excel is one the most powerful productivity software included in the Microsoft 365 product. Learn how to fix common problem such as when it crashes. Note that when you subscribe for a Microsoft 365 license, you have access to the latest productivity apps such as Teams, Word, Excel, PowerPoint, Outlook, OneDrive and many more.
One of the most critical jobs for Microsoft 365 Administrators is user management. You need to know how to manage users’ licenses in order to manage users. Your organization’s users need licenses to use Microsoft 365 services, such as Microsoft Outlook and Microsoft SharePoint Online. See how to complete Microsoft 365 Family subscription. When an administrator assigns a license to a user, the system automatically sets up some set of services for that user. For instance, when you offer a SharePoint Online license to a user, the system assigns the user edit access to the default team site. See why is it imperative to protect Microsoft 365.
The authorized set of people who can assign or remove licenses for members are Users with Microsoft 365 Global admin and User Management admin privileges. They can give or remove a license for single or multiple users. Managing user accounts involves doing the following: assigning administrator roles, setting the user’s sign-in status, specifying user location settings and assigning licenses.
If you’re looking to get started with Microsoft 365 to help drive more progress to your business, check out the various pricing options for it here.
Creating Microsoft Users with PowerShell
Using Windows PowerShell is faster than using the Microsoft 365 admin center to create user accounts.
To create a user account, run the below commands to install Microsoft Graph PowerShell, import the Microsoft.Graph.Identity.DirectoryManagement module and connect to MgGraph with the proper perms
Install-Module Microsoft.Graph -Scope CurrentUser
Import-Module Microsoft.Graph.Identity.DirectoryManagement
Connect-MgGraph -Scopes 'User.ReadWrite.All'
Installing the Microsoft Graph PowerShell
Running the Install-Module Microsoft.Graph -Scope CurrentUser command installs the Microsoft Graph PowerShell as shown in the below screenshot. It can take a longer time to finish installing all the dependencies. Feel free to grab a cup of coffee, sit back and relax while the installation completes.

Importing Microsoft.Graph.Identity.DirectoryManagement and connecting to MgGraph
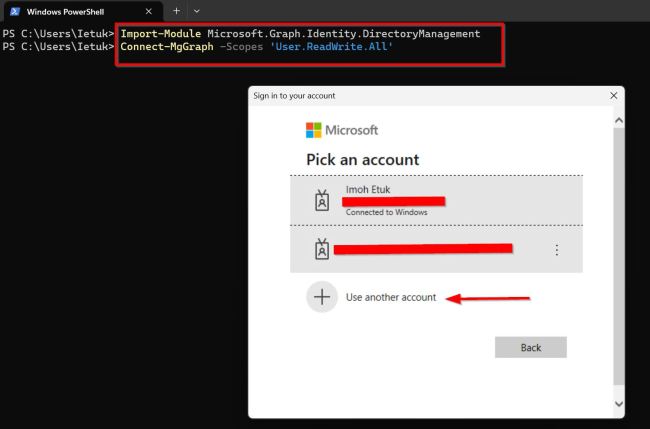
As shown above, you can use another account to sign in or select an account from the options that show up.
At this point, an additional browser interface will open for you to enter your password and sign in.

After you sign in, you’re ready to use the New-MgUser cmdlet to create a user account in Microsoft 365.
Creating a New User Account
To create a new user account, run the below command to create a test user:
$PasswordProfile = @{
   Password = ' %#@UmSEATEST+U-j'
  }
New-MgUser -DisplayName 'Test User' -PasswordProfile $PasswordProfile -AccountEnabled -MailNickName 'TestUser' -UserPrincipalName 'TestUser@testuser.onmicrosoft.com'
Please see how to check and assign privileges to a MySQL User, How to add or delete users and set permissions in Azure Active Directory, Learn more about Pleasant User Group Permission and User Access, What to note when Assigning Multiple IPs’ to an Instance, and how to set up Pass-Through Authentication Authentication and ADFS environment on Hyper-V for Hybrid Identity integration.
Viewing all Microsoft 365 Users
With the new Microsoft Graph PowerShell Cmdlets, it is very easy to view all the users in your Microsoft 365 account.
To view the list of all users in your Microsoft 365 account, run:
$Get-MgUser
Viewing Unlicensed Users
It saves time and makes the process faster when you view the list of unlicensed users in your Microsoft 365 environment with a single PowerShell command.
To view a list of all unlicensed users in your account, run the below command:
Get-MgUser -Filter 'assignedLicenses/$count eq 0' -ConsistencyLevel eventual -CountVariable unlicensedUserCount -All
Assigning a license to a user account
Only user accounts that have the UsageLocation property set to a valid ISO 3166-1 alpha-2 country code can be assigned a license. So the first thing to do is to assign a location to the Test User we created above.
To set the UsageLocation for a user account, run the following:
Update-MgUser -UserId "testuser@testuser.onmicrosoft.com" -UsageLocation USChecking the Microsoft 365 Admin Center shows that the test user doesn’t have any license assigned to his account yet.

Now, to assign a license to a user, run the below command:
$e5Sku = Get-MgSubscribedSku -All | Where SkuPartNumber -eq 'DEVELOPERPACK_E5'
Set-MgUserLicense -UserId "testuser@testuser.onmicrosoft.com" -AddLicenses @{SkuId = $e5Sku.SkuId} -RemoveLicenses @()
The above command sets the UsageLocation as the US for the Test User and assigns a license from the Microsoft 365 E5 Developer (without Windows and Audio Conferencing) as shown in the below screenshot:

Viewing a Specific User’s License using PowerShell
To view the license details of a specific user account, run the below command:
Get-MgUserLicenseDetail -UserId "testuser@testuser.onmicrosoft.com"
Viewing the Summary Details of MS 365 Account
To view summary details of the Microsoft 365 Account, run:
Get-MgSubscribedSku | Select -Property Sku*, ConsumedUnits -ExpandProperty PrepaidUnits | Format-List
Running the above command shows the summary details such as Sku ID, Sku Part Number, ConsumedUnits, Enabled licenses and a lot more in your Microsoft 365 subscription.
Deleting and Restoring a User Account
The last thing to look at is how to delete and restore a user account with PowerShell. To delete a user account using PowerShell, run the below command:
$Remove-MgUser -UserId '<UserID>'
Restore-MgDirectoryDeletedItem -DirectoryObjectId '<UserID>'

The delete user command won’t return any prompt if it is successful but the user restore command will return a prompt with the restored user ID.
In summary, you have learned how to automate tasks such as creating users. Assign licenses, view unlicensed users, view the summary details of your Microsoft 365 Account as well as delete and restore user accounts in this post.
I hope you found this post useful on Manage MS365 Accounts with PowerShell. Please let me know in the comment section if you have any questions.


Can you make a bulk / multiple version? with CSV