The Windows Remote Management (WinRM) service is Microsoft’s implementation of the WS-Management (WS-Man) protocol introduced in Windows before PowerShell. It allows remote management of your device (hardware and operating systems). For WinRM scripts to run, and for the Winrm command-line tool to perform data operations, WinRM has to be configured. In this article, I will be showing you how to enable or disable WinRM via the command-line. Please see how to fix WSManFault Message 2144108526 0x80338012: Fix the client cannot connect to the destination specified in the request, and How to configure a remote server (windows) to Support Ansible.
WinRM componnets are automatically installed with all currently-supported versions of the Windows operating system. WinRM is started automatically on newer versions of Windows Server, (that is from WS 2008) to be precise at the time of writing this piece. By default, no WinRM listener is configured.
Even if the WinRM service is running, WS-Management protocol messages that request data can’t be received or sent. Internet Connection Firewall (ICF) blocks access to ports. Please see how to fix “Cannot find the computer: Fix the following error occurred while using Kerberos authentication“.
Enable WinRM
To configure the WS-Management protocol on your device, and set up the default configuration for remote management. Please enter the following command below into PowerShell.
winrm quickconfig

Note: WinRM qucikconfig is abbreviated as winrm qc, and performs the following operations. Please see Concept of Ansible on Windows using Cygwin, how to fix “WinRM cannot complete the operation, verify that the specified computer name is valid, and how to fix “An error occurred while attempting to connect to the server: Check if the Virtual Machine Management service is running or you are not authorized to connect to this server”.
When this service is started, the startup type changes to “Automatic (Delayed)”. Starting the service in itself does not do anything as it does not listen for anything as mentioned above, and stated in the image below.
Therefore, a listener is created. This listener sends and receives WS-Management protocol messages using either HTTP or HTTPS on any IP address.

A firewall exception is created for Windows Remote Management only for the current user profile. If the firewall profile is changed for any reason, then run winrm quickconfig to enable the firewall exception for the new profile (otherwise the exception might not be enabled).
A configuration change is made such that when a remote user connects with admin rights to this machine, the admin rights are not stripped via User Account Control (UAC). Basically, this configuration change involves modifying a registry entry.
Disable WinRM
To disable the effect of winrm quickconfig one must undo each of these changes. Kindly follow the steps below to disable WinRM from running on your device.
Disabling the WinRM Service
Either go via the Services MMC console and stop the WinRM service from running (disabled). Alternatively, use PowerShell as an Administrator. Below are the steps to do this via the command line.
Stop-Service winrm
Set-Service -Name winrm -StartupType Disabled

Delete the Listener
For me, this step was not necessary. If you disabled the WinRM service as explained above, this disables the listener as well. If you need a listener on another port for an application other than PowerShell, you have to keep the WinRM service running.
Also, note that Server Manager uses the same listener for remote server management as PowerShell remoting. To display the available listeners you can run this command below. For us, there isn’t any listener running.
dir wsman:\localhost\listener
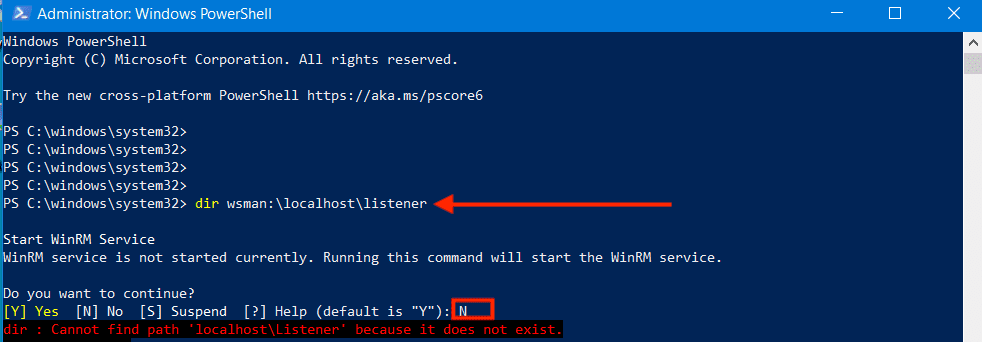
Note: If you have got some listeners, Once you know the name of the listener, you can remove it with the next PowerShell command.
Remove-Item -Path WSMan:\Localhost\listener\<Listener name>
To remove all listeners, you can use this command below.
Remove-Item -Path WSMan:\Localhost\listener\listener* -Recurse
Another security benefit of removing the listener(s) is that if someone starts the WinRM service, this will also activate the listener. However, if you delete the listener before you disable the service, you have to add the listener again with the Enable-PSRemoting cmdlet
Disable Windows firewall exceptions
I will be using the GUI to disable the Firewall exception created via the Windows Defender Firewall With Advanced Security.
Windows Defender Firewall with Advanced Security provides host-based, two-way network traffic filtering and blocks unauthorized network traffic flowing into or out of the local device
As you can see, the exception is still enabled. We have to disable it. To do this, right-click on the rule and select disable rule or click on the rule, and select disable rule on the Action Pane!

As you can see below, the rule has been disabled! Please see how to fix “Connecting to a remote server failed and WinRM cannot process the request: Error code 0x8009030e occurred while using Kerberos authentication, and a specified logon session does not exist“.
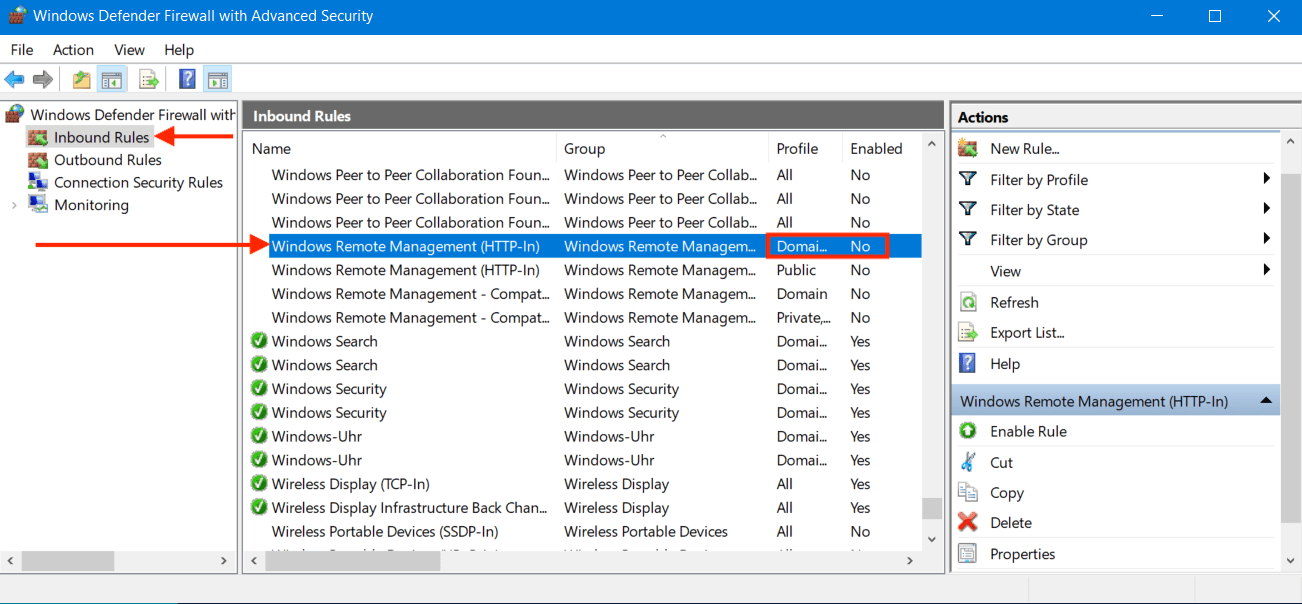
To disable the firewall exceptions via PowerShell, please use the following command below
Get-NetFirewallRule | ? {$_.Displayname -eq "Windows Remote Management (HTTP-In)"} | Set-NetFirewallRule -Enabled "False"
Disable Remote UAC
Note: Please set the value of the LocalAccountTokenFilterPolicy to 0. This restricts remote access to members of the Administrators group on the PC. On devices that are not members of the AD domain, WinRM adds the LocalAccountTokenFilterPolicy registry entry to the location below and sets the value to 1.
For me, this was already disabled as shown in the image below as it is a domain joined device. If this is not your case, please navigate to the following location via the Registry Editor.
HKEY_LOCAL_MACHINE\SOFTWARE\Microsoft\Windows\CurrentVersion\Policies\System
Then set the value of LocalAccountTokenFilterPolicy to 0 (zero).
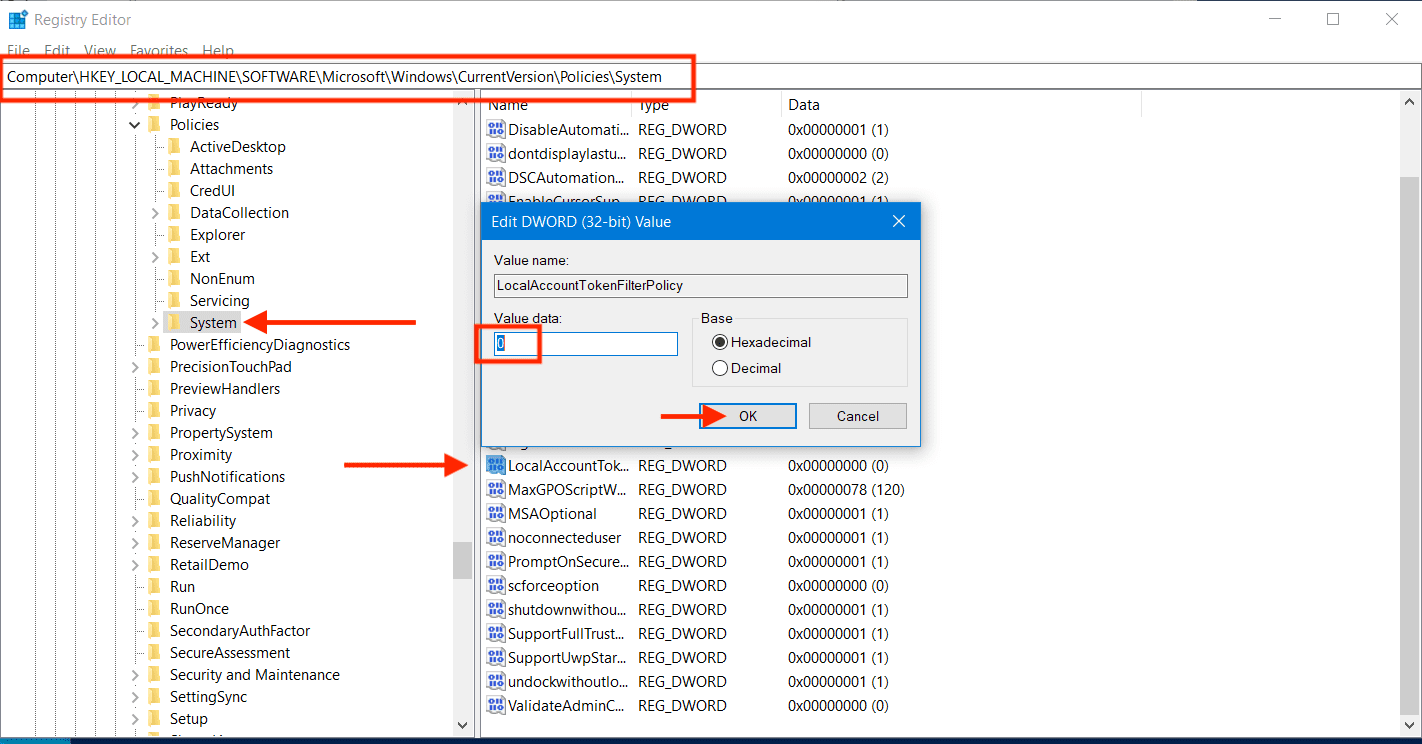
To do this via PowerShell, kindly run the command below.
Set-ItemProperty -Path "HKLM:\SOFTWARE\Microsoft\Windows\CurrentVersion\Policies\System" -Name LocalAccountTokenFilterPolicy -Value 0
I hope you found this blog post helpful on how to enable or disable WinRM via the command-line. Please let me know in the comment section if you have any questions.