Skip to content

TechDirectArchive

Hands-on IT, Cloud, Security & DevOps Insights

  • Home
  • About
  • Advertise With US
  • Contact
  • Reviews
  • Toggle search form
Home » Windows » How to Create Shared Folder in Windows Sandbox

How to Create Shared Folder in Windows Sandbox

Posted on 20/08/202322/01/2024 Temitope Odemo By Temitope Odemo No Comments on How to Create Shared Folder in Windows Sandbox
banner-1

One feature that I personally like from Microsoft is the Windows Sandbox which comes with the latest Windows 10 update. The value of this sandbox cannot be under-emphasized as it allows you to launch your Windows in a virtual environment so that you can test any untrusted applications before installing them on your system or where you can access some malicious websites. Though any changes you make to the sandbox get lost immediately you close the feature, but it keeps the system safe and secure from malicious attacks.

You can enable Windows Sandbox through the Windows Features and there is no difficulty in setting it up, but you can read How to Configure Windows Sandbox and How to Use Windows Sandbox as a security feature in Windows. Immediately you enable this feature you can launch it from the Start menu and you are ready to use it.

But there will always be instances of sharing files between the host and Windows Sandbox, you have the opportunity to create a shared folder in Windows Sandbox, and the shared folder will give you control over how and which files needed to be shared. In this guide, I will show you How to Create Shared Folder in Windows Sandbox.

You can also read about how to Create and access a hidden share folder on Windows.

Create Shared Folder in Windows Sandbox

Follow these steps on How to Create Shared Folder in Windows Sandbox

1: Create a folder and create a text file with any name but you must replace the .txt extension with .wsb.

wsb-file

2. Right-click on the .wsb file and open it with Notepad or any file editor.

open-with-notepad

3. Copy the below code and paste it into the file editor and add the folder path to the code.

Shared-Folder-Code

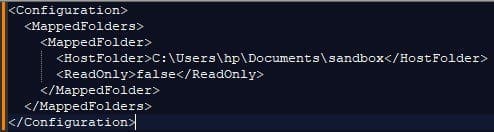
4. You can make the folder to be read-only by changing the false value to true.

Shared-Folder-read-only-Code

5. After adding the code save the file and close it. Now double-click on the .wsb file to launch Windows Sandbox.

You will see the Shared Folder icon on the Windows Sandbox desktop and you can start adding other files you want to share between the host and the windows sandbox.

Start-sharing-file

I hope you found this blog post on How to Create Shared Folder in Windows Sandbox. Interesting and helpful. In case you have any questions do not hesitate to ask in the comment section.

Rate this post

Thank you for reading this post. Kindly share it with others.

  • Share on X (Opens in new window) X
  • Share on Reddit (Opens in new window) Reddit
  • Share on LinkedIn (Opens in new window) LinkedIn
  • Share on Facebook (Opens in new window) Facebook
  • Share on Pinterest (Opens in new window) Pinterest
  • Share on Tumblr (Opens in new window) Tumblr
  • Share on Telegram (Opens in new window) Telegram
  • Share on WhatsApp (Opens in new window) WhatsApp
  • Share on Mastodon (Opens in new window) Mastodon
  • Share on Bluesky (Opens in new window) Bluesky
  • Share on Threads (Opens in new window) Threads
  • Share on Nextdoor (Opens in new window) Nextdoor
Virtualization, Windows Tags:Folder, sandboxing solutions, Windows 10, Windows 11, Windows Server 2016

Post navigation

Previous Post: Mendeley Cite ECITE40001 Error: Fix issue using Microsoft Word Desktop application
Next Post: Why is Google moving from Universal Analytics (UA) property to GA4 property

Related Posts

  • bannerr
    How to Disable Driver Signature Enforcement in Windows 11 Windows
  • How to Fix Scanning and Repairing Drive on Every Boot
    How to Fix Scanning and Repairing Drive on Every Boot Windows
  • windows hello la gi
    All you need to know before deploying Windows Hello for Business Key and Certificate Trust Windows
  • dd
    How to update Microsoft Defender Antivirus into the install image of Windows (install.wim) Windows
  • blog banner 1
    Reset and reinstall Windows 10 from the cloud and how to recover your Windows 10 when you cannot boot to Windows Windows
  • Featured image Periodic scanning
    How to enable or disable Windows Defender Antivirus Scanning periodically on Windows via Windows Settings Security | Vulnerability Scans and Assessment

More Related Articles

bannerr How to Disable Driver Signature Enforcement in Windows 11 Windows
How to Fix Scanning and Repairing Drive on Every Boot How to Fix Scanning and Repairing Drive on Every Boot Windows
windows hello la gi All you need to know before deploying Windows Hello for Business Key and Certificate Trust Windows
dd How to update Microsoft Defender Antivirus into the install image of Windows (install.wim) Windows
blog banner 1 Reset and reinstall Windows 10 from the cloud and how to recover your Windows 10 when you cannot boot to Windows Windows
Featured image Periodic scanning How to enable or disable Windows Defender Antivirus Scanning periodically on Windows via Windows Settings Security | Vulnerability Scans and Assessment

Leave a Reply Cancel reply

You must be logged in to post a comment.

Microsoft MVP

VEEAMLEGEND

vexpert-badge-stars-5

Virtual Background

GoogleNews

Categories

veeaam100

Veeam Vanguard

  • Active Directory Setup
    Active Directory: How to Setup a Domain Controller Windows Server
  • SystemUtilization
    Delivering System Utilization Report on a Linux based OS Linux
  • Synology Cloud Sync
    How to Sync Data in Cloud Drives to Synology NAS Backup
  • redirects3endpoint
    How to redirect requests for your bucket’s website endpoint to another bucket or domain AWS/Azure/OpenShift
  • Rules of Delegation
    Assign users with rights to reset password in Active Directory Windows Server
  • Screenshot 2022 04 27 at 02.18.50
    Why does MBAM not automatically re-encrypt MBAM or Bitlocker-protected devices? Windows
  • Smartscreen defender blocking application
    Unable to run downloaded Programs due to Defender SmartScreen Windows
  • plain screenshot 1
    How to make a screenshot on a macOS device Mac

Subscribe to Blog via Email

Enter your email address to subscribe to this blog and receive notifications of new posts by email.

Join 1,808 other subscribers
  • RSS - Posts
  • RSS - Comments
  • About
  • Authors
  • Write for us
  • Advertise with us
  • General Terms and Conditions
  • Privacy policy
  • Feedly
  • Telegram
  • Youtube
  • Facebook
  • Instagram
  • LinkedIn
  • Tumblr
  • Pinterest
  • Twitter
  • mastodon

Tags

AWS Azure Bitlocker Microsoft Windows PowerShell WDS Windows 10 Windows 11 Windows Deployment Services Windows Server 2016

Copyright © 2025 TechDirectArchive


Loading Comments...
 

You must be logged in to post a comment.