Skip to content

TechDirectArchive

Hands-on IT, Cloud, Security, Veeam & DevOps

  • Home
  • About
  • Advertise With US
  • Reviews
  • Contact
  • Toggle search form

How to protect your Windows PC from potentially unwanted applications

Posted on 27/05/202331/05/2023 Matthew By Matthew No Comments on How to protect your Windows PC from potentially unwanted applications
  1. Home
  2. Security | Vulnerability Scans and Assessment
  3. How to protect your Windows PC from potentially unwanted applications
Featured Image_Windows Security
Windows Security

Protecting your Windows PC from potentially unwanted applications (PUA) is essential to ensure smooth and secure operation. These applications can disrupt your system, slow down performance, display intrusive ads, and even install harmful software. Fortunately, Windows 10 and Windows 11 provides built-in features that can help safeguard your PC from PUAs. In this comprehensive guide, we’ll walk you through the process of configuring and utilizing these protection settings to keep your system secure. By implementing these measures, you can ensure the security and smooth operation of your computer, giving you peace of mind while using it for both personal and professional purposes.

Learn more about Windows Security in these related posts: How to restore quarantined files in Microsoft Defender Antivirus, How to find and remove Malware with Microsoft Defender Offline, how to remove Microsoft Defender update on Windows 10 and Windows Server image, how to view Microsoft Defender Antivirus update details on Windows 10 image (install.wim), and new Windows 11 encryption features and security enhancements will help protect hybrid work.

Configuring Potentially Unwanted App Blocking in Windows Security

Access Windows Security Settings: To begin, press the Windows key + I key to open “Settings.” From there, navigate to “Privacy & Security” and then click on “Windows Security.”

Protect against potentially unwanted applications: 1_Privacy and Security Settings
Privacy and Security Settings

Open App & Browser Control: Within Windows Security, locate and click on the “App & browser control” option. This section contains various security settings that you can customize.

Protect against potentially unwanted applications: 2_App and Browser Control
App and Browser Control

Access Reputation-based Protection Settings: In the App & browser control section, you’ll find the “Reputation-based protection settings” option. Click on it to configure the potentially unwanted app blocking feature.

Protect against potentially unwanted applications: 3_Reputation Based Protection Settings
Reputation Based Protection Settings

Customize Blocking Options: Within the Reputation-based protection settings, you’ll see a control panel that allows you to enable or disable “Potentially unwanted app blocking“. We recommend keeping this feature turned on for maximum protection. You can also choose to block apps, downloads, or both, depending on your preferences.

Understanding the Blocking Options in Windows Security

Block Apps: This option detects and blocks PUAs that are already downloaded or installed on your system. Even if you use a different browser, Windows Security can still identify and block PUAs after they have been downloaded.

4_Potentially unwanted app blocking
Potentially unwanted app blocking

Block Downloads: This feature specifically targets PUAs during the downloading process. However, it only works with the Microsoft Edge browser.

Detecting and Taking Action against PUAs in Windows Security

When Windows Security detects a potentially unwanted app, it will notify you through a notification prompt. Click on the notification to access the Virus & threat protection area of Windows Security.

6_PUAs notifications
Potentially unwanted app notification

Access Virus & Threat Protection: After clicking on the notification, you’ll be redirected to the Virus & threat protection section of Windows Security. Here, you can take further action against the detected PUA.

5_Virus & Threat Protection
Virus and Threat Control

Select the Desired Action: In the Virus & threat protection area, you’ll see the name of the PUA that has been detected. Click on the PUA’s name to reveal a list of available actions. Depending on the severity of the PUA, you may have various options to choose from, such as Quarantine, Remove, or Allow.

Note: It’s crucial to take action against the PUA promptly. Until you select and execute an action, the PUA will remain blocked on your system but not removed. Subsequent scans may continue to detect the PUA until you take appropriate action.

7_Current Threat

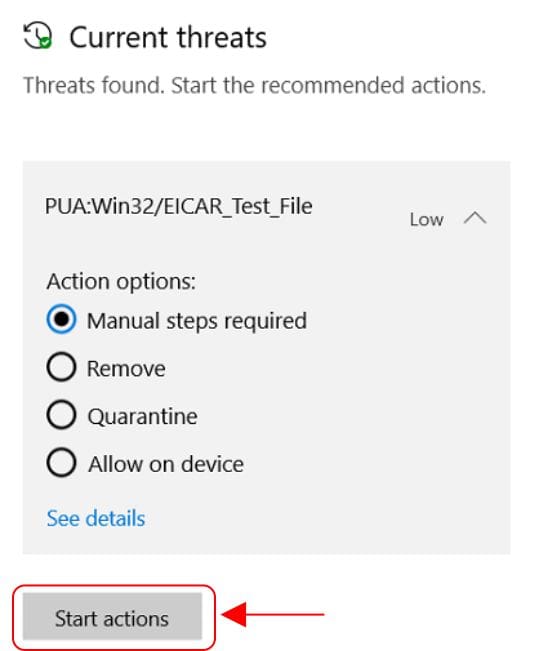
Initiate Actions: Once you’ve selected the desired action, click on “Start actions” to implement the chosen course of action against the PUA. Windows Security will execute the selected action, effectively blocking or removing the PUA from your system.

Conclusion

By following these steps and configuring the potentially unwanted app blocking feature, you can effectively protect your Windows PC from harmful and intrusive applications. Regularly review the notifications and take appropriate actions to ensure the ongoing security and stability of your system. With Windows 10 and 11 robust built-in security features, you can enjoy a safer computing experience free from potentially unwanted applications.

Rate this post

Thank you for reading this post. Kindly share it with others.

  • Share on X (Opens in new window) X
  • Share on Reddit (Opens in new window) Reddit
  • Share on LinkedIn (Opens in new window) LinkedIn
  • Share on Facebook (Opens in new window) Facebook
  • Share on Pinterest (Opens in new window) Pinterest
  • Share on Tumblr (Opens in new window) Tumblr
  • Share on Telegram (Opens in new window) Telegram
  • Share on WhatsApp (Opens in new window) WhatsApp
  • Share on Mastodon (Opens in new window) Mastodon
  • Share on Bluesky (Opens in new window) Bluesky
  • Share on Threads (Opens in new window) Threads
  • Share on Nextdoor (Opens in new window) Nextdoor
Security | Vulnerability Scans and Assessment, Windows Tags:Microsoft Windows, Windows 10, Windows 11, Windows Defender, Windows Defender Antivirus, Windows Security

Post navigation

Previous Post: How to Increase Disk Size in Hyper-V
Next Post: How to Enable Internet Explorer Mode in Edge in Windows 11

Related Posts

  • article 1280x720.13392821
    How to use command prompt to shutdown and restart your computer Windows
  • Featured image 4
    How to enable or fix the missing fast startup option on Windows 11 Windows
  • VMware workstation networking issues
    Network cable Unplugged: Fix VMware “Warning – Multiple default gateways are intended to provide redundancy to a single network Virtualization
  • diagnostic6
    How to enable and use Diagnostic Data Viewer on Windows Windows
  • Blog inside@2x
    How to block automatic delivery of Microsoft Edge Chromium-based Windows
  • BANNER
    How to Install and Set Lively Wallpaper on Windows 11 Windows

More Related Articles

article 1280x720.13392821 How to use command prompt to shutdown and restart your computer Windows
Featured image 4 How to enable or fix the missing fast startup option on Windows 11 Windows
VMware workstation networking issues Network cable Unplugged: Fix VMware “Warning – Multiple default gateways are intended to provide redundancy to a single network Virtualization
diagnostic6 How to enable and use Diagnostic Data Viewer on Windows Windows
Blog inside@2x How to block automatic delivery of Microsoft Edge Chromium-based Windows
BANNER How to Install and Set Lively Wallpaper on Windows 11 Windows

Leave a Reply Cancel reply

You must be logged in to post a comment.

Microsoft MVP

VEEAMLEGEND

vexpert-badge-stars-5

Virtual Background

GoogleNews

Categories

veeaam100

Veeam Vanguard

  • Azure Storage 1
    Azure CLI: How To Upload Batch Files to Azure Storage Account AWS/Azure/OpenShift
  • Zoom Blurred Background
    Why Zoom blurred background option is not available to you on Mac JIRA|Confluence|Apps
  • sshkey
    How to perform SSH key-based authentication in Linux Linux
  • intro to azure cloud shell
    The Overview of Azure Cloud Shell AWS/Azure/OpenShift
  • FTP
    How to install and configure an FTP Server on Windows Server Windows Server
  • updates
    How to stop Windows from applying updates Windows
  • PXE E18 Server response timeout
    Stuck at Start PXE over IPv4: PXE-E18 Server response timeout Windows
  • wsl5678uh
    Various methods to install Windows Subsystem for Linux Windows

Subscribe to Blog via Email

Enter your email address to subscribe to this blog and receive notifications of new posts by email.

Join 1,796 other subscribers
  • RSS - Posts
  • RSS - Comments
  • About
  • Authors
  • Write for us
  • Advertise with us
  • General Terms and Conditions
  • Privacy policy
  • Feedly
  • Telegram
  • Youtube
  • Facebook
  • Instagram
  • LinkedIn
  • Tumblr
  • Pinterest
  • Twitter
  • mastodon

Tags

Active Directory Azure Bitlocker Microsoft Windows PowerShell WDS Windows 10 Windows 11 Windows Deployment Services Windows Server 2016

Copyright © 2025 TechDirectArchive

Loading Comments...

You must be logged in to post a comment.