Configure Azure Container Registry for a secure connection with Azure Container Apps

Ensuring container app resource security is important, and creating a private endpoint for security ensures it. This guide prioritizes actively configuring Azure Container Registry for secure connections with Azure Container Apps. Microsoft Azure empowers users with Azure Container Registry, enabling secure storage and management of Docker container images via Docker Hub technology. Please see how to Join Bulk Devices using a Provisioning Package to Azure again Deploy a Static Website to Azure Storage from VSCode.
Azure Container Apps, a Microsoft Azure solution, actively simplifies deploying and managing containerized applications at scale, providing seamless scalability and management capabilities.
Leveraging Azure’s infrastructure streamlines deployment processes, offering features like automatic scaling, integrated monitoring, and seamless integration with Azure services.
Explore additional useful guides available here for further insights. How to Deploy Azure Resources Using Azure Bicep and How to Install Azure DevOps Server 2022 also Step-by-step guide on how to set up the Synology DS923+ NAS.
Configuring Azure Container Registry for secure connections
Create a user-managed identity.
Configure Container Registry with AcrPull permissions for the managed identity, and configure Container Registry with a private endpoint connection
Create a user-assigned managed identity for container app resource security
User-assigned managed identities provide a way to separate identity management from the lifecycle of the Azure resource itself.
Consequently, this can be particularly useful in scenarios where you have multiple resources that need to access other Azure services securely. By doing so, you can centralize the management of identities and their permissions. To achieve this using Azure CLI, you can use the following command:
az identity create --resource-group <resource-group-name> --name <managed-identity-name>
replace –resource-group-name with techd and managed identity with techdmi

Configure Container Registry with AcrPull permissions for the managed identity
Microsoft Azure provides Azure Container Registry (ACR), a managed Docker registry service. It enables storing and managing container images for Docker deployment. ACR offers features including image storage, management, security, and integration with other Azure services.
The “AcrPull” permission grants the ability to pull (download) container images from an Azure Container Registry. Granting this permission to a user, service principal, or managed identity allows them to retrieve Docker images from the registry.
It’s essential for any entity needing to deploy containers using images stored in the registry. In the end, all we just want to do is to ensure container app resource security.
Step1: create the container registry:
az acr create --resource-group techd --name techdacr --sku Basic

Step2: configure the ACR with the AcrPull permission
| In the Azure portal, open your Container Registry resource. | ||||||||
| On the left-side menu, select Access Control (IAM). | ||||||||
| On the Access Control (IAM) page, select Add role assignment. | ||||||||
| Search for the AcrPull role, and then select AcrPull. | ||||||||
| Select Next. | ||||||||
| On the Members tab, to the right of Assign access to, select Managed identity. | ||||||||
| Select + Select members. | ||||||||
| On the Select managed identities page, under Managed identity, select User-assigned managed identity, and then select the user-assigned managed identity created for this project. | ||||||||
| For example: techdmi | ||||||||
| On the Select Managed Identities page, under Managed identity, select User-assigned managed identity, and then select the user-assigned managed identity created for this project. | ||||||||
| On the Review + Assign tab, select Review + assign. Wait for the role assignment to be added. |


Configure Container Registry with a private endpoint
| Ensure that your Container Registry resource is open in the portal. | |
| Under Settings, select Networking. | |
| On the Private access tab, select + Create a private endpoint connection. | |
| Specify the following information under Project details on the Basics tab: Subscription: Specify the Azure subscription that you’re using for this guided project. Resource group: Use ‘techd‘. Name: Use ‘containerappendpoint’. Region: Select ‘eastus‘. | |
| Select Next: Resource. | |
| On the DNS tab, under Private DNS Integration, ensure that the following information is displayed: Ensure that “Yes” is selected for Integrate with private DNS zone. Notice that “(new) privatelink.azurecr.io” is specified for Private DNS Zone. | |
| Select Next: Virtual Network. | |
| On the Resource tab, make sure the following information is displayed: Ensure you’ve selected the Azure subscription you’re using for this guided project under Subscription. Make sure you’ve selected Microsoft.ContainerRegistry/registries for Resource Type. Ensure you’ve selected the name of your registry under Resource. Verify that the registry is selected under the Target sub-resource. | |
| Select Next: DNS. | |
| On the DNS tab, under Private DNS Integration, ensure that the following information is displayed: Make sure that “Yes” is selected for Integrate with private DNS zone. Notice that “(new) privatelink.azurecr.io” is specified for Private DNS Zone. | |
| Select Next: Tags. | |
| Select Next: Review + create. | |
| Upon seeing the “Validation passed” message on the Review + create tab, proceed by selecting “Create.” | |
| Please wait for the deployment to complete. |

Setting the registry tier to Basic may result in encountering issues when creating a private endpoint for the container registry.
The Basic tier does not support private endpoints. To resolve this problem, you’ll need to upgrade the tier to premium. Only the premium tier has the capability of creating a private endpoint, in addition to having firewalls.


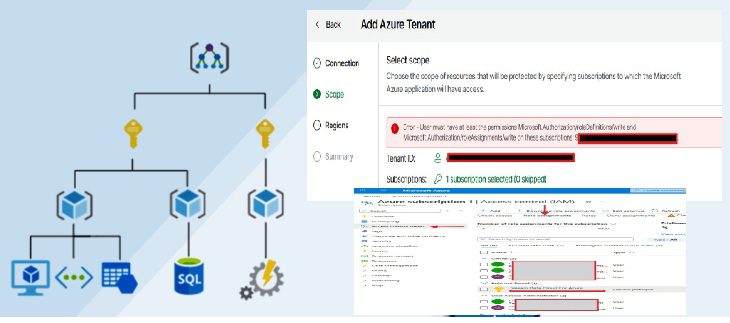
Create private endpoint
To ensure container app resource security, follow the directions in the table above, and subsequently, review all the input as shown below:


Configuring Azure Container Registry for secure connections with Azure
Configuring Azure Container Registry for secure connections with Azure Container Apps prioritizes workload security. Consequently, ensuring that the pricing tier of the container registry is premium is crucial.
In the event that it is, proceed to configure the workload to use a private endpoint. Subsequently, this article demonstrates how to configure a private endpoint for a secure connection with Azure Container Apps. In the end, all we just want to do is to ensure container app resource security.
I hope you found this article on how to Configure Azure Container Registry for a secure connection with Azure Container Apps useful. Please feel free to leave a comment below.