Skip to content

TechDirectArchive

Hands-on IT, Cloud, Security & DevOps Insights

  • Home
  • About
  • Advertise With US
  • Reviews
  • Contact
  • Toggle search form
Home » How to setup and configure Jitsi as SoftPhone

How to setup and configure Jitsi as SoftPhone

Posted on 09/03/201821/03/2024 Christian By Christian No Comments on How to setup and configure Jitsi as SoftPhone

Jitsi is a Secure and Simple Video Conferencing and Instant Messaging application that can be run on Windows, Linux, Mac etc. This is a standalone application that supports instant messaging and telephony protocols (OTR and SIP etc.). In this article, you will learn how to set up and configure Jitsi as SoftPhone. Here are some interesting guides: How to remove pre-provisioned apps from Windows Image and how to determine Apps UWP and remove pre-provisioned appx in Windows. In this guide, you will learn how to get the list of installed programs locally or remotely in Windows.

Scenario: If you ever wish to run your VoIP telephone system as software because you do not have enough corded or cordless phones, then you can turn to Jitsi for help.

Setup and configure Jitsi as SoftPhone

Here are the steps to Install Jitsi as a smartphone to enable you to use your existing phone system without a corded phone.

  • Download the installer.
  • Download the latest version of Jitsi-latest-x64.msi  (2017 installer) as at the time of writing
  • Double-click on the MSI file and follow the prompt as shown below

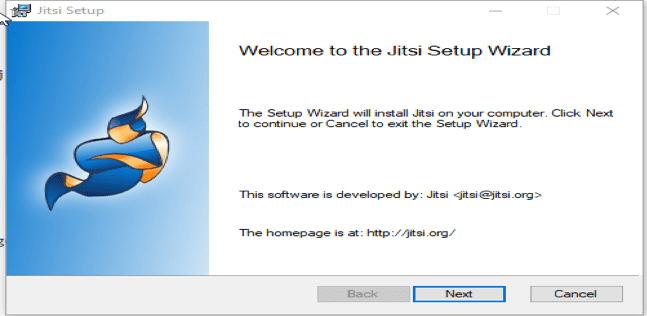
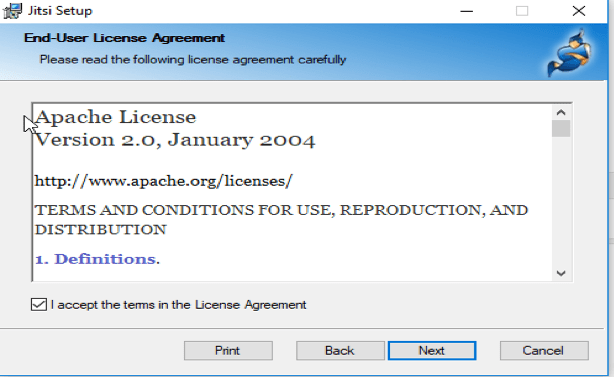
Click on next and accept the license

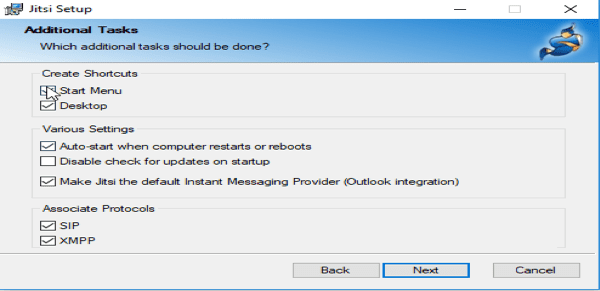
Click through the setup and additionally check “Auto start when the computer restarts or reboots and continue with the installation process by clicking on next

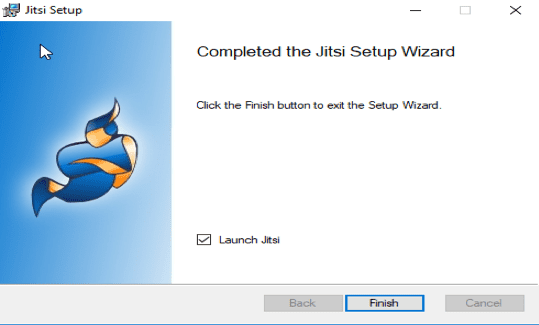
Finally, click on Install as shown below

Click on finish

This will prompt the windows security Alert window as shown below, (Simply allow the Firewall Access)

Step 2: Configuring Jitsi

Close every other Open Window except this below

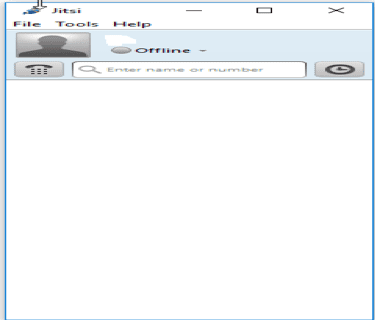
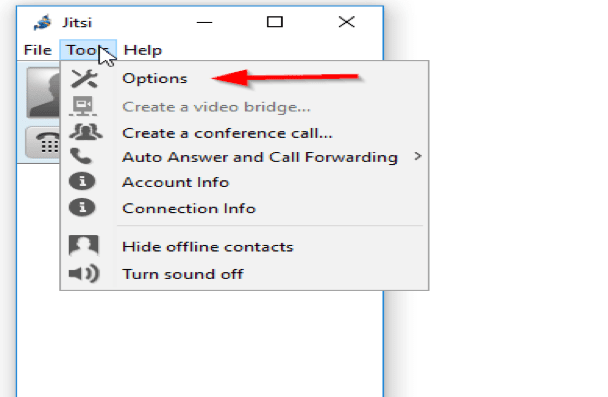
Click on Tools and Select Option. Now lets configure Jitsi to work with our telephone system
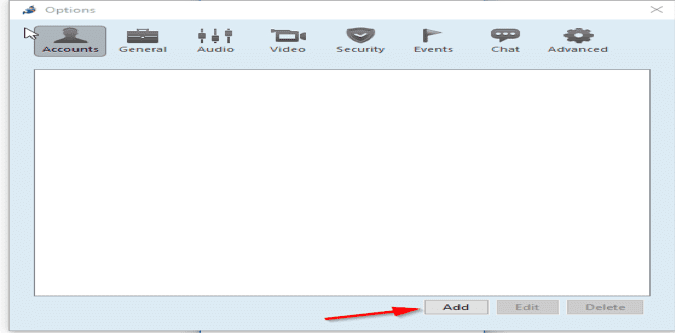
Click on Add

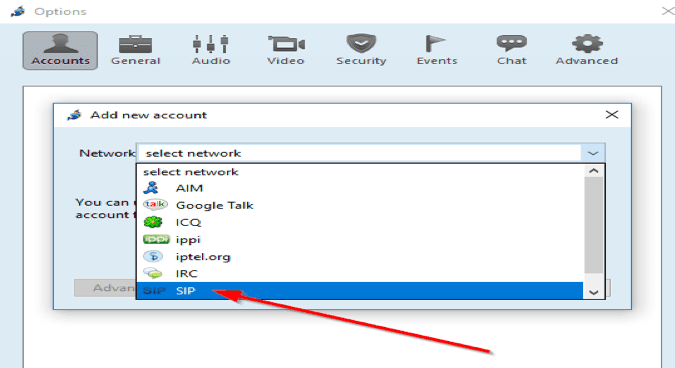
Select SIP under the network tab as shown below

And enter the relevant details. 

I hope you found this blog post on how to setup and configure Jitsi as SoftPhone helpful. If you have any questions, please let me know in the comment session.

Rate this post

Thank you for reading this post. Kindly share it with others.

  • Share on X (Opens in new window) X
  • Share on Reddit (Opens in new window) Reddit
  • Share on LinkedIn (Opens in new window) LinkedIn
  • Share on Facebook (Opens in new window) Facebook
  • Share on Pinterest (Opens in new window) Pinterest
  • Share on Tumblr (Opens in new window) Tumblr
  • Share on Telegram (Opens in new window) Telegram
  • Share on WhatsApp (Opens in new window) WhatsApp
  • Share on Mastodon (Opens in new window) Mastodon
  • Share on Bluesky (Opens in new window) Bluesky
  • Share on Threads (Opens in new window) Threads
  • Share on Nextdoor (Opens in new window) Nextdoor
Network | Monitoring Tags:Windows 10

Post navigation

Previous Post: Access EC2 Linux Instance via the Password
Next Post: Configure failover for ManageEngine Password Manager Pro

Related Posts

  • Emulate Cisco Router with GNS3
    How to make a router function as a switch in GNS3 Network | Monitoring
  • Featured image Microsoft Outlook
    How to Recall an Email in Microsoft Outlook Network | Monitoring
  • image 3
    How to Migrate Your WordPress Site with WordPress Duplicator Network | Monitoring
  • Watchguard Firewall 180504 100511
    WatchGuard Log and Report Server Installation in a VM Network | Monitoring
  • Hub Transport 1
    Hub Transport Server: Resolving ‘Failed to Reach Running Status’ Network | Monitoring
  • Azure backup for MSSQL
    Restore MSSQL Server on Azure VMs using Azure Backup Network | Monitoring

More Related Articles

Emulate Cisco Router with GNS3 How to make a router function as a switch in GNS3 Network | Monitoring
Featured image Microsoft Outlook How to Recall an Email in Microsoft Outlook Network | Monitoring
image 3 How to Migrate Your WordPress Site with WordPress Duplicator Network | Monitoring
Watchguard Firewall 180504 100511 WatchGuard Log and Report Server Installation in a VM Network | Monitoring
Hub Transport 1 Hub Transport Server: Resolving ‘Failed to Reach Running Status’ Network | Monitoring
Azure backup for MSSQL Restore MSSQL Server on Azure VMs using Azure Backup Network | Monitoring

Leave a Reply Cancel reply

You must be logged in to post a comment.

Microsoft MVP

VEEAMLEGEND

vexpert-badge-stars-5

Virtual Background

GoogleNews

Categories

veeaam100

Veeam Vanguard

  • CAL Removal
    How to Remove and Manage RDS Licenses Web Server
  • images 1
    WARNING: The provided hosts list is empty only the localhost is available and note that the implicit localhost does not match all Configuration Management Tool
  • Azure DevOps Server
    How to Install Azure DevOps Server 2022 Automation
  • sshfs
    Mounting remote directory using sshfs Linux
  • fix
    How to fix Windows cannot find the Microsoft software license terms Windows Server
  • DeleteAzureVM
    Remove Azure VM: How to delete a Virtual Machine via the Azure Portal AWS/Azure/OpenShift
  • removing containers and unused images from Docker synology
    Kill Containers and remove unused images from Docker Correctly Storage
  • Screenshot 2020 05 13 at 23.07.56
    ENA Driver on Amazon EC2: Easy Installation Guide AWS/Azure/OpenShift

Subscribe to Blog via Email

Enter your email address to subscribe to this blog and receive notifications of new posts by email.

Join 1,819 other subscribers
  • RSS - Posts
  • RSS - Comments
  • About
  • Authors
  • Write for us
  • Advertise with us
  • General Terms and Conditions
  • Privacy policy
  • Feedly
  • Telegram
  • Youtube
  • Facebook
  • Instagram
  • LinkedIn
  • Tumblr
  • Pinterest
  • Twitter
  • mastodon

Tags

Active Directory Azure Bitlocker Microsoft Windows PowerShell WDS Windows 10 Windows 11 Windows Deployment Services Windows Server 2016

Copyright © 2025 TechDirectArchive


Loading Comments...
 

You must be logged in to post a comment.