Skip to content

TechDirectArchive

Hands-on IT, Cloud, Security, Veeam & DevOps

  • Home
  • About
  • Advertise With US
  • Contact
  • Reviews
  • Toggle search form

URL Rewrite: How to redirect from HTTP to HTTPS

Posted on 13/08/201920/09/2023 IT Expert By IT Expert No Comments on URL Rewrite: How to redirect from HTTP to HTTPS
  1. Home
  2. Web Server
  3. URL Rewrite: How to redirect from HTTP to HTTPS
How to perform redirection from HTTP to HTTPS

IIS URL Rewrite enables Web administrators to create powerful rules to implement URLs that are easier for users to remember and easier for search engines to find. By using rule templates, rewrite maps, .NET providers, and other functionality integrated into IIS Manager, Web administrators can easily set up rules to define URL rewriting behavior based on HTTP headers, HTTP response or request headers, IIS server variables, and even complex programmatic rules. In addition, Web administrators can perform redirects, send custom responses, or stop HTTP requests based on the logic expressed in the rewrite rules.

Please see the following interesting articles on how to import a certificate into the Trusted Root and Personal file certificate store, how to request a certificate signing request in Windows using Microsoft Management Console, and how to export a certificate in PFX format in Windows. You may also be interested in this guide: How to install and configure Active Directory Certificate Services.

Without having a valid certificate from a trusted CA, when a user enters the servername (short name) such as "https://server1" instead of "https://server1.techdirectarch.com", the certificate will come as invalid. To resolve this issue, we will use the IIS URL Rewrite. URL Rewrite can also be used to direct users to the HTTPS site, instead of using HTTP.

Configure HTTP to HTTPS Redirection

Firstly,  I had to change the default port from 80 to 81. This is because HTTP listens on port 80 (You may ignore this step if you want). Also, I created a record in the host file to redirect traffic from the localhost/loopback address to 127.0.0.1 – You can do this in DNS too but I decided to use the host file. You can find it in the path as shown below

C:WindowsSystem32driversetc 

Upon entering the IP or hostname, you will be automatically redirected to the desired URL. Additionally, to ensure you can make changes effectively, it’s advisable to open the host file with elevated rights. You can achieve this by running Notepad as an Administrator and then opening the mentioned path. This approach simplifies the process of saving any changes.

127.0.0.1      mk.chris.com
1x.xx.xx.2     mk.chris.com

Note: To make this possible ensure you uncheck the SSL setting to not require certificate otherwise you will never be able to access it via HTTP.

  • Click on the website and
  • Navigate to the SSL Settings
  • Double click to open and set as shown below
SSL Settings

After that, create a binding to allow HTTP connection for the website as shown below.

Create a Binding

Also, to ensure the URL redirect works by redirecting to HTTPS, kindly follow these steps as shown below

  • Under sites, select the desired website
  • Click on URL rewrite (if you do not have this already installed, click on the web Platform Installer, run it and select URL rewrite to install).
  • Click on Add Rule (Under Action)
Clcik on Add Rules
  • The Add Rule URL Opens up
  • Enter any desired name to identify your rule
  • Under the Match URL, enter matches the pattern
  • Under “Using”, select Regular expression
  • Under Pattern, select (.*)
  • Select ignore cases, note: this is selected by default in most cases.
Match URL
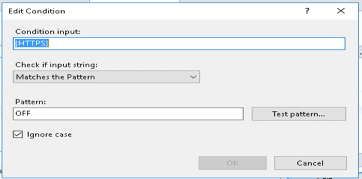
  • Navigate to condition and click on “Add” to create a rule
  • Set as shown below and click on Okay
Edit COndition
  • Under Actions “Action type”, select Redirect
    Enter the Redirect URL and the
  • Redirect type as “Found (302)”
Action type: Redirect

Finally, click on apply on the top right side of the screen.

I hope you found this blog post on How to perform redirection from HTTP to HTTPS helpful. If you have any questions, please let me know in the comment session.

Rate this post

Thank you for reading this post. Kindly share it with others.

  • Share on X (Opens in new window) X
  • Share on Reddit (Opens in new window) Reddit
  • Share on LinkedIn (Opens in new window) LinkedIn
  • Share on Facebook (Opens in new window) Facebook
  • Share on Pinterest (Opens in new window) Pinterest
  • Share on Tumblr (Opens in new window) Tumblr
  • Share on Telegram (Opens in new window) Telegram
  • Share on WhatsApp (Opens in new window) WhatsApp
  • Share on Mastodon (Opens in new window) Mastodon
  • Share on Bluesky (Opens in new window) Bluesky
  • Share on Threads (Opens in new window) Threads
  • Share on Nextdoor (Opens in new window) Nextdoor
Web Server Tags:IIS, Internet Information Services

Post navigation

Previous Post: Stop Apps from running automatically on MAC
Next Post: How to install Pleasant Password Server

Related Posts

  • kerberosdelegation
    Kerberos Delegation: A Comprehensive Guide Web Server
  • banner
    How to Edit Windows Hosts File via PowerToy Editor Utility Web Server
  • The Port used for the Virtualhost is not an Apache Listen Port
    Fix the Port used for the Virtualhost is not an Apache Listen Port Web Server
  • IIS
    How to Change the Log File Directory location in IIS Web Server
  • wordpresserrorsiteadmin
    There has been a critical error on this website please check your site admin email inbox for instructions Web Server
  • Azure VM Creation With CLI 1
    Deploy a Linux virtual machine (VM) on Azure using the Azure CLI AWS/Azure/OpenShift

More Related Articles

kerberosdelegation Kerberos Delegation: A Comprehensive Guide Web Server
banner How to Edit Windows Hosts File via PowerToy Editor Utility Web Server
The Port used for the Virtualhost is not an Apache Listen Port Fix the Port used for the Virtualhost is not an Apache Listen Port Web Server
IIS How to Change the Log File Directory location in IIS Web Server
wordpresserrorsiteadmin There has been a critical error on this website please check your site admin email inbox for instructions Web Server
Azure VM Creation With CLI 1 Deploy a Linux virtual machine (VM) on Azure using the Azure CLI AWS/Azure/OpenShift

Leave a Reply Cancel reply

You must be logged in to post a comment.

Microsoft MVP

VEEAMLEGEND

vexpert-badge-stars-5

Virtual Background

GoogleNews

Categories

veeaam100

Veeam Vanguard

  • Proxmox 9
    How to update Proxmox VE 9.0 now Supported by Veeam Virtualization
  • Screenshot 2020 06 15 at 21.08.38
    How to allow saved credentials for RDP connection Windows
  • Nakivo windows server backup
    How to perform Windows Server backup with Nakivo or Windows Server backup utility Windows Server
  • Remote Desktop 2 1
    How to install RDS via Quick Start Deployment: Install, Publish, Update, and Uninstall Remote Desktop Web Client Web Server
  • Create S3 Bucket with Terraform
    Create an S3 Bucket with Terraform AWS/Azure/OpenShift
  • Windows10
    Configure new GPO settings and Security baseline for Windows Windows
  • ACMP Defender Management
    How to Manage Microsoft Defender Antivirus with Argon ACMP Network | Monitoring
  • ansible logo600 591x296 1
    Ansible_user=UNREACHABLE {Failed to connect to the host via SSH: SSH: Could not resolve hostname (Name or service not known, unreachable true) Configuration Management Tool

Subscribe to Blog via Email

Enter your email address to subscribe to this blog and receive notifications of new posts by email.

Join 1,796 other subscribers
  • RSS - Posts
  • RSS - Comments
  • About
  • Authors
  • Write for us
  • Advertise with us
  • General Terms and Conditions
  • Privacy policy
  • Feedly
  • Telegram
  • Youtube
  • Facebook
  • Instagram
  • LinkedIn
  • Tumblr
  • Pinterest
  • Twitter
  • mastodon

Tags

Active Directory Azure Bitlocker Microsoft Windows PowerShell WDS Windows 10 Windows 11 Windows Deployment Services Windows Server 2016

Copyright © 2025 TechDirectArchive

Loading Comments...

You must be logged in to post a comment.