How to install and Configure Pleasant Reset Password

Pleasant Reset Password enables users to have their passwords reset by themselves without having to create tickets or call up service desk to have their passwords reset.
For related guides on Pleasant Password see: Errors associated with Pleasant Password, How to configure and use Pleasant Password RDP SSO, How To Use Pleasant Password Private Folder and How to use Pleasant Password Server tool
Simply put, Pleasant Reset Password is a fast and secure password resets over your Active Directory networks so users regain access to their accounts on forgotten password calls.
- Pleasant Reset Server is available as a stand-alone product or as an add-on to Pleasant Password Server Enterprise+ and Enterprise+SSO editions.
In our deployment, it is an add-on to the Pleasant Password Server as they were both integrated together. Lets install and Configure Pleasant Reset Password.
Steps in installing Pleasant Password Server
Download link here.
This will redirect you to the page below where the installer can be downloaded here.
Run the installer
Import Reset Users
After installation, Reset Users can be imported to the Reset Server by the administrator. Here are the steps for performing this operation.
- Click on Users and Roles
- Select Reset Users

3. Click on Manage Directories: This step is not necessary in our case as we have already setup directory connection. If this step has been implemented before, please proceed to the next step.
– Because we integrated this functionality on the same server as the Password Server, this is why this is omitted as we have already set it up.
Below is a screenshot of some reset users available in our Password Reset Server. Reset users can be viewed under Users and Roles and then Manage reset Users

Note: You do not necessarily have to import Reset Users as they will be automatically imported when they try to access the URL (i.e., logon to the Reset Server URL). This is because we have the auto import function selected. See the image below for the auto import settings configured.

Reset User Policy
User Policies allows administrators to manage the security configurations of User Accounts. This Policy administrative interface can be accessed via the User and Roles menu.
- Next click on Policies.

This will open up the Policies Administration page.
Note: You can create a new policy or use the default policy. The default policy has all the settings required for our deployment and to ease Policy management and assignment, we decided to work with the Default Policy.

In order to view the Default policy, instead of clicking on Edit above,
- Click on Details. This will display the default Policy properties page.
Password Policy Properties
- Password Policy: Here you can define the Minimum, maximum, required lower and upper case length, etc.
- Lock Out Policy: This is currently not applicable to reset users (Currently not enabled in our case).
- Timeout Policy: Here you can configure the Web Client, Elevation and Application Authentication TimeOut. It determines the amount of time needed before the user browser session expires (signed out).
- Two Factor Authentication: In order to ensure, reset users alone can reset their password or have tighter security control over the system, we enabled 2FA. This will require you to set up an Authentication App for every user in order to have them reset their password.
- IP Filter Policy: You can use this policy to enforce sign in. I.e., limit access to the Password Server based on a set of IPs defined. (Simply put, used in restricting network access to specific subnet/ranges).
- Managed Account Policy: Disabling this policy prevents users from changing their account name, email address and phone number in Active Directory.
Here are some screenshots of the configured Policies.
Password Policy and Lockout policy

Two factor Policy

IP Policy and Manage Account Policy

Challenge Configurations
The Challenge Functionality allows Administrators to setup Challenge-Response Configurations to determine security requirements of their users as well as to create Security Questionnaire that Reset Users will have to answer before they can have their password reset.
Kindly follow the steps below to access the Challenge Administrative Interface.
- Click on Users and Roles in the menu bar
- Click on Challenge
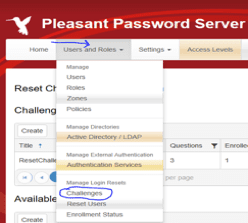
This opens the Reset Challenge Administration Page. In this UI you can create, modify and delete the Challenge Policies.
Create or Modify the Challenge Questionnaire
Note: We can modify or create new Challenge Questionnaires from scratch.
- To create a new Questionnaire, click on create as shown below

- Enter the Question Title, Type (can be text or Image) and the actual Question.

The image below shows a modified Challenge Questionnaire created.

- Select the desired Questionnaire,
- Click on Edit
This would display the Edit Question window as shown previously and below.

Challenge Configuration policy.
This policy is essentially the configured set rules and questions a Reset User must follow to have their password reset. I have created a Challenge Policy named: ResetChallengeQuestionnaire, which we can modify later.
Here are the steps needed to create a Challenge Policy.
- Click on create as shown below

- Since I already created a Challenge Policy named: ResetChallengeQuestionnaire, I will proceed to have this policy modified.
- Click on the Actions tab associated with the Challenge Policy and
- Click on Edit. This will open the Edit policy page where you can modify these parameters.

Under the Edit Challenge Authentication Window, We also have the Authentication Field and the User Policy field.

In this policy windows above, Reset Users are allowed to have their Passwords reset, a number of questions to be answered correctly was also defined and two-factor Authentication was also enabled (required) in order to have users able to reset their passwords.
Note: Users need to be enrolled in order to have their passwords reset successfully. Finally, the Questions option can be moved by simply dragging them from the Available options to the selected window and click on save when you are done. That’s it for installing and configuring pleasant reset password.
I hope this blog post on How to install and configure pleasant reset password was helpful. If you have any questions, please let me know in the comment session.