Skip to content

TechDirectArchive

Hands-on IT, Cloud, Security, Veeam & DevOps

  • Home
  • About
  • Advertise With US
  • Reviews
  • Contact
  • Toggle search form

Leave a Slack Workspace temporarily: How to deactivate a Slack workspace

Posted on 17/11/202130/09/2023 IT Expert By IT Expert No Comments on Leave a Slack Workspace temporarily: How to deactivate a Slack workspace
  1. Home
  2. JIRA|Confluence|Apps
  3. Leave a Slack Workspace temporarily: How to deactivate a Slack workspace
slack

Slack is a messaging app for businesses that connects people to the information they need. By bringing people together to work as one unified team, Slack transforms the way organizations communicate. At the time of writing this piece, Slack was developed by an American software company Slack Technologies, and is now owned by Salesforce. Slack offers many IRC-style features, including persistent chat rooms organized by topic, private groups, and direct messaging. Kindly refer to these similar guides: How to install and configure Jitsi video conferencing server on Ubuntu, how to set up and configure Jitsi as SoftPhone, how to update Zoom Desktop Client on macOS, and how to integrate WordPress site with WP Telegram. Also, read Top 10 Communication Software for Mac.

Please be aware that when you deativate the Slack workspace. To get in the workspace again, you will need to have the administrator of the workspace add you back. Here are some related yguides you may want to visit: How to install and configure BigBlueButton on Ubuntu Linux 16.04 LTS Xenial Xerus, and how to install Mattermost on Ubuntu and Debian.

How to temporarily leave a Slack Workspace

To temporarily leave a workspace, launch the Slack application over the browser. Select the workspace name at the top-left corner of the window. A menu will appear. Here, select “Profile“.

Note: You can also do this on your macOS or Windows device. Navigate to the workspace you would like to leave. 
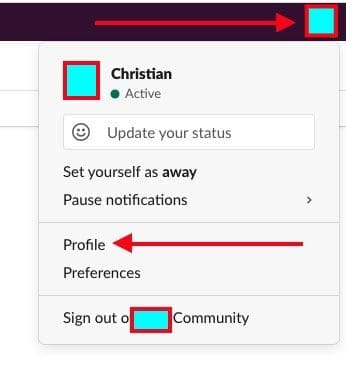
profile

Once selected, the Workspace Profile will be displayed. Click the icon with three vertical dots. This will prompt another drop-down menu. Please, select “Account Settings.”

Click on More and Account Settings

Afterward, the system will guide you to the “Account Settings” tab within the chosen Slack workspace.

Note: If you are doing this on your PC, the tab will open in your default browser and you will have to sign in to your Slack workspace to proceed.

In this window, please scroll down to the “Deactivate Account” option. Since we are interested in deactivating the workspace, click on the “Deactivate Your Account” button.

deactivate your account

Please enter your password in the text box and click “Confirm Password.”

confirm password

A warning message appears asking you to confirm before deactivating the account. Please, select “Yes, Deactivate My Account.”

Screenshot-2021-11-17-at-13.27.21

Another message appears asking if you’re really sure you want to deactivate your account. Click the box next to “Yes, I Want To Deactivate my account” and then select “Deactivate my account.”

Yes, deactivate my account

As you can see below, you have now deactivated the Slack workspace. To get in again as discussed above, you must contact the administrator of the Workspace.

Account deactivated

I hope you found this blog post on How to leave a slack workspace helpful. If you have any questions, please let me know in the comment session.

Rate this post

Thank you for reading this post. Kindly share it with others.

  • Share on X (Opens in new window) X
  • Share on Reddit (Opens in new window) Reddit
  • Share on LinkedIn (Opens in new window) LinkedIn
  • Share on Facebook (Opens in new window) Facebook
  • Share on Pinterest (Opens in new window) Pinterest
  • Share on Tumblr (Opens in new window) Tumblr
  • Share on Telegram (Opens in new window) Telegram
  • Share on WhatsApp (Opens in new window) WhatsApp
  • Share on Mastodon (Opens in new window) Mastodon
  • Share on Bluesky (Opens in new window) Bluesky
  • Share on Threads (Opens in new window) Threads
  • Share on Nextdoor (Opens in new window) Nextdoor
JIRA|Confluence|Apps Tags:Slack Workspace

Post navigation

Previous Post: Oracle VirtualBox: Installing Windows 11 without TPM Support
Next Post: How to delete your Slack account

Related Posts

  • Nextcloud installation on macOS
    How to install Nextcloud on Mac JIRA|Confluence|Apps
  • Schedule and join Teams Meeting
    How to schedule and join meetings with Microsoft Teams JIRA|Confluence|Apps
  • fixzoomaudioissue
    How to fix unable to access microphone on Zoom JIRA|Confluence|Apps
  • unabletouninstallonedriveonmac
    Cannot Uninstall the OneDrive App: The item “OneDrive” canot be moved to the Bin because it is open JIRA|Confluence|Apps
  • Telegram Bot for wordpress
    Configure Telegram to receive Blog Notifications JIRA|Confluence|Apps
  • Auto Update Upgrade issues
    Fix Microsoft Office Showing “Upgrade Required” in AutoUpdate JIRA|Confluence|Apps

More Related Articles

Nextcloud installation on macOS How to install Nextcloud on Mac JIRA|Confluence|Apps
Schedule and join Teams Meeting How to schedule and join meetings with Microsoft Teams JIRA|Confluence|Apps
fixzoomaudioissue How to fix unable to access microphone on Zoom JIRA|Confluence|Apps
unabletouninstallonedriveonmac Cannot Uninstall the OneDrive App: The item “OneDrive” canot be moved to the Bin because it is open JIRA|Confluence|Apps
Telegram Bot for wordpress Configure Telegram to receive Blog Notifications JIRA|Confluence|Apps
Auto Update Upgrade issues Fix Microsoft Office Showing “Upgrade Required” in AutoUpdate JIRA|Confluence|Apps

Leave a Reply Cancel reply

You must be logged in to post a comment.

Microsoft MVP

VEEAMLEGEND

vexpert-badge-stars-5

Virtual Background

GoogleNews

Categories

veeaam100

Veeam Vanguard

  • veeam and wasabi
    Modern Backup Strategy with Veeam and Wasabi: Truly Immutable Network | Monitoring
  • EFK Stack
    EFK Stack Installation on Docker Virtualization
  • Watchguard Firewall 180504 100511
    WatchGuard Log and Report Server Installation in a VM Network | Monitoring
  • Create your own Network on AWS from Scratch
    VPC, Subnet, NACL, Security Group: Create your own Network on AWS from Scratch [Part 2] AWS/Azure/OpenShift
  • SystemUtilization
    Delivering System Utilization Report on a Linux based OS Linux
  • media8
    How to create a Windows 11 Bootable USB drive Windows
  • Microsoft Enterprise Root Certification Authority and Forest Domain to Azure migration
    Migrate Microsoft Enterprise Root Certification Authority and Forest Domain to Azure AWS/Azure/OpenShift
  • GRADLE FEATURE
    How to install Gradle on Ubuntu Linux

Subscribe to Blog via Email

Enter your email address to subscribe to this blog and receive notifications of new posts by email.

Join 1,801 other subscribers
  • RSS - Posts
  • RSS - Comments
  • About
  • Authors
  • Write for us
  • Advertise with us
  • General Terms and Conditions
  • Privacy policy
  • Feedly
  • Telegram
  • Youtube
  • Facebook
  • Instagram
  • LinkedIn
  • Tumblr
  • Pinterest
  • Twitter
  • mastodon

Tags

AWS Azure Bitlocker Microsoft Windows PowerShell WDS Windows 10 Windows 11 Windows Deployment Services Windows Server 2016

Copyright © 2025 TechDirectArchive

Loading Comments...

You must be logged in to post a comment.