Skip to content

TechDirectArchive

Hands-on IT, Cloud, Security, Veeam & DevOps

  • Home
  • About
  • Advertise With US
  • Reviews
  • Contact
  • Toggle search form

How to delete obsolete drivers from the Driver Store in Windows

Posted on 04/12/202030/08/2026 Christian By Christian 3 Comments on How to delete obsolete drivers from the Driver Store in Windows
  1. Home
  2. Windows
  3. How to delete obsolete drivers from the Driver Store in Windows
Image illustrating device drivers, featuring a monitor displaying colorful gears on a blue background, alongside the Windows logo.

In this article, you will learn how to delete obsolete drivers from the Driver Store in Windows. The driver store is a trusted collection of inbox and third-party driver packages. See the following guide for “how to rename a Printer in Windows 10“.. Also, see reasons to deploy AAD, how to set up Azure AD Tenant, and how to add or delete users, and set permissions in Azure Active Directory. The operating system maintains this collection in a secure location on the local hard disk. Only the driver packages in the driver store can be installed for a device.

When a driver package is copied to the driver store, all of its files are copied. This includes the INF file and all files that are referenced by the INF file. All files that are in the driver package are considered critical to the device installation.

When you install or update device drivers in Windows, older driver versions are still stored in the system. Each time you install or update your device driver, Windows OS since the introduction of Windows Vista continues to store the old version of the driver in the system Driver Store. Thereby, if the system doesn’t work correctly with the new driver, the user can roll back to an older version of the driver.

Caution: Before deleting obsolete drivers

Before proceeding to clear unused drivers, please adhere to the following points discussed below

  • Do not delete any files from the DriverStore manually.
  • Prior to clearing the Driver Store, it is strongly recommended that you create a system restore point before deleting the Drivers or backup your system image.

Windows Driver Store is located in the folder C:\windows\system32\DriverStore\FileRepository. You may notice that over time, the folder begins to increase more and more and will fill the disk space.
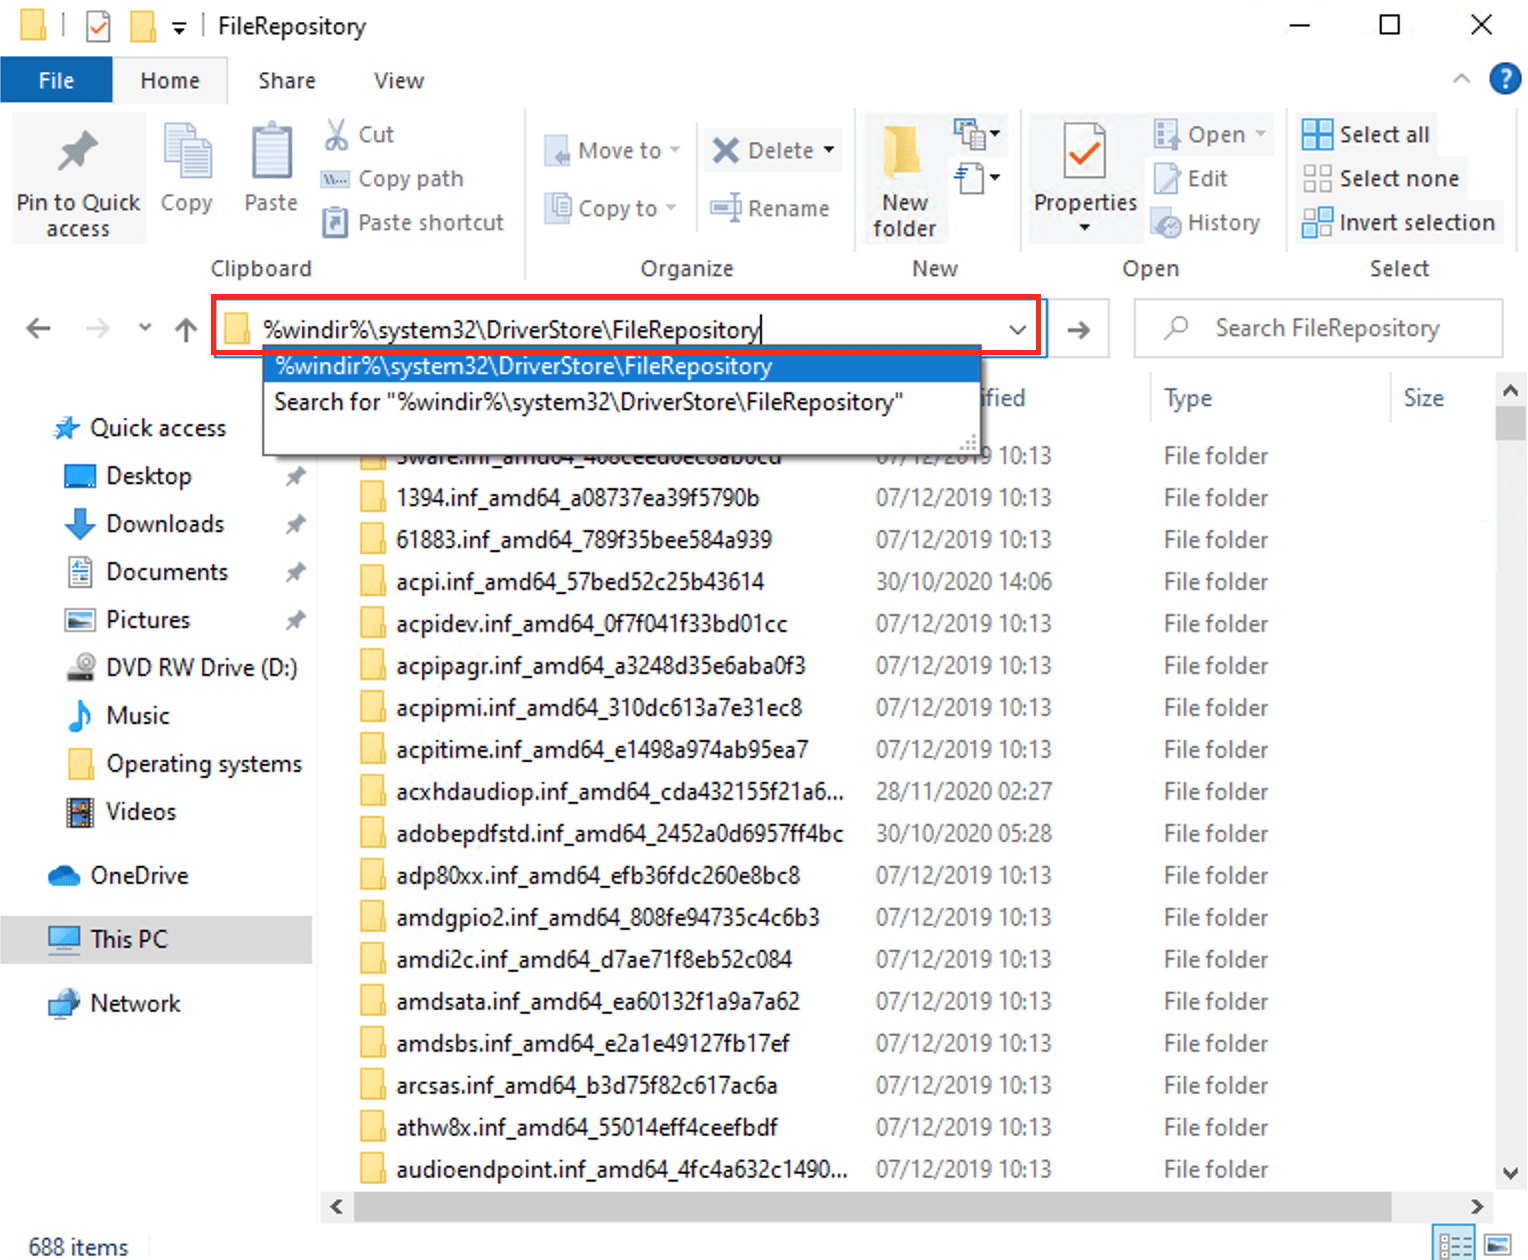
Screenshot of a Windows File Explorer window showing the DriverStore FileRepository directory with various driver files listed.

There are numerous ways to have this done, but I will be discussing the following handy steps

Method 1: Delete Obsolete Drivers from the Driver Store

Via Windows Settings (Remove Printer Driver From Print Server Properties): We can remove Drivers from the Driver Store by using the following methods below.

Launch the Windows Settings, click on Devices, and click on Printer and Scanners. Finally, On the right pane of the Windows, click on “Print Server Properties”
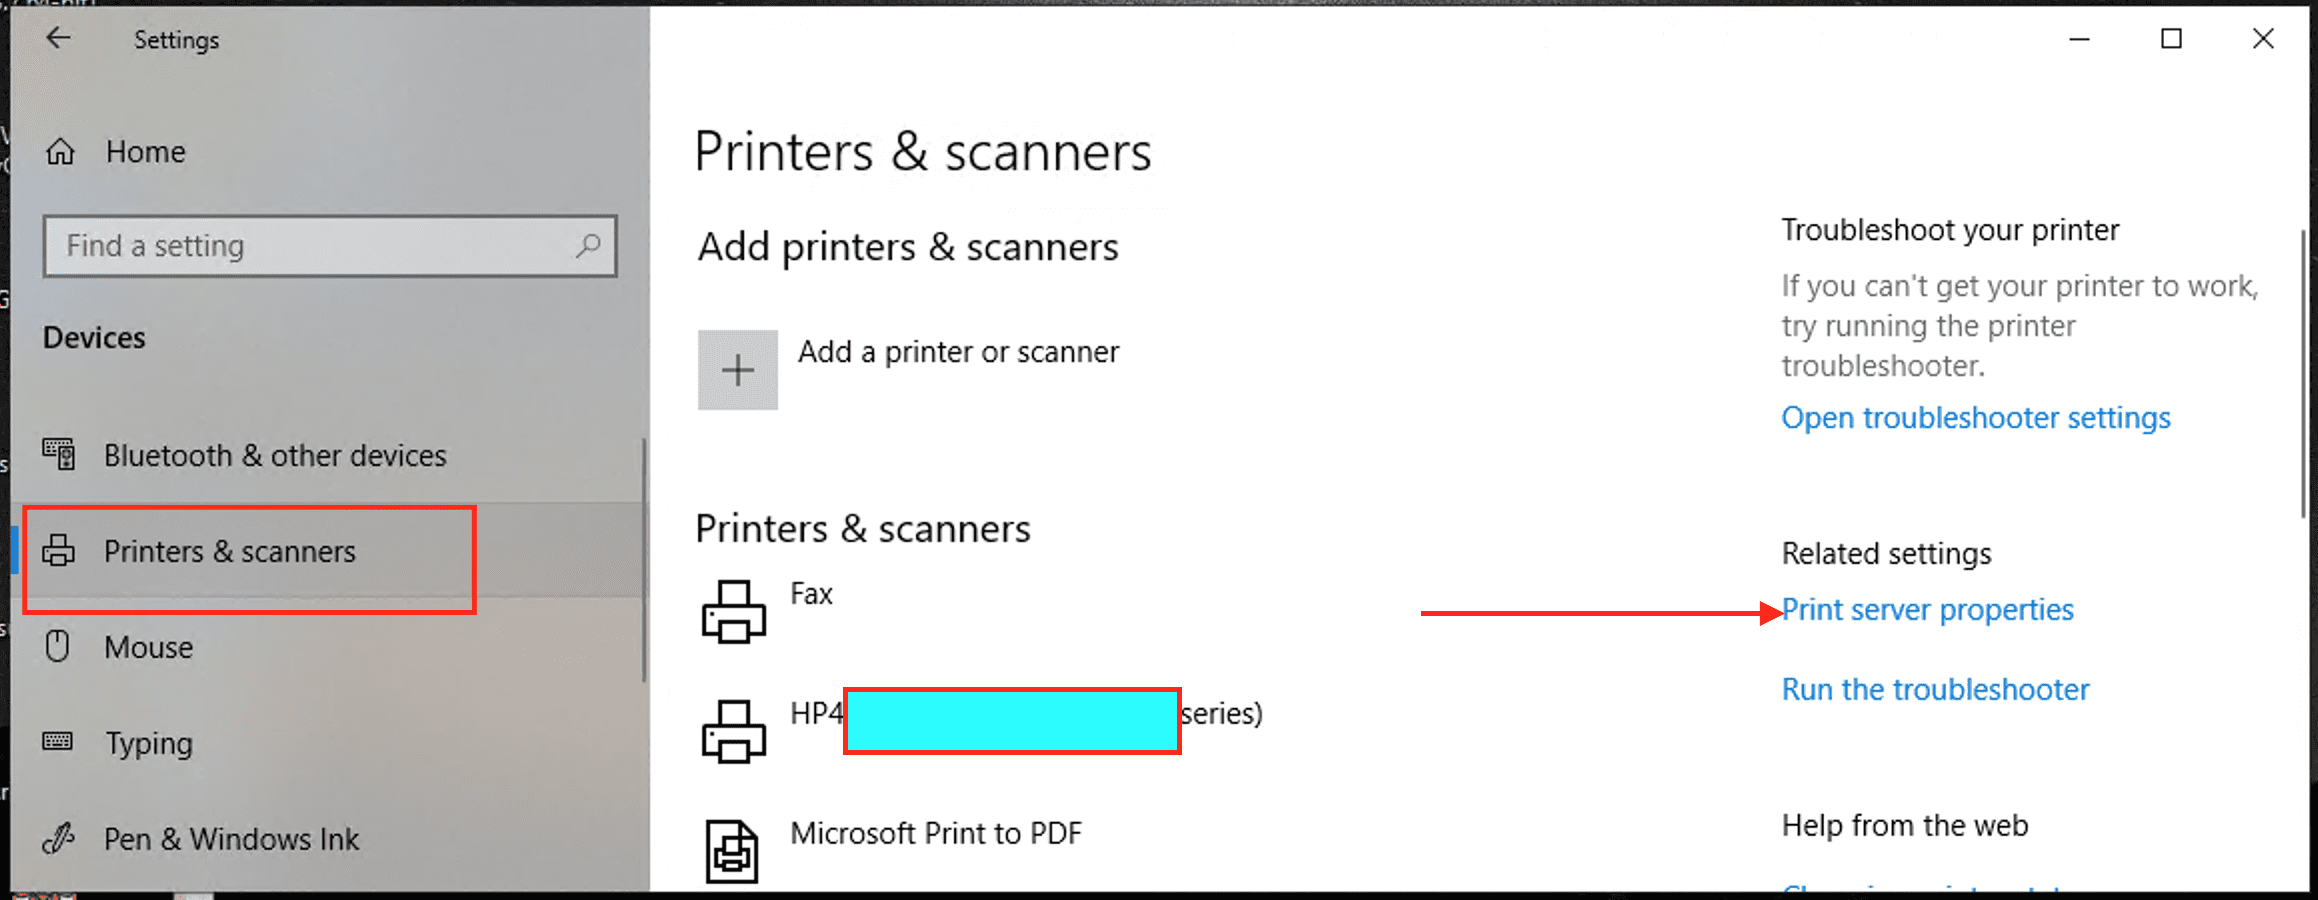
Screenshot of the 'Printers & Scanners' settings menu on a Windows device, displaying options to add printers or scanners and related settings like 'Print server properties'.

This will open up the Print Server Properties window as shown below. Click on the Driver you wish to uninstall.

Print Server Properties window showing installed printer drivers, including an HP series printer with options to remove or manage drivers.

Next, select Remove, and the following window will be prompted. Select remove driver and Driver packages and press ok.

Dialog box titled 'Remove Driver And Package' with options to remove driver only or both driver and driver package, featuring an 'OK' button highlighted in red.

Method 2: Delete Obsolete Print Drivers from the Driver Store

Delete printer driver using Print Management
– Launch the Control Panel and navigate to the following and click on Administrative Tool as shown below.

Control Panel\System and Security\Administrative Tools

Search through the Administrative Tools and select “Print Management” as shown below.

Screenshot of Windows Control Panel displaying the 'System and Security' section, highlighting 'Administrative Tools'. The lower part shows the 'Administrative Tools' folder with various management options like 'Performance Monitor' and 'Print Management'.

This will open up the Print Management window as shown below. Expand the Custom Filters branch, and click on All Drivers from the left navigation pane.

Right-click the printer driver on the right side, and then select the Delete option.

A screenshot of the Print Management window in Windows, displaying a list of printer drivers, with options to remove a driver package, set driver isolation, and view properties.
You will be prompted to click on the “Yes” button

Method 3: Using the PNPUtil

To delete a driver, you can use the PNPUtil command: Pnputil.exe is a command-line utility that you can use to manage the driver store. You can use this command to add driver packages and remove them as described here.

Note: The driver uninstall package will fail if this file is not an installed OEM INF.

pnputil.exe -d oemxxx.inf

Alternatively, you could use the command /delete-driver. This command deletes a driver package from the driver store. According to Microsoft, this command is available starting in Windows 10, version 1607.

PNPUTIL /delete-driver [/uninstall] [/force] [/reboot]

Flags:

  • /uninstall – uninstall driver package from any devices using it
  • /force – delete driver package even when it is in use by devices
  • /reboot – reboot system if needed to complete the operation

Method 3: Using Disk Cleanup to Delete Unused Drivers from the Driver Store

Disk Cleanup tool (cleanmgr.exe) that also allows for deleting deprecated updates. To have this done, follow the steps below.

Run Disk Cleanup utility as shown below:
Screenshot of the Windows search bar showing 'Disk Cleanup' as the best match, with options to open the app and manage disk settings.
You can use Win+R or “cleanmgr” to open this window up

This will open up the Disk Cleanup for the C: as shown below. Select “Clean up system files”

Disk Cleanup window displaying options for deleting temporary internet files, DirectX Shader Cache, Delivery Optimization Files, Recycle Bin, and temporary files on drive C. A button labeled 'Clean up system files' is highlighted.

This will expand the Disk Cleanup option. You will notice a new “More Option” as shown below. Check Device driver packages in the list

Screenshot of the Disk Cleanup utility for drive C: on Windows, showing options to delete files, including Device driver packages, with a highlighted 'OK' button.
As you can see the size is negligible and there is nothing to delete “= ´bytes”

Click on Okay. As you can see, I also selected another option to clear. This is absolutely up to you. Now, the Disk clean-up will delete all obsolete or unused driver versions.

Note 1: AFter performing this operation, be aware that the Rollback driver button in the Driver Properties tab of Device Manage will become inactive.

Note 2: You can also uninstall the printer driver via the Control Panel or Windows Settings through the uninstall program and features wizard.

I hope you found this blog post helpful on how to delete obsolete drivers from the Driver Store in Windows. If you have any questions, please let me know in the comment session.

Thank you for reading this post. Kindly share it with others.

  • Share on X (Opens in new window) X
  • Share on Reddit (Opens in new window) Reddit
  • Share on LinkedIn (Opens in new window) LinkedIn
  • Share on Facebook (Opens in new window) Facebook
  • Share on Pinterest (Opens in new window) Pinterest
  • Share on Tumblr (Opens in new window) Tumblr
  • Share on Telegram (Opens in new window) Telegram
  • Share on WhatsApp (Opens in new window) WhatsApp
  • Share on Mastodon (Opens in new window) Mastodon
  • Share on Bluesky (Opens in new window) Bluesky
Windows Tags:Microsoft Windows, Printer, Printer Management, Remove Printer, Windows 10, Windows Server 2016

Post navigation

Previous Post: How to setup PowerShell on a Linux server
Next Post: How to rename a Printer in Windows 10

Related Posts

  • VMware Error Fix
    How to fix “The process cannot access the file because another process has locked a portion of the file” Virtualization
  • RDP Certificate Issues
    Connecting to the RDP host: Fix the Certificate could not be verified back to the root certificate Mac
  • Uninstall MicrosoftDefenderUpdate
    Remove Microsoft Defender Update on Windows 10 & Server Windows
  • Stop automatic driver updates in windows e1779389546566
    Prevent Automatic Driver Updates in Windows and Xen-Orchestra Virtualization
  • xxxxxx 1
    Display Windows system information via the Windows registry Windows
  • Windows Image Converation from Evaluation to retail Edition
    Convert Windows Server Essentials or Evaluation to Retail Edition Windows

More Related Articles

VMware Error Fix How to fix “The process cannot access the file because another process has locked a portion of the file” Virtualization
RDP Certificate Issues Connecting to the RDP host: Fix the Certificate could not be verified back to the root certificate Mac
Uninstall MicrosoftDefenderUpdate Remove Microsoft Defender Update on Windows 10 & Server Windows
Stop automatic driver updates in windows e1779389546566 Prevent Automatic Driver Updates in Windows and Xen-Orchestra Virtualization
xxxxxx 1 Display Windows system information via the Windows registry Windows
Windows Image Converation from Evaluation to retail Edition Convert Windows Server Essentials or Evaluation to Retail Edition Windows

Comments (3) on “How to delete obsolete drivers from the Driver Store in Windows”

  1. Avatar photo Steve Sybesma says:
    27/03/2023 at 9:17 AM

    I installed an INF file manually but this doesn’t explain how to remove it properly from the Driver Store if CleanMgr.exe says 0 bytes and the file is not in the format you suggested. So I have no choice but to delete it directly from there even though you say not to do it that way. Have to look elsewhere. I think the driver was incompatible and I tried to force it to install by using the right-click Install method on the INF directly. The device itself never had the proper driver installed, so this is just an orphaned driver that was never attached to any device.

    Log in to Reply
    1. Avatar photo Steve Sybesma says:
      27/03/2023 at 3:34 PM

      I found out the answer and it would have been nice if this were explained. All or most INF files are re-named by Windows into an OEM###.INF formatted name.
      When you want to uninstall an INF file you manually installed, you do not know what name Windows assigned to it because that is not the filename you installed.
      To find out the OEM###.INF formatted name, look in the Registry for the INF file you manually installed. It will be accompanied by the OEM###.INF name. Once you’re sure you have the right file (on occasion there can be a file by the same name but there will be other info that you will see like the location of the file you installed), you can then run the command pnputil.exe /delete-driver OEM###.inf (replace the ### with the 3 digits of the file Windows named) and then it will properly uninstall the INF you manually installed.
      BTW, there is a typo in the instruction that gives the command incorrectly with two file extensions: pnputil.exe -d oemxxx.inf.inf
      Also, the syntax of the command does not mention -d but does specify /delete-driver

      Log in to Reply
      1. chris Christian says:
        27/03/2023 at 3:46 PM

        Dear Steve,

        Thanks a lot for sharing this valuable information with the community. This is very much appreciated.

Leave a Reply Cancel reply

You must be logged in to post a comment.

Microsoft MVP

vexpert-badge-stars-5

Virtual Background

VEEAMLEGEND

Categories

veeaam100

Veeam Vanguard

  • Screenshot 2020 09 19 at 02.22.42
    Remove Windows 10 Apps with DISM: How to remove pre-provisioned apps from Windows Image Windows Server
  • BitLocker beviour when MBAM Agent is removed No uninstall options in control panel to remove app
    BitLocker behavior when MBAM agent is removed: No Uninstall Option in Control Panel Windows
  • images
    AWS Network Adapter: Redhat to Citrix PV and AWS PV Driver AWS/Azure/OpenShift
  • Unveiling OOTBI Mini
    Unveiling OOTBI Mini and New Features for v1.7 from Object First Backup
  • How to create and delete MySQL database
    How to delete and create MySQL Databases Oracle/MSSQL/MySQL
  • Clone a Virtual Machine via Export and Import
    Clone a VM via Export and Import: Copy Virtual Hard Disk on Hyper-V Virtualization
  • Add Hyper V to VRO e1773748172543
    Integrate Hyper-V [SCVMM] with Veeam Recovery Orchestrator Virtualization
  • windows 10 spying 1200x687 1
    Error 183: Specified image is being serviced by another DISM operation Windows Server

Subscribe to Blog via Email

Enter your email address to subscribe to this blog and receive notifications of new posts by email.

Join 1,752 other subscribers
  • RSS - Posts
  • RSS - Comments
  • About
  • Authors
  • Write for us
  • Contact
  • Advertise with us
  • General Terms and Conditions
  • Privacy policy
  • Feedly
  • Telegram
  • Youtube
  • Facebook
  • Instagram
  • LinkedIn
  • Tumblr
  • Pinterest
  • Twitter
  • mastodon
  • Bsky

Tags

Active Directory Azure Bitlocker Microsoft Windows PowerShell WDS Windows 10 Windows 11 Windows Deployment Services Windows Server 2016

Copyright © 2026 TechDirectArchive

Loading Comments...

You must be logged in to post a comment.