Clear TPM via Management Console or Windows Defender Center App

In this article, we shall discuss “Clear TPM via Management Console or Windows Defender Center App”. Clearing or resetting the TPM resets it to an unowned state. After the TPM is cleared, the Windows 10 OS will automatically re-initialize it and take ownership again. In this way, the BitLocker encryptions work without any issues. Here is a guide on how to clear, enable or disable TPM in Windows via the BIOS or UEFI. The system uses TPM functions primarily to measure system integrity and create and manage keys.
During the boot process, the TPM measures and records the loaded boot code, including firmware and operating system components. The integrity measurements can be used as evidence for how a system started and to make sure that a TPM-based key was used only when the correct software was used to boot the system.
Kindly refer to some of these related guides: How to clear, enable or disable TPM in Windows via the BIOS or UEFI, BitLocker Back Door:TPM Only: From stolen laptop to inside the company network. Here is a guide on ‘SSD TRIM: Delete files permanently without using the Recycle Bin“.
Here are some reasons for resetting the TPM
- When preparing for a clean installation can help ensure that the new OS can fully deploy any TPM-based functionality that it includes, such as attestation. However, even if the TPM is not cleared before a new operating system is installed, most TPM functionality will probably work correctly.
- Since there are ways to extract BitLocker keys from a TPM, it’s better to be safe to clear TPM on a device before discarding them.
- Encrypt SSD with BitLocker and then clear the TPM module to destroy the keys. In this way, the keys cannot be recoverable.
Microsoft advises not to clear TPM directly from UEFI. This can lead to data loss etc. This is because you may not have access to the recovery key.
Note: It is recommended to use the functionality in the operating system (such as TPM.msc) to clear the TPM.
In this way, we will not experience data loss as we saw already from our test. Here is a guide on how to backup existing and new BitLocker recovery keys to Active Directory, and BitLocker recovery keys in Active Directory.
Clearing via the TPM.msc Snap-in (Management console)
From the run dialog windows, type TPM.msc. This will open the TPM snap-in window as shown below.

1: You need to be an administrator on the device to be able to clear the TPM. For more information, see the following link: There was an error opening the Trusted Platform Module snap-in: You do not have permission to open the Trusted Platform Module Console.
2: Also, you could also launch the TPM management console via the MMC and select TPM Management for the Local Computer. I will demonstrate the steps in the next guide.
3: You could search for TPM.msc from the search window as shown below and click on open.

From the run dialog windows, type TPM.msc. This will open the TPM snap-in window as shown below.
- You need to be an administrator on the device to be able to clear the TPM. for more information, see the following link: There was an error opening the Trusted Platform Module snap-in: You do not have permission to open the Trusted Platform Module Console.
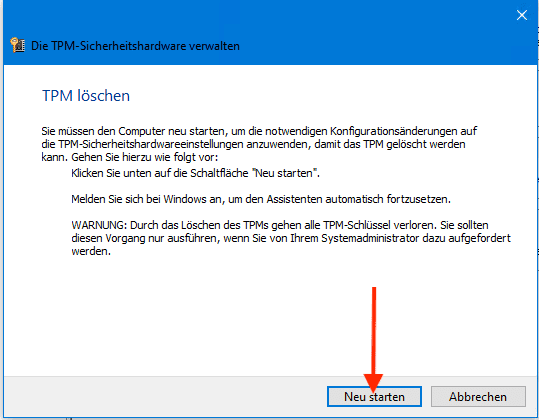
Also, you could also launch the TPM management console via the MMC and select TPM Management for the Local Computer. I will demonstrate the steps in the next guide. In the Action pane, click on Clear TPM (TPM Loschen) as shown below

You will be notificed as shown below that your device will be restated. Click on the close button.
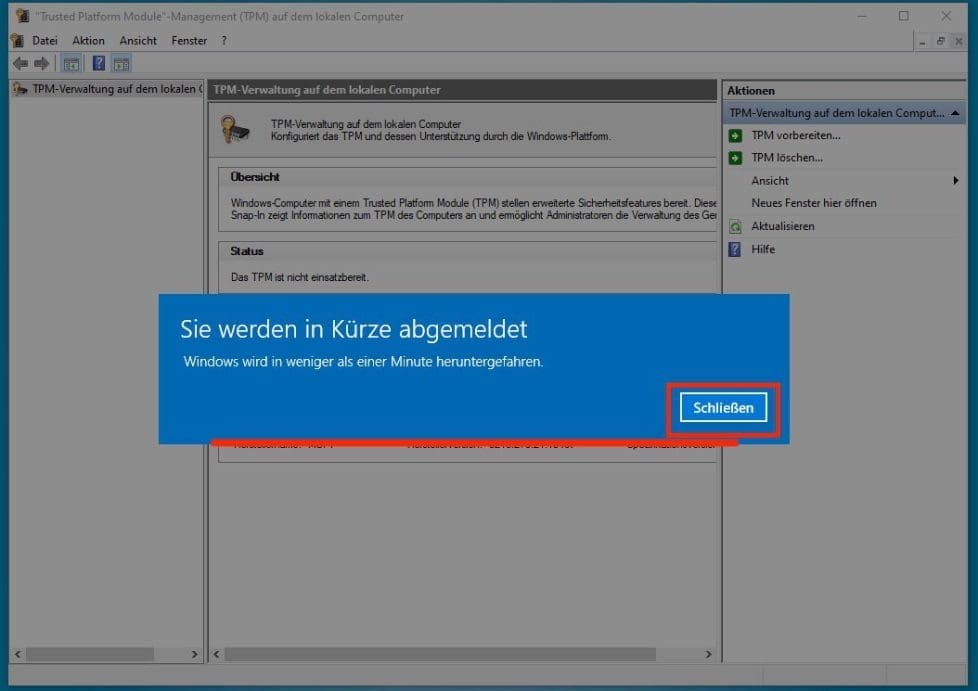
In the Window below, click on Restart as shown below.
As you can see below, the device is restarted. As discussed in the first paragraph, starting with Windows 10, the operating system automatically initializes and takes ownership of the TPM.
This is a change from previous operating systems, where you would initialize the TPM and create an owner password.

Nonetheless, Windows 10, the operating system automatically initializes and takes ownership of the TPM.
Also, see how to fix your device cannot use a Trusted Platform Module, allow BitLocker without a compatible TPM. Here is how to fix “this device cannot use a Trusted Platform Module, allow BitLocker without a compatible TPM when turning on Bitlocker” and how to enable Bitlocker Pre-Boot Authentication via the Group Policy.
Via the Windows Defender Security Center App
To do follow these steps, follow the steps below.
-> Click on the Start button
-> Settings
-> Update & Security
-> Windows Security and
-> Device security.
-> Under Security processor, select Security processor details.
-> Select Security processor troubleshooting, and then under Clear TPM, select Clear TPM.Alternatively, you could double-click the shield icon in the Windows Defender Security Center system tray to start.

– This will open the Windows Defender Security Center app.
– Click on Device Security.
– them, click Security processor details.
– Click Security Processor Troubleshooting and click on Clear TPM.

You will be prompted to restart the computer. During the restart.

Moreover, when the PC restarts, your TPM will be automatically prepared for use by Windows. In addition, This is because the operating system will automatically initialize and take ownership of the TPM again.
Why clear TPM
Preparing for a clean installation in this way helps ensure that the new operating system can fully deploy any TPM-based functionality that it includes, such as attestation.
However, even if the TPM is not cleared before a new operating system is installed, most TPM functionality will probably work correctly.
Note: Furthermore, Clearing the TPM resets it to an unowned state. After you clear the TPM, the Windows 10 operating system will automatically re-initialize it and take ownership again.
I hope you found this blog post on “Clear TPM via Management Console or Windows Defender Center App” helpful. However, Please let me know in the comment session if you have any questions.


